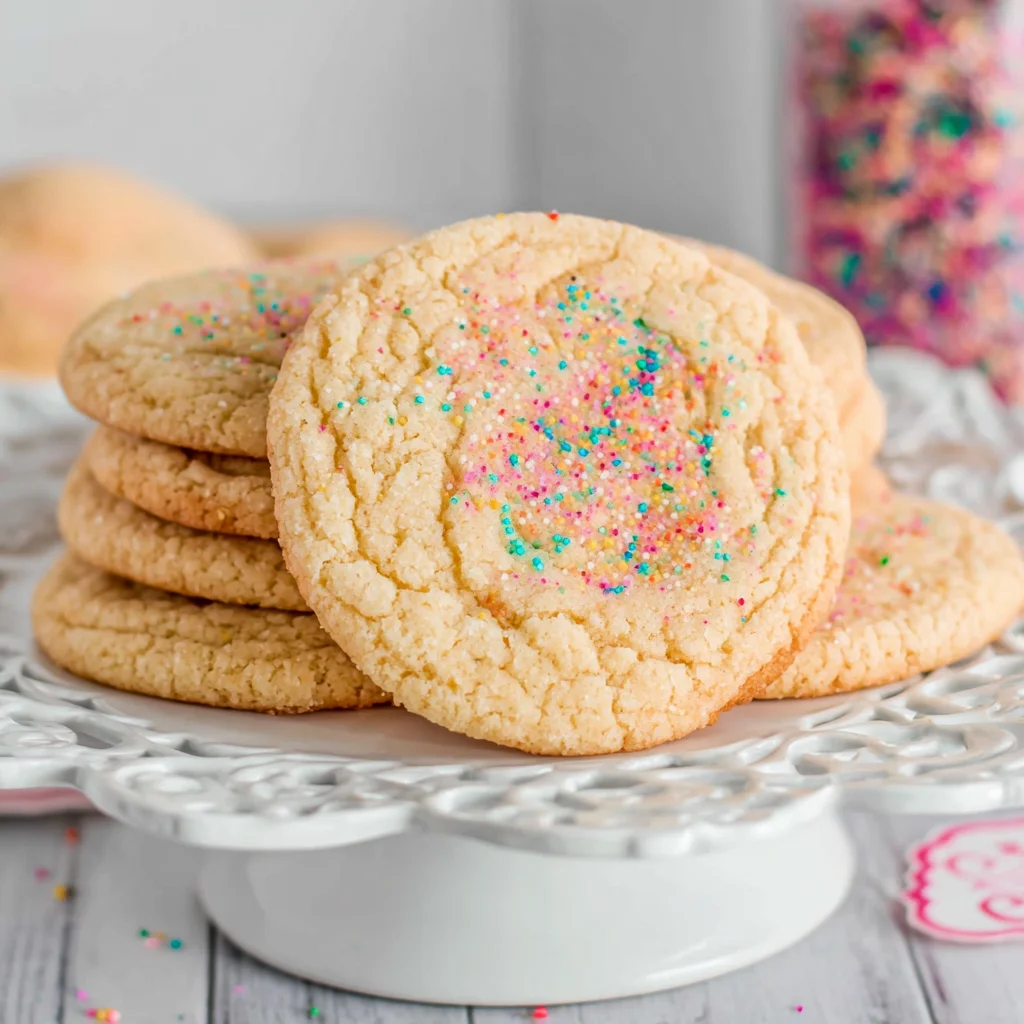
There is a fundamental debate in the world of baking: crisp vs. chewy. When it comes to the perfect sugar cookie, the answer, for most true dessert lovers, leans heavily toward the latter. Forget those thin, crunchy discs that shatter on the first bite. We are talking about cookies that boast a buttery, crinkled edge and a luxuriously soft, dense center the gold standard of homemade treats. If you have been searching for a sugar cookie recipe that delivers maximum chewiness and flavor depth, your quest ends here. These Chewy Sugar Cookies are easy to master, require minimal chilling, and consistently deliver that coveted soft texture every single time.
This recipe balances simple ingredients with specific techniques (hello, brown sugar!) to ensure your cookies stay moist and pliable long after they cool. Whether you’re making them for a holiday platter, a weeknight treat, or just because you need the comforting aroma of vanilla filling your kitchen, these soft sugar cookies will become your new go-to. Prepare to elevate your baking game and serve up the best, melt-in-your-mouth Chewy Sugar Cookies you have ever tasted.
Yield: Approximately 2 Dozen Cookies
Prep time: 15 minutes
Chill time (Optional): 30 minutes
Cook time: 8-10 minutes
Why You’ll Fall in Love with These Chewy Sugar Cookies
Baking is often about precision and technique, but it’s also about the emotional payoff that first perfect bite. These cookies aren’t just good; they are revolutionary in the sugar cookie category. They solve the common problem of dry, flat cookies by focusing on specific ingredient ratios that promote moisture retention and proper spread. If you crave that nostalgic, buttery flavor paired with an unbelievably satisfying texture, this recipe is tailored just for you.
One of the key features that sets this recipe apart is the inclusion of brown sugar alongside granulated sugar. While granulated sugar promotes spread and crispness, light brown sugar is hygroscopic meaning it retains moisture. It also adds a slight molasses note, providing a subtle depth of flavor that is often missing from traditional, one-dimensional sugar cookies. This combination ensures the exterior sets beautifully with a delightful crackle, while the interior remains wonderfully soft and pliable. The resulting texture is closer to a dense, bakery-style cookie rather than a thin, delicate treat.
Moreover, the simplicity of the preparation means anyone, from novice bakers to seasoned pros, can achieve flawless results. The instructions are straightforward, emphasizing the crucial step of proper creaming and minimal mixing once the flour is incorporated. Over-mixing is the death knell for soft cookies, developing too much gluten and leading to tough results. By carefully controlling this process, we guarantee a tender crumb.
Beyond the texture and taste, these cookies are incredibly versatile. They form a perfect canvas. You can roll them in colored sugar for holidays, add a simple vanilla glaze, or even sandwich two together with buttercream frosting. This adaptability makes them ideal for any occasion, proving that a basic sugar cookie recipe can be anything but boring. For those who enjoy rich, buttery desserts with complex textures, much like our popular Chewy Pecan Pie Cookies, these soft, thick sugar cookies offer a similar level of indulgence and satisfaction.
The final reason to adore this recipe is the incredibly short bake time. By baking them for just 8 to 10 minutes, we prevent them from drying out. The residual heat on the baking sheet finishes cooking the cookies after they leave the oven, leaving the centers perfectly underbaked and guaranteeing that sought-after chewiness. Never bake these until they are fully golden brown pale centers are your goal for perfection!
Why You Should Try This Recipe Now: The Science of Chew
Understanding why certain cookies turn out flat, tough, or crispy, while others achieve that magnificent, bakery-style chew, helps elevate your baking from following steps to truly mastering the craft. This recipe for Chewy Sugar Cookies is a masterclass in controlled baking science, designed to manipulate ingredients for maximum tenderness.
The Crucial Role of Fats and Sugars
The texture of these Chewy Sugar Cookies is largely determined by the interplay between the butter and the sugars. We use softened (room temperature) unsalted butter. When you cream this butter with sugar, you are not just mixing; you are incorporating air into the fat molecules. This aeration creates lift and structure, leading to thick, puffy cookies rather than flat pancakes. The goal is to reach a stage where the mixture is “light and fluffy” a process that takes a full 3 to 4 minutes and should not be rushed.
As mentioned, the ratio of brown sugar to granulated sugar is the secret weapon. Granulated sugar melts rapidly during baking, encouraging immediate spread. Brown sugar, with its higher moisture content (due to molasses), delays the spread slightly and keeps the dough from drying out. Using a ratio of 1 cup granulated sugar to 1/2 cup packed light brown sugar gives us the best of both worlds: enough granulated sugar for those delightful crinkled edges and enough brown sugar for a dense, soft, and satisfying chew.
Preventing Dryness and Toughness: The Flour Factor
Flour contains gluten, and gluten development is what gives bread structure and cookies toughness. To ensure tender Chewy Sugar Cookies, we must minimize gluten development. This means two things:
- Sifting/Whisking Dry Ingredients: While we don’t strictly require sifting in the instructions, whisking the flour, salt, and baking soda ensures they are evenly distributed, so you don’t have to overmix later.
- Mixing Technique: When adding the dry mixture, mix only until the flour streaks disappear. The dough will look shaggy and slightly sticky. As soon as it comes together, STOP the mixer. A few seconds too long, and you risk a tough cookie.
The Importance of Rest and Rolling
While chilling is optional, it is highly recommended for the best texture and shape control. The 30-minute chill period allows the flour to fully hydrate (absorbing the moisture from the butter and eggs) and solidifies the butter. Hydrated flour results in a softer final product, and solid butter melts slower, which reduces premature spreading in the oven, leading to thicker cookies. For more tips on achieving bakery-quality desserts, check out our collection of recipes here: Cocina Facilita Recipe Collection.
Finally, rolling the dough balls in extra granulated sugar is a step often overlooked in sugar cookie recipes, but it’s critical here. This external sugar coating creates a protective, caramelized layer during baking, enhancing the contrasting textures crisp exterior and soft interior that define true Chewy Sugar Cookies. It also gives them that classic sparkle and crinkle finish.
Ingredients and Necessary Utensils
Achieving bakery-quality Chewy Sugar Cookies starts with using the right ingredients at the right temperature and having the proper tools. Quality ingredients are non-negotiable for flavor, and the right equipment ensures technical success.
Detailed Ingredient List with Purpose
This recipe calls for two main groups of ingredients, plus an optional coating. Ensure all measurements are accurate.
For the Dry Ingredients:
- 3 cups All-Purpose Flour: The structure builder. Use standard AP flour; protein content is key here for tender cookies. Measure flour correctly by spooning it into the measuring cup and leveling it off, rather than scooping directly, which packs the flour and leads to dry cookies.
- 1 teaspoon Baking Soda: The primary leavening agent. Baking soda requires an acid (in this case, brown sugar/molasses) to activate, promoting spread and providing the necessary rise.
- 1/2 teaspoon Salt: Essential for balancing the sweetness and enhancing the deep, buttery flavor. Do not skip the salt!
For the Wet Ingredients:
- 1 cup (2 sticks) Unsalted Butter, softened to room temperature: Room temperature is crucial. If the butter is too cold, it won’t cream properly; if it’s melted or greasy, the cookies will spread too much. The ideal temperature is around 67°F (19°C) it should yield slightly when pressed but still hold its shape.
- 1 cup Granulated Sugar: Provides sweetness, aids in creaming, and contributes to the crisp exterior edges.
- 1/2 cup Light Brown Sugar, packed: The star ingredient for chewiness. The molasses content adds moisture and a subtle caramel depth. Make sure to pack this firmly into your measuring cup.
- 2 large Eggs: Provide structure, richness, and moisture. Ensure these are also close to room temperature, which helps them emulsify fully with the creamed butter mixture, resulting in a smoother batter.
- 2 teaspoons Pure Vanilla Extract: Use pure extract, not imitation, for the best aroma and flavor. Vanilla is the primary flavor profile of a classic sugar cookie.
For Rolling (Optional but Highly Recommended):
- 1/4 cup Granulated Sugar: Creates that desirable sparkly, crisp coating and ensures controlled spreading.
Essential Kitchen Tools for Success
While this recipe is simple, certain tools make the process significantly easier and guarantee consistent results, especially when aiming for perfect texture:
- Stand Mixer or High-Powered Hand Mixer: The creaming step (beating butter and sugar) is non-negotiable for volume and texture. A stand mixer with a paddle attachment performs this task most effectively over the required 3–4 minutes.
- Rubber Spatula: Necessary for scraping down the sides of the bowl during mixing. This ensures all ingredients are uniformly incorporated, preventing pockets of unmixed butter or sugar.
- Medium Cookie Scoop (1.5 Tablespoons/3-4 cm diameter): A scoop is vital for uniformity. Uniform cookies bake evenly, ensuring none are underdone or burnt. This measurement size creates the ideal thickness for a chewy center.
- Parchment Paper or Silicone Baking Mats: Highly recommended. These prevent sticking and promote even heat distribution across the bottom of the cookies, preventing overly crisp bottoms and aiding in the development of that soft center.
- Large Baking Sheets: Using standard, light-colored aluminum baking sheets is preferred over dark sheets, which absorb too much heat and can scorch the bottoms of the cookies.
- Wire Cooling Rack: Essential for proper cooling. Transferring the cookies to a rack allows air to circulate, preventing steam buildup that can make the bottoms soggy.
- Measuring Cups and Spoons: Accuracy in baking hinges on precise measurements. Use dry measuring cups for flour and wet measuring cups for liquids like vanilla (though measuring spoons are fine for small amounts).
Taking the time to ensure your ingredients are correctly measured (especially the flour and the softened butter) and having your equipment ready will significantly boost your confidence and the final result of your Chewy Sugar Cookies.
Detailed Recipe Steps: Achieving the Perfect Chew
Follow these steps precisely, focusing on the timing of the creaming stage and the minimal mixing once the dry ingredients are added. This guarantees thick, soft, and delicious Chewy Sugar Cookies every time.
Part 1: Preparation
- Preheat and Prepare (The Oven Setup): Preheat your oven to 350°F (175°C). This temperature is ideal for allowing the cookies to spread slightly before setting, aiding the chewy texture. Line two large baking sheets with parchment paper or silicone baking mats. This step ensures easy removal and prevents scorching.
- Combine Dry Ingredients (Preventing Gluten Overdevelopment): In a medium bowl, whisk together the 3 cups of all-purpose flour, 1 teaspoon of baking soda, and 1/2 teaspoon of salt. Whisking incorporates air and ensures the leavening agent is distributed evenly, which is crucial for uniform rise. Set this mixture aside.
Part 2: Mixing the Dough (The Key to Texture)
- Cream Butter and Sugars (Aeration is Everything): In the bowl of a stand mixer fitted with the paddle attachment (or using a large bowl and a hand mixer), combine the softened butter, granulated sugar, and brown sugar. Beat this mixture on medium speed until it is noticeably light, fluffy, and pale yellow. This step is the most critical for texture and must take a full 3 to 4 minutes. Proper creaming incorporates air, which helps the cookies stay thick and puffy. Scrape down the bowl periodically.
- Add Eggs and Vanilla (Emulsification): Reduce the speed to low. Beat in the eggs one at a time, ensuring each egg is fully incorporated into the mixture before adding the next. This allows for better emulsification. Scrape down the sides of the bowl again. Add the 2 teaspoons of pure vanilla extract and mix until just combined.
- Incorporate Dry Ingredients (The Mixing Limit): Gradually add the reserved dry ingredient mixture to the wet mixture, mixing on the absolute lowest speed. Mix only until the dough just comes together and no flour streaks remain. Stop immediately when the dough forms. Overmixing at this stage will develop gluten, resulting in tough, cakey cookies. The dough should be soft and slightly sticky.
- Chill (Recommended for Thickness): If your kitchen is warm or the dough seems excessively sticky, cover the bowl with plastic wrap and chill it in the refrigerator for 30 minutes. This rest time allows the flour to hydrate fully, resulting in a softer crumb, and helps solidify the butter, preventing excessive spreading. If you are pressed for time or the dough feels firm enough, you can proceed directly to shaping.
Part 3: Shaping and Baking (The Short & Sweet Method)
- Shape the Cookies (Uniformity is Key): Place the extra 1/4 cup of granulated sugar (if using) into a small, shallow bowl. Use a medium cookie scoop (about 1.5 tablespoons) to scoop the dough. Roll the dough firmly into smooth, uniform balls.
- Roll in Sugar (The Sparkling Finish): Roll each dough ball completely in the extra granulated sugar to coat the exterior thoroughly. This sugar coating caramelizes beautifully, enhancing the texture contrast and creating that signature sparkle of a perfect Chewy Sugar Cookie.
- Arrange and Bake (Spacing): Place the coated dough balls onto the prepared baking sheets, ensuring they are spaced about 2 inches apart. They will spread slightly but should remain thick.
- Bake (The Chew Secret): Bake the cookies for 8 to 10 minutes. Timing is critical here. The edges should look set and lightly golden, but the centers should still look slightly pale, puffy, and perhaps even a touch underbaked. This underbaked center is the absolute key to maintaining a moist, chewy texture after cooling.
- Cool (The Finishing Touch): Remove the baking sheets from the oven. Do not move the cookies yet. Let the cookies cool on the hot baking sheet for 5 minutes. The residual heat from the pan continues the baking process gently without drying out the centers. After 5 minutes, carefully transfer the warm Chewy Sugar Cookies to a wire rack to cool completely. Enjoy the perfect results! You can pin this recipe for later or explore other favorites on our Pinterest profile.
Tips, Variations, and Troubleshooting for Chewy Sugar Cookies
Baking is flexible, and while the core recipe for these Chewy Sugar Cookies is foolproof, you can adapt it to dietary needs or flavor preferences. Understanding common pitfalls ensures you achieve success every time.
Flavor and Ingredient Variations
- Vegan Chewy Sugar Cookies: Substitute the butter with high-quality vegan butter sticks (not margarine tubs, which have too much water). Replace the two large eggs with flax eggs (2 tablespoons flaxseed meal mixed with 6 tablespoons water, allowed to sit for 5 minutes) or a commercial egg replacer like Bob’s Red Mill. Note that the texture may be slightly denser.
- Gluten-Free Option: Use a reputable 1:1 gluten-free baking blend that contains xanthan gum (like Bob’s Red Mill or King Arthur). Follow the recipe exactly, but note that the gluten-free dough benefits significantly from the 30-minute chill time to prevent spreading.
- Adding Zest: For a bright flavor, add 1 tablespoon of lemon, orange, or lime zest to the wet ingredients during the creaming stage. The oils in the zest will infuse the butter beautifully.
- Almond Extract: Replace 1 teaspoon of vanilla extract with 1/2 teaspoon of pure almond extract for a marzipan-like flavor depth. Almond extract is strong, so use it sparingly.
- Cinnamon Sugar: Instead of rolling the balls in plain granulated sugar, mix 1/4 cup granulated sugar with 1 teaspoon of ground cinnamon for a snickerdoodle-inspired sugar coating. This adds a warm, spicy note to the classic Chewy Sugar Cookies.
Troubleshooting Common Mistakes
If your cookies aren’t turning out chewy, or if they spread too much, one of these factors is usually the culprit:
- My Cookies Spread Too Thinly:
- Fix: Your butter was too soft or slightly melted. Ensure the butter is at true room temperature (cool to the touch, not greasy). Also, ensure you are measuring the flour correctly (spoon and level, don’t scoop).
- Prevention: Always use the 30-minute chill time if the dough feels warm or sticky.
- My Cookies Are Tough/Cakey:
- Fix: You overmixed the flour. Gluten develops quickly. The moment you see no dry streaks of flour, stop the mixer.
- Prevention: Ensure your baking soda is fresh, as old leaveners can contribute to poor texture.
- My Cookies Are Crispy, Not Chewy:
- Fix: You baked them too long. Remember the secret: bake until the edges are golden, but the center is still pale and slightly underdone. Check them at the 8-minute mark. Also, ensure you used brown sugar (the moisture retainer) as specified.
- Uneven Baking:
- Fix: Make sure your oven temperature is accurate (consider using an oven thermometer). Also, avoid placing too many cookies on a single sheet, which reduces air circulation.
Nutritional Values and Ingredient Benefits
While Chewy Sugar Cookies are undeniably a treat and should be enjoyed as part of a balanced diet, understanding the macronutrient breakdown and the function of the core ingredients is helpful.
Disclaimer: Nutritional information is an estimate based on standard ingredients and yield (approximately 24 cookies). Exact values may vary based on specific brands and exact portion sizes.
Estimated Nutritional Information (Per Cookie)
| Nutrient | Approximate Value |
|---|---|
| Calories | 150 – 170 kcal |
| Total Fat | 8g – 10g |
| Saturated Fat | 5g – 6g |
| Carbohydrates | 18g – 22g |
| Sugars | 12g – 15g |
| Protein | 2g – 3g |
Benefits of Key Ingredients
While we consume these Chewy Sugar Cookies primarily for pleasure, the core ingredients contribute essential nutrients:
- Butter (Dairy Fat): Butter is a source of fat-soluble vitamins, including Vitamin A, D, E, and K. Using high-quality unsalted butter improves both the flavor and richness of the cookie.
- Eggs: Eggs are an excellent source of high-quality protein, essential vitamins (like B12 and D), and minerals. They also contain choline, important for brain health. In baking, they are essential binders and contribute significant moisture.
- Flour (Carbohydrates): All-purpose flour provides the necessary structure and energy. While refined, it is the fundamental building block of the cookie dough.
- Salt: While used in small amounts, salt is an essential electrolyte. In baking, it’s necessary for flavor development, preventing the end product from tasting flat or overly sweet.
For those mindful of sugar intake, using the optional sugar coating can be omitted entirely, resulting in a slightly less crispy exterior but still maintaining the signature chewiness derived from the brown sugar ratio. Alternatively, cutting the sugar measurements slightly (e.g., reducing granulated sugar by 1/4 cup) can reduce the overall sugar content without drastically compromising the texture of the Chewy Sugar Cookies.
FAQs About Chewy Sugar Cookies
How do you keep sugar cookies soft and chewy?
To keep sugar cookies soft and chewy, the key is using a mixture of granulated sugar and brown sugar, which retains moisture due to its molasses content. Additionally, slightly underbaking the cookies (removing them when the centers are still pale) and storing them in an airtight container with a slice of bread will help maintain moisture and tenderness for days.
What is the difference between a chewy sugar cookie and a regular sugar cookie?
Regular sugar cookies often use only granulated sugar and are typically rolled thin and baked until crispy or firm, designed for cut-out shapes. Chewy Sugar Cookies, conversely, are thicker, relying on brown sugar and slightly lower oven temperatures to keep the centers soft. They are usually scooped and rolled rather than cut, emphasizing density and moisture over crispness.
Can I freeze this Chewy Sugar Cookie dough?
Yes, this dough freezes beautifully. Scoop the dough into balls and coat them in sugar as directed, then arrange them on a baking sheet and flash freeze until solid. Once frozen, transfer the dough balls to a zip-top freezer bag or airtight container. They can be stored for up to 3 months and baked directly from frozen; just add 2-4 minutes to the total bake time.
Why did my Chewy Sugar Cookies come out flat instead of thick?
Cookies usually spread too much (come out flat) if the butter was too warm or melted, or if the dough was not chilled. Ensure your butter is only softened, not greasy. If you skipped the chill step, try chilling the dough for 30 minutes next time. Also, verify that your baking soda is fresh and active, as improper leavening contributes to a lack of lift.
How long should I cream the butter and sugar for maximum chewiness?
You should cream the butter and sugar for a full 3 to 4 minutes on medium speed until the mixture is light, fluffy, and pale yellow. This process incorporates air into the fat (a step known as aeration), which is necessary to create tiny air pockets that expand during baking, ensuring the cookies rise vertically and remain thick and chewy.
Conclusion: The Perfect Chewy Sugar Cookies Are Yours
This recipe transforms the humble sugar cookie into a rich, buttery, and utterly irresistible dessert experience. By understanding the critical role of the brown sugar, the importance of proper creaming, and the necessity of pulling the cookies from the oven when they still look just slightly underdone, you have mastered the secret to guaranteed chewiness. No more dry, disappointing results only soft centers and perfectly crinkled, buttery edges await.
We covered every essential technique: from the crucial 3-4 minutes spent creaming the butter and sugar, which builds the necessary structure for thick cookies, to the light touch required when incorporating the dry ingredients to prevent toughness. Whether you opt for the classic granulated sugar coating or decide to experiment with lemon zest or almond extract, these soft sugar cookies provide the ideal foundation.
Baking these Chewy Sugar Cookies is not just about following steps; it’s about experiencing comfort and nostalgia in every bite. They are the perfect addition to any dessert table, a welcome treat for school lunches, or the ultimate comfort food paired with a glass of milk. We encourage you to try this recipe tonight. If you love baking and experimenting, feel free to share your success and any variations you create in the comments below! Happy baking, and enjoy the taste of true chewiness.

CHEWY SUGAR COOKIES: The Ultimate Classic Recipe
Ingredients
Equipment
Method
- Preheat your oven to 350°F (175°C). Line two large baking sheets with parchment paper or silicone baking mats.
- In a medium bowl, whisk together the flour, baking soda, and salt. Set this mixture aside.
- Cream Butter and Sugars: In the bowl of a stand mixer fitted with the paddle attachment, beat the softened butter, granulated sugar (1 cup), and brown sugar together on medium speed until the mixture is light, fluffy, and pale yellow. This usually takes 3 to 4 minutes.
- Add Eggs and Vanilla: Beat in the eggs one at a time, ensuring each egg is fully incorporated before adding the next. Scrape down the sides of the bowl as needed. Add the vanilla extract and mix until just combined.
- Incorporate Dry Ingredients: Gradually add the reserved dry ingredient mixture to the wet mixture, mixing on low speed until the dough just comes together. Be careful not to overmix the dough once the flour has been added, as this can lead to tough cookies.
- Chill (Recommended): If the dough seems too sticky to handle, cover the bowl with plastic wrap and chill in the refrigerator for 30 minutes. This helps prevent excessive spreading.
- Shape the Cookies: Place the extra 1/4 cup of granulated sugar (if using) into a small, shallow bowl. Scoop the dough using a medium cookie scoop (about 1.5 tablespoons) and roll the dough into smooth, uniform balls.
- Roll in Sugar (Optional): Roll each dough ball completely in the extra granulated sugar to coat the exterior for a crispier edge and sparkling finish.
- Arrange and Bake: Place the dough balls onto the prepared baking sheets, ensuring they are spaced about 2 inches apart.
- Bake the cookies for 8 to 10 minutes. The edges should look set and lightly golden, but the centers should still look slightly pale and puffy (this is key to maintaining a chewy texture).
- Cool: Remove the sheets from the oven. Let the cookies cool on the baking sheet for 5 minutes before carefully transferring them to a wire rack to cool completely.