There are peanut butter cookies, and then there are truly exceptional, melt-in-your-mouth, Chewy Peanut Butter Cookies. If your previous attempts at this classic treat have resulted in dry, crumbly hockey pucks, prepare yourself for a transformation. This definitive guide focuses entirely on creating that perfect, soft center and slightly crisp edge the hallmark of an outstanding homemade cookie.
We’ve cracked the code on achieving maximum chewiness and robust flavor, utilizing the magical combination of brown sugar, creamy stabilized peanut butter, and precise mixing techniques. Forget those recipes that rely on three ingredients and result in a one-note texture. We are aiming for cookie perfection, the kind of nostalgic bake sale favorite that disappears immediately from the cooling rack. Whether you are baking for a school lunch, a holiday platter, or simply craving the ultimate comfort dessert, this recipe for the best Chewy Peanut Butter Cookies is guaranteed to become your permanent go-to.
The secret lies in the balance of fats and sugars, ensuring that moisture is retained during the short, hot bake time. Stick with us through the detailed steps, pay close attention to the ingredient notes (especially regarding the type of peanut butter!), and you will be rewarded with a batch of cookies that are delightfully soft, intensely peanut-buttery, and wonderfully chewy. Let’s get baking!
Why You’ll Fall Head Over Heels for These Chewy Peanut Butter Cookies
In the vast world of dessert recipes, few evoke the comforting nostalgia quite like a peanut butter cookie. However, the standard recipe often disappoints, producing a sandy texture that crumbles instantly. This recipe changes everything. You will absolutely love these cookies because they deliver everything the classic version promises, but with a luxurious upgrade in texture and depth of flavor.
The Perfect Texture: Chewy Centers and Crisp Edges
The number one reason this recipe stands above the rest is the texture. We prioritize chewiness above all else. This characteristic is achieved primarily through a higher ratio of brown sugar to granulated sugar. Brown sugar contains molasses, which is naturally acidic and hydrophilic (it loves water). This combination not only adds a deeper, caramelized flavor but, crucially, retains moisture during baking, preventing the cookie from drying out. When you take a bite, you experience a delightful resistance, followed by a soft, almost gooey center. The edges, thanks to the butter content, crisp up just enough to provide a satisfying counterpoint to the interior chewiness.
Intense Peanut Butter Flavor
While some recipes treat peanut butter as an afterthought, here it is the star. We use a full cup of creamy, stabilized peanut butter, ensuring the flavor punches through. The decision to use commercial, non-natural peanut butter (like Jif or Skippy) is deliberate. Natural peanut butter, where the oil separates, introduces inconsistent moisture and fat levels, which can make predicting spread and chewiness nearly impossible. The stabilizers in creamy brands ensure a predictable, high-fat, high-sugar base that contributes directly to the soft, rich texture we crave in a high-quality Chewy Peanut Butter Cookie.
A Timeless Classic with a Modern Upgrade
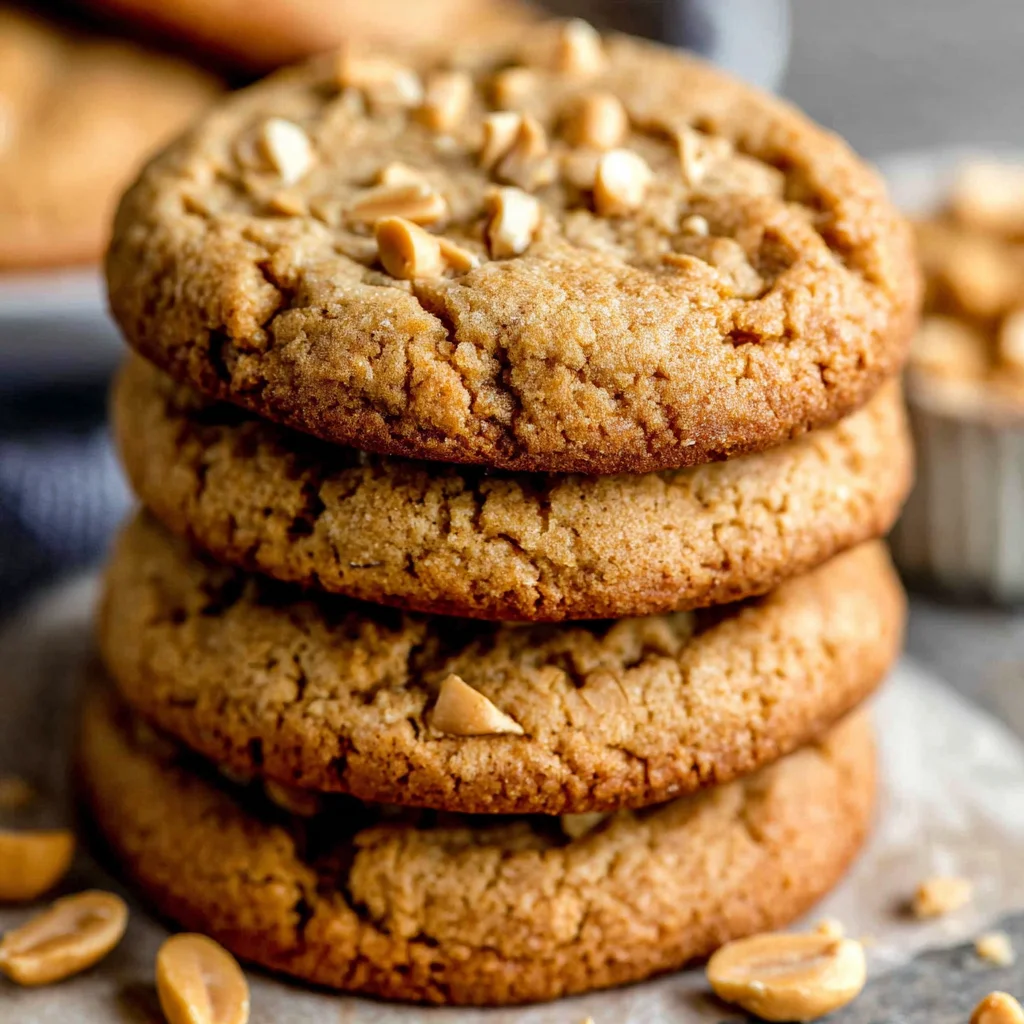
These cookies are familiar yet superior. They have that iconic criss-cross pattern that signals “peanut butter cookie,” making them instantly recognizable and universally loved. They are incredibly easy to scale up for parties, bake sales, or holiday platters. Plus, the dough freezes beautifully, allowing you to have freshly baked Chewy Peanut Butter Cookies ready in minutes, anytime the craving strikes. They pair perfectly with a glass of cold milk, a scoop of vanilla ice cream, or even crumbled over yogurt. For more classic comfort food ideas, check out this recipe for Classic Peanut Butter Cookies, which provides a great counterpoint to this chewier version.
Why You Should Try This Chewy Peanut Butter Cookies Recipe Today
If you have been searching for a peanut butter cookie recipe that consistently delivers on the promise of texture and flavor, your search ends here. This recipe isn’t just about making a snack; it’s about mastering a baking staple that will earn you rave reviews from family and friends.
Mastering Moisture and Spread: The Science of Chew
Baking is chemistry, and this recipe leverages specific techniques to control the dough’s behavior. The meticulous creaming of the butter, peanut butter, and sugars (Step 3) incorporates air, creating tiny pockets that help the cookie lift slightly during baking. The significant amount of brown sugar, as discussed, provides moisture, while the specific instruction to stop mixing the flour immediately upon combining (Step 5) is crucial. Overmixing flour develops gluten strands, which make the cookie tough and dry, counteracting the desired soft, chewy texture. By following these precise steps, you guarantee a perfect, consistent spread and chew every time.
The Critical Role of Chilling
We include an optional but highly recommended chilling step (Step 6). Chilling the dough does two fantastic things: it solidifies the fat (butter), which slows the spread during baking, resulting in thicker, richer cookies; and it allows the dry ingredients (especially the flour) to fully hydrate. Proper hydration leads to a more tender crumb and prevents that grainy, dusty taste sometimes found in quickly baked cookies. If you want maximum chewiness and thickness in your Chewy Peanut Butter Cookies, do not skip that 15 to 30 minutes in the fridge!
Simple Ingredients, Extraordinary Results
You likely have all the ingredients for these cookies in your pantry right now. There are no fancy, hard-to-find components just basic staples elevated by proper technique. This accessibility means you can decide to bake these on a whim, satisfying that sudden peanut butter craving without a trip to the store. The simple composition allows the deep, nutty flavor of the peanut butter to truly shine, complemented only by the rich sweetness of brown sugar and a hint of vanilla.
Furthermore, this recipe is incredibly forgiving once the dry ingredients are just incorporated. It’s a fantastic starter recipe for new bakers looking to perfect their cookie technique, but it offers enough nuance through temperature control and timing to satisfy seasoned experts. Give these Chewy Peanut Butter Cookies a try today, and discover how truly incredible this classic treat can be when made correctly.
Ingredients and Tools for Perfect Chewy Peanut Butter Cookies
Achieving the perfect texture requires specific ingredients and, just as importantly, the right tools to handle the dense dough. Pay close attention to the notes on sugar and peanut butter selection to ensure maximum chewiness.
Essential Ingredients List: Achieving Maximum Chew
- 2 ¼ cups All-Purpose Flour: The structure builder. Measured correctly (spooned into the cup and leveled off, not scooped directly from the bag) to prevent tough cookies.
- 1 teaspoon Baking Soda: The leavening agent. Works with the acidity of the brown sugar to help the cookies rise slightly and spread just the right amount.
- ½ teaspoon Salt: Essential for balancing the intense sweetness and enhancing the deep, nutty flavor of the peanut butter.
- ½ cup (1 stick) Unsalted Butter: Must be softened precisely to room temperature. Butter that is too cold won’t cream properly, leading to a denser cookie. Butter that is too melted won’t incorporate air, resulting in flat, greasy cookies.
- 1 cup Creamy Peanut Butter: Crucial Selection Note: Use a shelf-stable, commercial brand (such as Jif or Skippy). The fats and sugars in these brands are stabilized and emulsified, which is necessary for consistent spread and chewiness. Do NOT use natural-style peanut butter where the oil separates; the excess, inconsistent oil will cause the cookies to spread too much and become greasy.
- 1 cup Light Brown Sugar, firmly packed: The primary source of chewiness and moisture. Make sure it is firmly packed into the measuring cup to ensure you get the full amount of moisture-retaining molasses.
- ½ cup Granulated Sugar: Provides structure, aids in spreading, and contributes to the slight crispness around the edges.
- 1 large Egg: The binder. Works with the fat to hold the cookie structure together while adding richness and moisture.
- 1 tablespoon Vanilla Extract: A surprisingly large amount, but essential for rounding out the flavors and adding aromatic depth to the Chewy Peanut Butter Cookies.
The Science Behind the Sugar Ratio
The 2:1 ratio of brown sugar to white sugar (1 cup brown, ½ cup white) is the secret weapon for these truly Chewy Peanut Butter Cookies. Brown sugar’s moisture content resists crystalizing during baking, keeping the internal structure soft. Granulated sugar, conversely, melts and spreads, creating the delicate lace-like edge. This specific ratio guarantees the cookie spreads adequately without becoming thin, while ensuring the internal structure remains soft and delightfully bendy.
Recommended Tools for Cookie Success
Using the right equipment makes the process of baking Chewy Peanut Butter Cookies smooth, consistent, and guarantees professional-quality results.
- Stand Mixer or Hand Mixer: A stand mixer fitted with the paddle attachment (or a powerful hand mixer) is highly recommended. Properly creaming the butter, peanut butter, and sugars requires significant power and endurance, which is difficult to achieve by hand due to the density of the peanut butter.
- Parchment Paper or Silicone Baking Mats: Essential for preventing sticking and ensuring the bottoms of the cookies bake evenly without scorching. Silicone mats also promote slightly less spread, leading to thicker cookies.
- Medium Mixing Bowl and Whisk: For combining the dry ingredients thoroughly before adding them to the wet mixture.
- Standard Cookie Scoop (1.5 tablespoons): Absolutely vital for uniform cookies. Uniformity ensures all cookies bake at the same rate, preventing some from being underdone and others overbaked and dry. This step directly impacts the consistent chewiness of the final product.
- Wire Cooling Rack: Necessary for transferring the cookies and allowing air circulation beneath them to stop the residual cooking process, thus preserving the soft, chewy interior.
- A Standard Kitchen Fork: The only tool needed to create that classic, signature criss-cross pattern!
By preparing these tools and adhering strictly to the ingredient requirements especially the type of peanut butter you set the stage for baking the ultimate batch of Chewy Peanut Butter Cookies. This foundation is critical before we move into the precise mixing steps.
Detailed Step-by-Step Instructions for Chewy Peanut Butter Cookies
Precision is key in baking, especially when chasing a perfect texture. Follow these steps carefully to ensure your cookies come out thick, soft, and wonderfully chewy.
Step 1: Prepare the Oven and Baking Sheets (The Setup)
Preheat your oven to 375°F (190°C). Oven temperature accuracy is essential for cookie spread. If your oven runs hot or cold, consider using an oven thermometer. Line two large baking sheets with parchment paper or high-quality silicone baking mats. This preparatory step ensures that when your dough is ready, you can move straight to baking, minimizing the time the dough spends warming up on the counter.
Step 2: Combine the Dry Ingredients (Even Distribution is Key)
In a medium bowl, whisk together the all-purpose flour, baking soda, and salt. It may seem sufficient to just stir, but whisking is important. Whisk for at least 30 seconds. This step is necessary to ensure the leavening agent (baking soda) and salt are evenly distributed throughout the flour. If these components are clumped, some cookies might rise unevenly or taste excessively salty, ruining the texture and flavor profile of your Chewy Peanut Butter Cookies.
Step 3: Cream the Fats and Sugars (The Aeration Process)
Place the softened butter, creamy peanut butter, light brown sugar (firmly packed), and granulated sugar into the bowl of your stand mixer (paddle attachment recommended). Beat on medium speed for 2 to 3 minutes. This stage, known as creaming, is fundamental to the final cookie texture. You are whipping air into the mixture, which is what gives the final cookies their light, puffy, and ultimately chewy structure. The mixture should transform from dense and grainy into a pale, fluffy mass. Remember to stop the mixer frequently and scrape down the sides and bottom of the bowl. Residual unmixed ingredients on the bottom can lead to inconsistent cookies. This step ensures that the foundation of your Chewy Peanut Butter Cookies is airy and ready to hold moisture.
Step 4: Add the Wet Ingredients (Incorporation)
Crack the large egg into the creamed mixture and add the vanilla extract. Beat again on medium speed, but only until the egg is just incorporated about 30 seconds. The mixture might look slightly curdled momentarily, but it should come back together quickly. Do not overmix at this stage. Once the yolk and white are seamlessly blended, stop the mixer.
Step 5: Incorporate the Dry Ingredients (The Gluten Avoidance Zone)
Reduce the mixer speed to low. Gradually add the reserved flour mixture into the wet ingredients. Mix only until the flour streaks have mostly disappeared and a thick, soft dough forms. Stop the mixer immediately once the dough comes together. This is perhaps the most critical technical step for achieving true chewiness. Overmixing the flour activates too much gluten, which develops a strong structure, resulting in a tougher, cakey, or less chewy cookie. The goal is barely combined.
If you enjoy making other soft, delicate desserts, the principle here is similar to ensuring a tender crumb in cakes or muffins. For example, ensuring proper blending in this step is just as important as when making Moist Chocolate Cake you want lightness, not density.
Step 6: Scoop and Chill (Optional but Highly Recommended)
Use a standard cookie scoop (approximately 1.5 tablespoons) to scoop uniform balls of dough. Place the balls onto the prepared baking sheets. For significantly chewier cookies that spread less and retain a puffy shape, place the scooped dough balls in the refrigerator for 15 to 30 minutes before proceeding. This short chill time firms up the fat, guaranteeing a superior texture in your Chewy Peanut Butter Cookies.
Step 7: Create the Criss-Cross Pattern
Before baking, take a fork and gently flatten each cookie dough ball, pressing down in one direction. Then, press again perpendicular to the first mark (creating the classic peanut butter cookie criss-cross pattern). This step is not just decorative; it’s functional. Since this dough is denser than many other cookie doughs, the criss-cross helps the cookie flatten evenly during baking and ensures that the heat penetrates the center thoroughly, promoting even, safe cooking.
Step 8: Bake the Cookies (The Perfect Window)
Place the baking sheets into the preheated oven. Bake for a short window of 8 to 11 minutes. The key here is to underbake slightly. The cookies are done when the edges are set and lightly golden brown, but the centers still look slightly soft, puffy, and perhaps a touch underdone. Do not overbake. Overbaking is the single greatest reason peanut butter cookies turn dry instead of chewy. If you are baking two sheets at once, rotate them halfway through the baking time to ensure uniform heat distribution.
Step 9: Cool Completely (The Final Set)
Remove the sheets from the oven and allow the Chewy Peanut Butter Cookies to cool on the baking sheets for 5 minutes. This is a crucial resting time! The residual heat on the baking sheet will finish cooking the soft centers without drying out the exterior. After 5 minutes, carefully transfer the cookies to a wire rack to cool completely. Store them in an airtight container at room temperature.
Tips, Troubleshooting, and Variations for Chewy Peanut Butter Cookies
Once you’ve mastered the basic recipe for these perfect Chewy Peanut Butter Cookies, you can easily adapt them to suit dietary needs or flavor preferences. Here are expert tips and common variations.
Pro Tips for Guaranteed Chewiness
- Monitor Oven Temperature: Ensure your oven is accurate. If it’s too hot, the cookies will set too quickly and become cakey. If it’s too cold, they will spread excessively.
- Avoid Overmixing the Flour: As mentioned in Step 5, this is non-negotiable for a chewy texture. Mix until just combined, even if there are a few residual flour specks.
- Don’t Substitute the Peanut Butter: Resist the urge to use natural peanut butter. Its instability will ruin the consistency of the final cookie.
- Brown Sugar Management: If your brown sugar is hard, microwave it briefly with a damp paper towel or use fresh, soft brown sugar. Hardened brown sugar will not contribute the necessary moisture.
- For the Ultimate Thickness: If you desire a truly thick cookie, wrap the dough balls individually and freeze them for 30 minutes or overnight before baking. This cold start drastically reduces spread.
Common Troubleshooting Issues
- Cookies are too Crumbly/Dry: Likely due to overbaking or overmixing the flour. Ensure you pull the cookies when the center is still soft, and minimize mixing in Step 5.
- Cookies are too Flat/Greasy: Usually caused by warm dough or overly soft/melted butter. Ensure the butter is only softened, not liquid, and always chill the scooped dough (Step 6) if your kitchen is warm.
Flavor and Ingredient Variations
The beauty of the Chewy Peanut Butter Cookies base recipe is how easily it adapts to delicious additions:
- Chocolate Chip Peanut Butter Cookies: Stir in ½ cup to ¾ cup of mini chocolate chips (milk or semi-sweet) along with the dry ingredients. Peanut butter and chocolate is a match made in heaven! If you love this flavor combo, you might also enjoy our recipe for Peanut Butter Chocolate Chip Cookies.
- Peanut Butter M&M Cookies: Substitute the chocolate chips with M&Ms for color and extra crunch.
- Gluten-Free Variation: While we can’t guarantee the exact same chewiness, you can successfully substitute the all-purpose flour with a high-quality 1:1 gluten-free baking blend that contains xanthan gum.
- Vegan Adaptation: Replace the unsalted butter with a high-quality vegan butter stick (ensure it has high-fat content) and use a flax egg or commercial egg replacement. Results may vary slightly in spread and chew, but the flavor remains excellent.
For more baking inspiration and dessert ideas that pair well with these chewy cookies, be sure to follow my latest sweet treats and recipes on Pinterest!
Nutritional Values and Benefits of Chewy Peanut Butter Cookies
While cookies are undeniably an indulgence, the primary ingredient, peanut butter, offers a few surprisingly beneficial components. Understanding the nutritional breakdown helps you enjoy these treats responsibly.
Estimated Nutritional Breakdown (Per Cookie, assuming 2 dozen total)
Please note: These are estimated values based on standard ingredient measurements and yielding 24 standard 1.5-tablespoon cookies. Calorie counts will vary based on brand and size.
| Component | Estimated Value (Per Cookie) |
|---|---|
| Calories | 180 – 200 kcal |
| Total Fat | 9 – 11 g |
| Saturated Fat | 4 – 5 g |
| Cholesterol | 15 – 20 mg |
| Sodium | 100 – 120 mg |
| Total Carbohydrates | 22 – 25 g |
| Dietary Fiber | 1 g |
| Total Sugars | 14 – 16 g |
| Protein | 4 – 5 g |
The Benefits of the Main Ingredient
The star of these Chewy Peanut Butter Cookies, peanut butter, is more than just a flavor enhancer; it’s a powerhouse ingredient:
- Healthy Fats: Peanuts are rich in monounsaturated and polyunsaturated fats. These are considered “heart-healthy” fats that help lower bad cholesterol levels when consumed in moderation as part of a balanced diet.
- Protein Power: Peanut butter provides a significant boost of plant-based protein (4-5g per cookie), making these cookies more satisfying than those made purely from flour and sugar. Protein helps promote satiety and muscle repair.
- Essential Nutrients: Peanuts contain key vitamins and minerals, including Vitamin E (an antioxidant), Magnesium (important for muscle and nerve function), and Niacin (Vitamin B3), which is crucial for energy production.
- Energy Source: Thanks to the combination of fats, carbohydrates, and protein, these cookies serve as an excellent, calorie-dense energy source, perfect for a mid-afternoon snack or post-workout treat.
While these Chewy Peanut Butter Cookies are a treat, knowing they contain beneficial fats and proteins from the peanut butter makes them a more nutritionally sound choice than many store-bought baked goods. Enjoy them mindfully!
FAQs About Chewy Peanut Butter Cookies
We’ve gathered the most common questions about baking these classic peanut butter treats to ensure your batch is perfect every time.
Why do I need to use a fork to make the criss-cross pattern?
The criss-cross pattern is essential because peanut butter cookie dough is denser and less likely to spread naturally than standard butter cookie dough. Pressing the fork down helps flatten the dough evenly, ensuring the heat can reach the center thoroughly for proper cooking and a consistent, chewy texture. It is a necessary functional step, not just a decoration.
Can I use crunchy peanut butter instead of creamy for these Chewy Peanut Butter Cookies?
Yes, you can substitute crunchy peanut butter, but ensure you are still using a stabilized, commercial brand (non-natural). The chunks of peanuts will alter the texture, making the cookie slightly less uniform in its chewiness but adding a pleasing crunch. The ratio of fats and liquids should remain consistent if using the same style of peanut butter.
What is the best way to store leftover Chewy Peanut Butter Cookies to maintain freshness?
To maintain their softness and chewiness, store the cooled cookies in an airtight container at room temperature for up to one week. To keep them extra soft, consider placing half a slice of bread (which will dry out over time) in the container; the cookies will absorb the bread’s moisture instead of their own.
Why did my cookies spread too much and become thin?
Excessive spreading is typically caused by too much soft fat. This can mean your butter was melted rather than softened, or you skipped the recommended chilling step (Step 6). Ensure your butter is the correct room temperature and always try to chill the scooped dough for at least 15 minutes before baking to solidify the fats and limit spread.
Can I freeze the dough for later use?
Absolutely! Scooped and rolled dough balls freeze wonderfully. Place them on a baking sheet and freeze until solid, then transfer them to a heavy-duty freezer bag or container. They can be stored for up to 3 months. When ready to bake, you can bake them directly from frozen; just add 2-4 minutes to the total baking time.
Conclusion: Your New Favorite Chewy Peanut Butter Cookies
You have now unlocked the secrets to baking the perfect batch of Chewy Peanut Butter Cookies. We’ve moved beyond the dry, crumbly recipes of the past and embraced the scientific elements the precise balance of brown sugar and granulated sugar, the importance of stabilized peanut butter, and the critical step of minimal flour mixing that guarantee a luxurious, soft, and satisfying chew.
Remember, the short bake time (8 to 11 minutes) is your biggest ally in achieving that coveted soft center. Pull them out of the oven when they still look just slightly underdone, trust the 5-minute cooling rest on the hot pan, and then transfer them to the rack. This patient approach ensures the integrity of the chewiness remains intact.
These truly exceptional cookies are a testament to the fact that even the simplest recipes can be perfected with attention to detail. Whether you’re pairing them with a cup of coffee or saving them for a special occasion, these Chewy Peanut Butter Cookies are destined to become a staple in your home baking repertoire. We encourage you to try this recipe, share your successful results with friends and family, and let us know what you thought in the comments below. Happy baking!
CHEWY PEANUT BUTTER COOKIES (The Classic Criss-Cross Recipe)
Ingredients
Equipment
Method
- Preheat your oven to 375°F (190°C). Line two large baking sheets with parchment paper or silicone baking mats. Setting up your workspace beforehand ensures a smooth baking process.
- In a medium bowl, whisk together the all-purpose flour, baking soda, and salt. Whisk for about 30 seconds to ensure the leavening agent (baking soda) and salt are evenly distributed throughout the flour. Set this bowl aside.
- In the bowl of a stand mixer fitted with the paddle attachment, or using a large bowl and a hand mixer, beat the softened butter, creamy peanut butter, light brown sugar, and granulated sugar together. Beat on medium speed for 2 to 3 minutes until the mixture is light, fluffy, and well-combined. Scrape down the sides of the bowl frequently during this step to ensure uniform mixing.
- Crack the large egg into the creamed mixture and add the vanilla extract. Beat again on medium speed until the egg is just incorporated. Be careful not to overmix at this stage.
- Reduce the mixer speed to low. Gradually add the reserved flour mixture into the wet ingredients, mixing only until the flour streaks have mostly disappeared and a thick dough forms. Stop the mixer immediately once the dough comes together. Overmixing the flour will develop too much gluten, resulting in a tougher, less chewy cookie.
- Use a standard cookie scoop (about 1.5 tablespoons) to scoop uniform balls of dough. Place the balls onto the prepared baking sheets. For chewier cookies that spread less, place the scooped dough balls in the refrigerator for 15 to 30 minutes before baking.
- Before baking, use a fork to flatten each cookie dough ball slightly, pressing down in one direction, and then pressing again perpendicular to the first mark (creating the classic peanut butter cookie criss-cross pattern). This pattern helps the cookie flatten evenly and ensures thorough cooking.
- Place the baking sheets into the preheated oven. Bake for 8 to 11 minutes. The cookies are done when the edges are set and lightly golden brown, but the centers still look slightly soft and puffy. Do not overbake, as they will become dry instead of chewy. If using two sheets, rotate them halfway through the baking time.
- Remove the cookies from the oven and allow them to cool on the baking sheets for 5 minutes. This crucial resting time allows the soft centers to finish setting up. After 5 minutes, carefully transfer the cookies to a wire rack to cool completely.