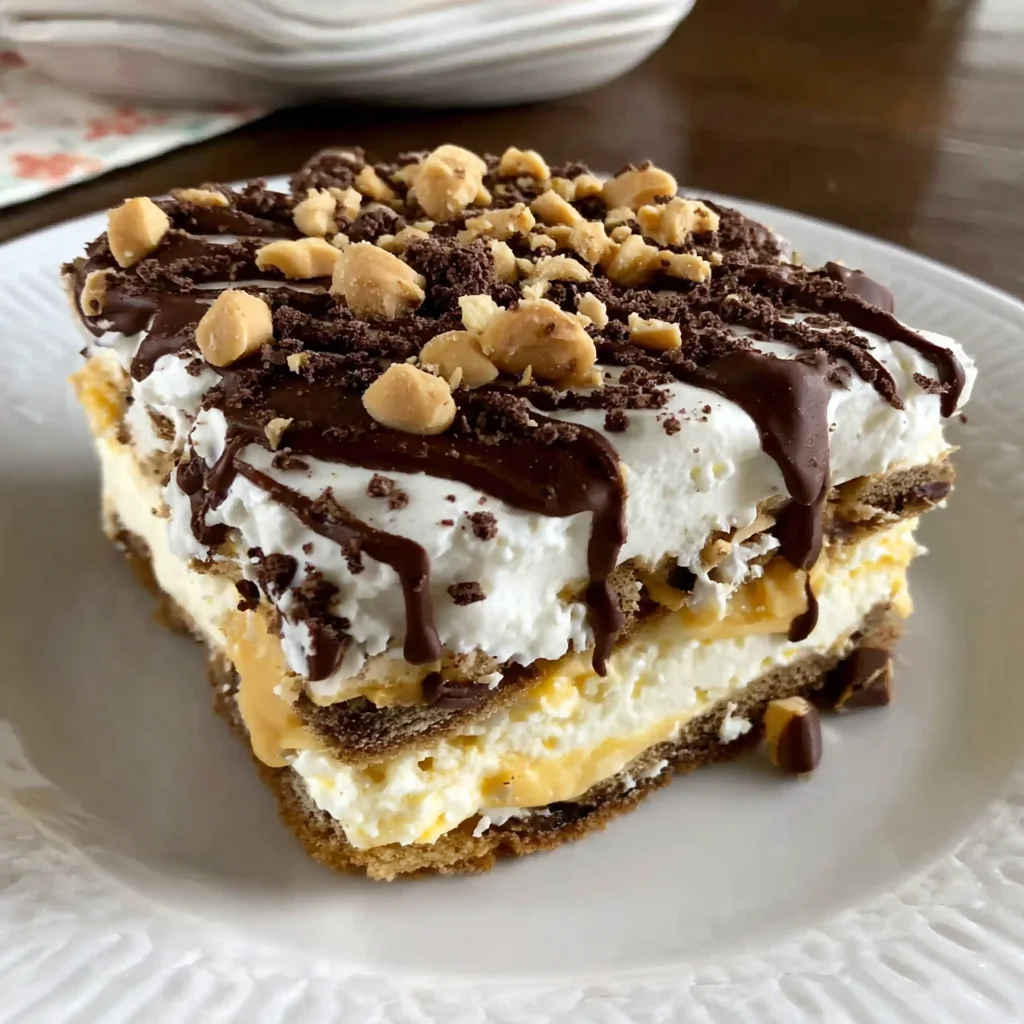
If you are searching for a decadent, easy-to-make dessert that requires absolutely no oven time, look no further. This Peanut Butter Chocolate Eclair Cake is the perfect solution. Layered with soft graham crackers, a ridiculously creamy peanut butter filling, and topped with a glossy, rich chocolate glaze, this dessert takes the classic eclair concept and transforms it into a make-ahead masterpiece. Forget fussy pastry dough we achieve that iconic soft, cake-like texture simply by letting the layers chill overnight. Get ready for a dessert that’s guaranteed to be a hit at any potluck, holiday gathering, or quiet weekend treat.
Why You’ll Fall Head Over Heels for This Peanut Butter Chocolate Eclair Cake
This dessert isn’t just easy; it’s an absolute flavor powerhouse. Combining the beloved duo of chocolate and peanut butter in a light, no-bake format creates a dessert experience that is both nostalgic and irresistibly satisfying. Here are the top reasons why this particular Peanut Butter Chocolate Eclair Cake will become your new favorite recipe:
Unbeatable Flavor Combination
The marriage of creamy, slightly salty peanut butter and deep, sweet chocolate is timeless. While many eclair cakes rely solely on vanilla pudding, our version elevates the flavor profile dramatically by incorporating a lush peanut butter mixture into the vanilla base. This peanut butter filling is stabilized with whipped topping and powdered sugar, ensuring it holds its shape beautifully while remaining incredibly airy. It hits that perfect balance between savory richness and sweet indulgence, making every bite complex and satisfying.
Effortless Elegance: A True No-Bake Wonder
The term “eclair” often brings to mind delicate pastry work and hot ovens. This recipe throws all that complexity out the window. By substituting traditional pâte à choux with honey graham crackers, we create a foolproof base that softens perfectly in the refrigerator. The lengthy chill time (which is the secret to its success) means you can prepare this cake days in advance, allowing you to focus on other tasks when entertaining. It’s truly a hands-off showstopper that requires minimal effort for maximum impact.
If you are a fan of simple, creamy desserts that don’t require turning on your oven, you might also love our No-Bake Peanut Butter Pie. The core appeal of the no-bake dessert lies in its simplicity and versatility, especially during warm weather or when oven space is limited.
Perfectly Balanced Texture
The texture of this Peanut Butter Chocolate Eclair Cake is one of its most appealing features. The graham crackers transform from crunchy squares into tender, cake-like layers, providing a solid foundation without being soggy. Sandwiched between these layers is the airy, cloud-like peanut butter mousse. Finally, the homemade chocolate glaze sets into a rich, slightly firm shell on top, offering a delightful contrast to the creamy filling below. This multi-layered approach ensures that every slice provides textural harmony creamy, soft, and slightly firm all at once.
Why You Should Try Making This No-Bake Peanut Butter Chocolate Eclair Cake Today
In the vast world of desserts, the No-Bake Eclair Cake holds a special place. It’s a classic for a reason, but our peanut butter variation elevates it far beyond the standard recipe. Here’s a compelling argument for adding this specific dessert to your immediate repertoire:
It’s a Highly Customizable Dessert Base
While the chocolate and peanut butter combination is divine, the structure of this graham cracker eclair cake is incredibly forgiving and flexible. Once you master the technique of stabilizing the pudding and assembling the layers, you can swap out components easily. Use different types of crackers, experiment with chocolate peanut butter pudding, or add mix-ins like crushed pretzels or mini chocolate chips for extra crunch. This adaptability ensures the recipe never gets boring and can be tailored to seasonal themes or personal preferences.
The Secret to Success: The Homemade Chocolate Glaze
A key difference between a good eclair cake and a great one is the glaze. Many recipes call for canned frosting or basic melted chocolate, but our homemade chocolate glaze is formulated to set perfectly shiny, smooth, and firm enough to slice cleanly, yet soft enough to melt in your mouth. Using a combination of melted butter, chocolate chips, and sifted powdered sugar, we create a rich, ganache-like topping that seals the cake and enhances the overall presentation. This glossy finish is what transforms a simple stack of crackers into an elegant dessert.
If you enjoy working with simple, rich chocolate glazes, you might find inspiration in our guide to making Easy Chocolate Fudge, which shares a similar foundation of melted chocolate and stabilized sugar components.
Perfect for Feeding a Crowd
Baked in a standard 9×13 inch dish, this Peanut Butter Chocolate Eclair Cake serves 12 to 15 people generously. Since it needs to be made ahead, it eliminates any last-minute stress. Whether you are hosting a summer barbecue, celebrating a birthday, or contributing to a holiday potluck, this dessert travels well and holds its structure beautifully once fully chilled. Plus, its universally loved flavor profile means you won’t be left with leftovers!
For those who love this indulgent combination, exploring other recipes that utilize rich chocolate and creamy peanut butter is a must. Check out our recipe for Chocolate Peanut Butter Fudge for another simple, crowd-pleasing option.
Ingredients and Necessary Utensils for the Creamy Peanut Butter Chocolate Eclair Cake
Achieving perfection with this no-bake recipe hinges on having the correct ingredients and ensuring they are prepared properly, especially the temperature and type of peanut butter used.
Essential Ingredients Checklist
This recipe is divided into three main components: the base, the filling, and the glaze. Here is a detailed breakdown of what you will need:
For the Graham Cracker Base and Layers:
- 1 (14.4 ounce) box of Honey Graham Crackers: This typically yields approximately 48 full sheets. This number is crucial, as you need three complete layers in a 9×13 pan. Use classic honey graham crackers for the most authentic flavor and optimal softening results.
For the Luxurious Peanut Butter Filling:
- 2 (3.4 ounce) boxes instant vanilla pudding mix (or French vanilla): Ensure these are instant pudding mixes, not the cook-and-serve variety. The instant mix provides the essential quick-setting and stabilizing properties required for a solid filling structure.
- 3 cups cold whole milk (or 2% milk): The milk must be very cold. Cold milk helps the instant pudding set faster and thicker, preventing a runny filling.
- 1 cup creamy peanut butter: Crucial Tip: Do not use natural-style peanut butter that separates (where oil pools on top). The natural oil content prevents the filling from setting properly and can result in a greasy texture. Stick to traditional processed creamy peanut butter (like Jif or Skippy) for stability.
- 1/2 cup powdered sugar (optional, but highly recommended): While the pudding already contains sugar, this additional powdered sugar helps stabilize the peanut butter filling and adds a smoother texture and slightly increased sweetness.
- 1 (8 ounce) container frozen whipped topping (Cool Whip), thawed completely: The whipped topping adds volume and lightness, transforming the dense pudding and peanut butter mixture into a fluffy, creamy mousse. Ensure it is fully thawed before use; otherwise, it will not fold in properly.
For the Signature Chocolate Glaze:
- 1 cup semi-sweet chocolate chips (or milk chocolate chips): Semi-sweet provides a richer, less intensely sugary glaze, balancing the sweet peanut butter filling.
- 1/4 cup unsalted butter: Butter adds richness, shine, and helps the glaze set to a pliable but sliceable consistency.
- 1 teaspoon vanilla extract: Enhances the chocolate flavor complexity.
- 3 tablespoons cold milk (or heavy cream): Heavy cream results in a richer, slightly thicker glaze, while milk provides a lighter texture. Cold liquid helps control the temperature when mixing in the powdered sugar.
- 1 cup powdered sugar, sifted: Sifting is mandatory here. Unsifted powdered sugar will inevitably leave lumps, resulting in a grainy glaze. The sugar is what thickens the glaze once it’s taken off the heat.
Recommended Tools and Utensils for Recipe Success
While this is a no-bake recipe, having the right equipment will make the process smooth and successful.
Key Preparation Tools:
- 9×13 Inch Baking Dish: The standard size for this recipe. A glass dish is ideal as it retains cold temperature well.
- Large Mixing Bowl (for the Pudding/Filling): Needs to be big enough to whisk the pudding and fold in the whipped topping without spilling.
- Medium Mixing Bowl (for Peanut Butter Mixture): Used initially to blend the peanut butter and powdered sugar.
- Wire Whisk: Essential for quickly incorporating the milk and instant pudding mix to ensure it activates and thickens immediately.
- Rubber Spatula or Spoon: Crucial for gently folding in the whipped topping and spreading the filling evenly without damaging the graham cracker layers.
- Small Saucepan: Needed for melting the chocolate chips and butter for the glaze over low heat.
- Sieve or Fine-Mesh Strainer: Absolutely necessary for sifting the powdered sugar for the glaze, guaranteeing a smooth finish.
- Offset Spatula or Butter Knife: The best tool for gently spreading the warm chocolate glaze over the delicate top layer of crackers.
- Measuring Cups and Spoons: Accuracy is important, especially with the pudding powder to liquid ratio and the glaze ingredients.
Utensil Tip for Optimal Creaminess: When preparing the peanut butter filling, use a large, flexible rubber spatula. This allows you to fold the whipped topping gently. Over-mixing the whipped topping will deflate the air, resulting in a dense, heavy filling rather than the intended light, airy mousse.
Detailed Step-by-Step Instructions for Assembling Your Peanut Butter Chocolate Eclair Cake
Follow these steps precisely to ensure your no-bake cake sets perfectly and the layers hold together beautifully after the chilling process.
Step 1: Preparing the Foundation (The Graham Cracker Base)
- Grease the Pan: Lightly grease a standard 9×13 inch baking dish. This prevents the filling from sticking to the edges, making for cleaner slices later.
- Lay the First Layer: Carefully arrange a single, solid layer of honey graham crackers on the bottom of the prepared dish. Graham crackers typically come in rectangles. You may need to use a sharp knife or break pieces by hand to fit the edges and corners completely. Important: Avoid overlapping the crackers. A single layer ensures even absorption of moisture. Set the remaining crackers aside; you will need two more full layers.
Step 2: Activating the Pudding Base
- Whisk the Instant Pudding: In a large mixing bowl, combine the two packages of instant vanilla pudding mix and the 3 cups of cold milk. Whisk vigorously for about two full minutes. You will feel the mixture rapidly start to thicken and seize up.
- Allow to Set: Stop whisking and let the pudding mixture sit undisturbed for 5 minutes. This allows the thickening agents to fully hydrate and set into a firm base. A firm pudding base is essential for a stable peanut butter filling.
Step 3: Creating the Signature Peanut Butter Filling
- Combine Peanut Butter and Sugar: In a separate medium bowl, combine the 1 cup of creamy peanut butter and the optional 1/2 cup of powdered sugar. Stir them together until the mixture is smooth and slightly malleable, almost like soft dough.
- Incorporate Peanut Butter into Pudding: Add the peanut butter mixture to the set vanilla pudding. Stir gently don’t whisk aggressively. Stir until the mixture is mostly combined but still shows a few light streaks of peanut butter. This gentle mixing technique prevents the pudding from breaking down too much and keeps the texture interesting.
- Fold in Whipped Topping: Gently fold in the entire container of thawed whipped topping. Use a rubber spatula, turning the mixture over itself until the filling is uniform, light brown, and creamy. Avoid overmixing! Folding (not stirring) is key to keeping the air in the whipped topping, ensuring a light, mousse-like filling texture.
Step 4: Layering the Cake Structure
- First Filling Layer: Pour exactly half (approximately 3 cups) of the peanut butter filling over the graham cracker base layer in the 9×13 dish.
- Spread Evenly: Use a rubber spatula or the back of a spoon to gently spread the filling into an even layer, ensuring it reaches all the corners without lifting or breaking the crackers beneath.
- Second Cracker Layer: Arrange a second layer of graham crackers directly on top of the first peanut butter filling layer. Again, ensure the coverage is complete, with no gaps or overlaps.
- Second Filling Layer: Pour the remaining half of the peanut butter filling on top of the second cracker layer. Spread it smoothly and evenly across the entire surface.
- Final Cracker Layer: Place a third and final layer of graham crackers directly on top of the remaining filling. This will be the surface that holds the chocolate glaze.
Step 5: Preparing the Rich Chocolate Glaze
The glaze should be made just before pouring, while it is still warm and liquid.
- Melt Chocolate and Butter: In a small saucepan over low heat, combine the 1 cup of chocolate chips and the 1/4 cup of butter. Stir constantly until the chocolate and butter are fully melted, smooth, and glossy. Do not let the mixture boil or scorch.
- Remove from Heat and Add Liquids: Remove the pan from the heat immediately. Stir in the vanilla extract and the 3 tablespoons of cold milk (or cream).
- Thicken with Sugar: Gradually whisk in the 1 cup of sifted powdered sugar. Start slow, ensuring each addition is incorporated before adding more. Whisk until the glaze is completely smooth, shiny, and lump-free. Pro-Tip: If the glaze seems too thick to pour easily, add milk 1 teaspoon at a time until it reaches a thick, pourable consistency (like thick syrup).
Step 6: Glaze and Chill (The Essential Step)
- Glaze the Cake: Pour the warm chocolate glaze evenly over the top layer of graham crackers. Use an offset spatula or the back of a spoon to gently spread the glaze, ensuring the entire top surface is uniformly covered, right up to the edges.
- Cover Properly: Cover the dish tightly with plastic wrap. Crucial Point: Ensure the plastic wrap does not directly touch the wet glaze, as this will stick and ruin the finish. You can insert toothpicks into the cake corners to hold the plastic above the glaze.
- The Waiting Game (Chill Time): Refrigerate the Peanut Butter Chocolate Eclair Cake for a minimum of 8 hours, or preferably overnight (12-24 hours). The extended chilling time is non-negotiable. This time allows the graham crackers to fully soften and absorb moisture from the filling, creating the signature tender, cake-like texture.
Step 7: Serving
- Slice and Serve: Once chilled, remove the plastic wrap. Use a sharp knife (wiping it clean between cuts for the neatest presentation) to slice the cake.
- Storage: The cake can be kept refrigerated for up to 4 days, though the graham crackers will continue to soften slightly over time.
Tips, Variations, and Troubleshooting for Your Peanut Butter Eclair Cake
While this recipe is straightforward, a few key tips can ensure absolute success, and knowing some variations can keep things interesting!
Solving Common Eclair Cake Issues
“My Filling is Runny!”
If your filling is too loose, it likely means one of two things:
- Milk Temperature: The milk used for the instant pudding must be ice cold. Warmer milk prevents the setting agents from working efficiently.
- Overmixing: You stirred or whisked the whipped topping too vigorously, which deflated the air and liquidity into the mix. Next time, use the folding technique gently. If the filling is still slightly too soft, add 1 tablespoon of cornstarch (unmixed) to the filling and fold it in quickly this can help absorb excess moisture before chilling.
“My Glaze is Too Thick/Hard”
If the chocolate glaze sets up too quickly or is too stiff to pour, it’s usually because it cooled down too much before the powdered sugar was incorporated, or too much powdered sugar was added initially. Reheat the mixture very gently over low heat, stirring constantly, and add another teaspoon of cold milk or cream until it reaches the desired pourable consistency. Remember, sifting the powdered sugar is critical to avoid graininess in the glaze.
“My Crackers Haven’t Softened Enough”
This is purely a matter of time. If you slice the cake after only 4-6 hours, the crackers will still be chewy or crunchy. You must allow a minimum of 8 hours, but ideally 12-24 hours. The magic happens when the moisture from the filling completely permeates the dry graham crackers.
Flavor and Ingredient Variations
- Gluten-Free Peanut Butter Chocolate Eclair Cake: Swap out the traditional graham crackers for gluten-free graham crackers or use thin layers of gluten-free vanilla wafer cookies. The principle remains the same: the cookie/cracker base will soften during the long chilling period.
- Pudding Swap: For an even deeper chocolate experience, use instant chocolate pudding mix instead of vanilla. This creates a triple chocolate and peanut butter layer!
- Vegan Option: Replace dairy milk with unsweetened almond or soy milk, use a vegan “Cool Whip” alternative (often coconut-based), and ensure your chocolate chips are dairy-free. Note that results may vary slightly, as plant-based milks sometimes hinder the setting ability of instant pudding.
- Texture Boost: Fold in 1/2 cup of mini chocolate chips or 1/4 cup of chopped dry-roasted peanuts into the filling before assembly for an added layer of crunch.
- Swapping the Topping: If you prefer a lighter finish, you can top the cake with a thin layer of whipped topping instead of the chocolate glaze, or drizzle melted peanut butter over the chocolate glaze for a visually stunning and flavor-enhanced finish.
For more baking inspiration and flavor twists, be sure to check out my Pinterest board: Cocinafacilita Dessert Ideas, where you can find countless recipes for easy, satisfying treats like this eclair cake.
Nutritional Insights and Component Benefits of the Peanut Butter Chocolate Eclair Cake
It’s important to understand that this Peanut Butter Chocolate Eclair Cake is an indulgent dessert, intended to be enjoyed as a treat. As a creamy, layered confection, it is rich in fats and carbohydrates. The following nutritional information is an estimate based on the ingredients used, assuming 15 servings in a 9×13 pan.
Estimated Nutritional Value (Per Serving, based on 15 servings):
(Note: These figures are estimates and vary based on exact brands and measurements.)
| Nutrient | Estimated Amount |
|---|---|
| Calories | 350 – 400 kcal |
| Total Fat | 20 – 25 g |
| Saturated Fat | 10 – 12 g |
| Total Carbohydrates | 40 – 50 g |
| Dietary Fiber | 2 – 3 g |
| Sugars | 30 – 40 g |
| Protein | 6 – 8 g |
Benefits of Key Components (In the Context of a Dessert)
Peanut Butter (Protein and Healthy Fats)
Peanut butter is the star ingredient, providing the filling’s rich flavor and texture. It is a good source of plant-based protein and unsaturated fats (like monounsaturated and polyunsaturated fatty acids). These components help provide satiety, meaning a small serving of this rich dessert can feel more satisfying than a sugar-only treat. Peanut butter also contains essential nutrients such as magnesium, potassium, and Vitamin E.
Dairy (Calcium and Vitamin D)
The whole milk used in the pudding base contributes calcium, which is vital for bone health, and Vitamin D (if fortified). Even in a dessert context, whole milk adds richness and essential nutrients that support various bodily functions.
Graham Crackers (Whole Grains)
While sweetened, traditional honey graham crackers often contain whole wheat flour, offering a small amount of whole grains and dietary fiber. This provides a more complex carbohydrate base compared to white flour alone.
Managing Indulgence: Because this dessert is decadent, it’s best enjoyed in moderation. The high fiber and protein content from the peanut butter helps stabilize the blood sugar response slightly compared to a purely sugary treat, allowing you to savor the rich flavor without an immediate sugar crash.
FAQs About Peanut Butter Chocolate Eclair Cake
Do you have questions about making the perfect no-bake Peanut Butter Chocolate Eclair Cake? We’ve answered some of the most common inquiries below, structured for optimal search engine clarity.
How long does the Peanut Butter Chocolate Eclair Cake need to chill before serving?
The cake requires a minimum of 8 hours of refrigeration, but ideally, it should chill for 12 to 24 hours. The extended chilling time is crucial because it allows the dry graham crackers to fully soften by absorbing moisture from the creamy filling, creating the desired tender, cake-like texture necessary for a perfect slice.
Can I use natural peanut butter in this eclair cake recipe?
It is strongly recommended that you do not use natural-style peanut butter that separates (where the oil rises to the top). The excess natural oil interferes with the instant pudding’s ability to set and stabilize, resulting in a runny, unstable filling. Use conventional creamy, homogenized peanut butter for the best structural results.
Can I freeze this no-bake peanut butter dessert?
Yes, you can freeze the assembled Peanut Butter Chocolate Eclair Cake. Wrap the chilled cake tightly in several layers of plastic wrap and aluminum foil. It will keep well in the freezer for up to one month. Thaw the cake slowly in the refrigerator overnight before slicing and serving, as this prevents textural changes in the filling.
What can I use instead of Cool Whip (whipped topping)?
You can substitute the store-bought whipped topping with homemade stabilized whipped cream. To stabilize 8 ounces of heavy cream, whip it with 1/4 cup of powdered sugar and 1 teaspoon of vanilla until stiff peaks form. The stability added by the sugar is necessary to keep the peanut butter filling light and firm.
How do I prevent my chocolate glaze from being lumpy or grainy?
The key to a silky smooth glaze is sifting the powdered sugar. Unsifted powdered sugar clumps easily, causing a grainy texture when mixed into the warm chocolate. Also, ensure the chocolate and butter are fully melted before removing the mixture from the heat and adding the liquids and sugar.
Conclusion: The Perfect No-Bake Peanut Butter Chocolate Eclair Cake Awaits
The journey to creating the perfect Peanut Butter Chocolate Eclair Cake is exceptionally rewarding, largely because the process is so simple, yet the result is so spectacular. We have combined the ease of instant pudding and graham crackers with the irresistible pairing of rich chocolate and creamy peanut butter to produce a dessert that truly satisfies on every level. Remember that the success of this recipe hinges on a few crucial steps: using cold milk for the pudding, gently folding the whipped topping to maintain volume, and, most importantly, allowing sufficient time for the cake to chill.
This dessert proves that you don’t need complicated techniques or professional baking skills to achieve elegant, crowd-pleasing results. Whether you are a novice cook or an experienced baker looking for a reliable, make-ahead sweet treat, this recipe is designed for flawless execution. The glossy chocolate top and the cool, airy filling make it an instant favorite among guests of all ages.
Now that you have the detailed instructions and troubleshooting tips, it’s time to head to the kitchen. Gather your ingredients, prepare your layers, and embrace the patience required for the overnight chill. We guarantee that the first slice of this creamy, perfectly set Peanut Butter Chocolate Eclair Cake will be worth the wait. Try this recipe today, share your results, and let us know in the comments how much you loved this ultimate no-bake indulgence!

Peanut Butter Chocolate Eclair Cake (No-Bake)
Ingredients
Equipment
Method
- Lightly grease a standard 9x13 inch baking dish. Arrange a single, solid layer of graham crackers on the bottom of the prepared dish. Break or cut the crackers as needed to cover the bottom completely, without overlapping. Set the remaining crackers aside.
- In a large mixing bowl, whisk together the two packages of instant vanilla pudding mix and the 3 cups of cold milk for about two minutes, until the mixture starts to thicken substantially.
- Let the pudding mixture sit undisturbed for 5 minutes to fully set.
- In a separate medium bowl, combine the 1 cup of creamy peanut butter and the 1/2 cup of powdered sugar. Stir well until the mixture is smooth and slightly malleable.
- Add the peanut butter mixture to the set vanilla pudding. Stir gently until the mixture is mostly combined but still slightly streaky (this helps maintain a lighter texture).
- Gently fold in the entire container of thawed whipped topping until the filling is uniform, light, and creamy. Do not overmix, or the volume will deflate.
- Pour half (approximately 3 cups) of the peanut butter filling over the graham cracker base layer in the 9x13 inch dish. Use a rubber spatula or the back of a spoon to gently spread the filling into an even layer, ensuring it reaches all the corners.
- Arrange a second layer of graham crackers directly on top of the peanut butter filling, again making sure there are no gaps or overlaps. Pour the remaining half of the peanut butter filling on top of the second cracker layer. Spread it smoothly and evenly.
- Place a third and final layer of graham crackers directly on top of the remaining filling.
- In a small saucepan over low heat, combine the 1 cup of chocolate chips and the 1/4 cup of butter. Stir constantly until the chocolate and butter are fully melted and smooth.
- Remove the mixture from the heat. Stir in the vanilla extract and the 3 tablespoons of cold milk (or cream).
- Gradually whisk in the 1 cup of sifted powdered sugar until the glaze is smooth, shiny, and lump-free. If the glaze is too thick, add milk 1 teaspoon at a time until it reaches a pourable consistency.
- Pour the warm chocolate glaze evenly over the top layer of graham crackers, spreading gently with a knife or offset spatula to ensure the entire top surface is covered.
- Cover the dish tightly with plastic wrap. Ensure the plastic wrap does not directly touch the glaze.
- Refrigerate the Peanut Butter Chocolate Eclair Cake for a minimum of 8 hours, or preferably overnight. The extended chilling time allows the graham crackers to soften and absorb moisture, creating a cake-like texture.
- Slice and serve the chilled cake. The cake can be kept refrigerated for up to 4 days.