There are certain scents and flavors that instantly transport you to the heart of the holiday season, and nothing achieves that festive magic quite like the combination of rich, melting chocolate and the invigorating crunch of peppermint. This easy-to-make peppermint bark is not just a treat; it’s a culinary hallmark of winter, offering a perfect blend of sweetness, coolness, and satisfying texture. Forget the overpriced, pre-packaged versions you find in stores; crafting your own gourmet peppermint bark at home is surprisingly simple, deeply rewarding, and infinitely more customizable.
This recipe demystifies the process of creating the ideal layered confection. We start with a foundation of robust, semi-sweet or dark chocolate, infused with a subtle hint of mint, creating a rich base that stands up beautifully to the brightness of the white chocolate layer. The top layer creamy white chocolate is where the real magic happens, providing the perfect canvas for a generous showering of vibrant, crushed candy canes. The contrast in color, flavor, and temperature (cool mint vs. warm chocolate) is what elevates homemade Peppermint Bark from a simple dessert to an unforgettable holiday experience.
Whether you are looking for the perfect edible gift, a show-stopping dessert for your next festive gathering, or just a quick, satisfying treat to snack on while wrapping presents, this recipe delivers maximum impact with minimal fuss. We’ll guide you through every step, from selecting the best melting chocolate to achieving that flawless snap when you break the bark. Get ready to fill your kitchen with the irresistible aroma of chocolate and mint the holidays have officially arrived with the introduction of your perfect batch of homemade Peppermint Bark.
Why This Homemade Peppermint Bark Will Be Your New Holiday Staple
The allure of making your own Peppermint Bark extends far beyond the final delicious product. It’s an activity that captures the spirit of the holidays joyful, slightly messy, and centered around sharing warmth and flavor. But specifically, why should this recipe earn permanent residency in your annual rotation? The reasons are numerous, blending convenience, quality, and undeniable charm.
Effortless Elegance: The Simplicity Factor
One of the biggest advantages of making Peppermint Bark is its straightforward, no-bake nature. Unlike cookies or elaborate cakes that require precise timing, oven temperatures, and complex decoration, bark relies on melting, layering, and chilling. This makes it an ideal project for novice bakers, busy parents, or anyone who needs a gorgeous dessert fast. The entire hands-on process, from unwrapping the chocolate to crushing the candy canes, rarely takes more than 30 minutes. The rest is passive chilling time, allowing you to focus on other holiday preparations, like setting up your festive appetizers or mixing a batch of delicious drinks. For another simple holiday appetizer idea, check out this recipe for a Cranberry Pecan Cheese Ball.
Superior Quality and Customization
When you purchase store-bought Peppermint Bark, you are often limited to generic chocolate compounds. By making it at home, you control the quality of every component. Choosing high-quality chocolate (such as premium melting wafers) ensures a richer, smoother mouthfeel and a truly decadent flavor profile. You can select your preferred cocoa percentage for the dark layer from bittersweet to milk chocolate and adjust the intensity of the peppermint extract. Do you prefer a subtle whisper of mint or a bold, refreshing punch? The choice is entirely yours. This level of customization is simply unparalleled.
The Perfect Edible Gift
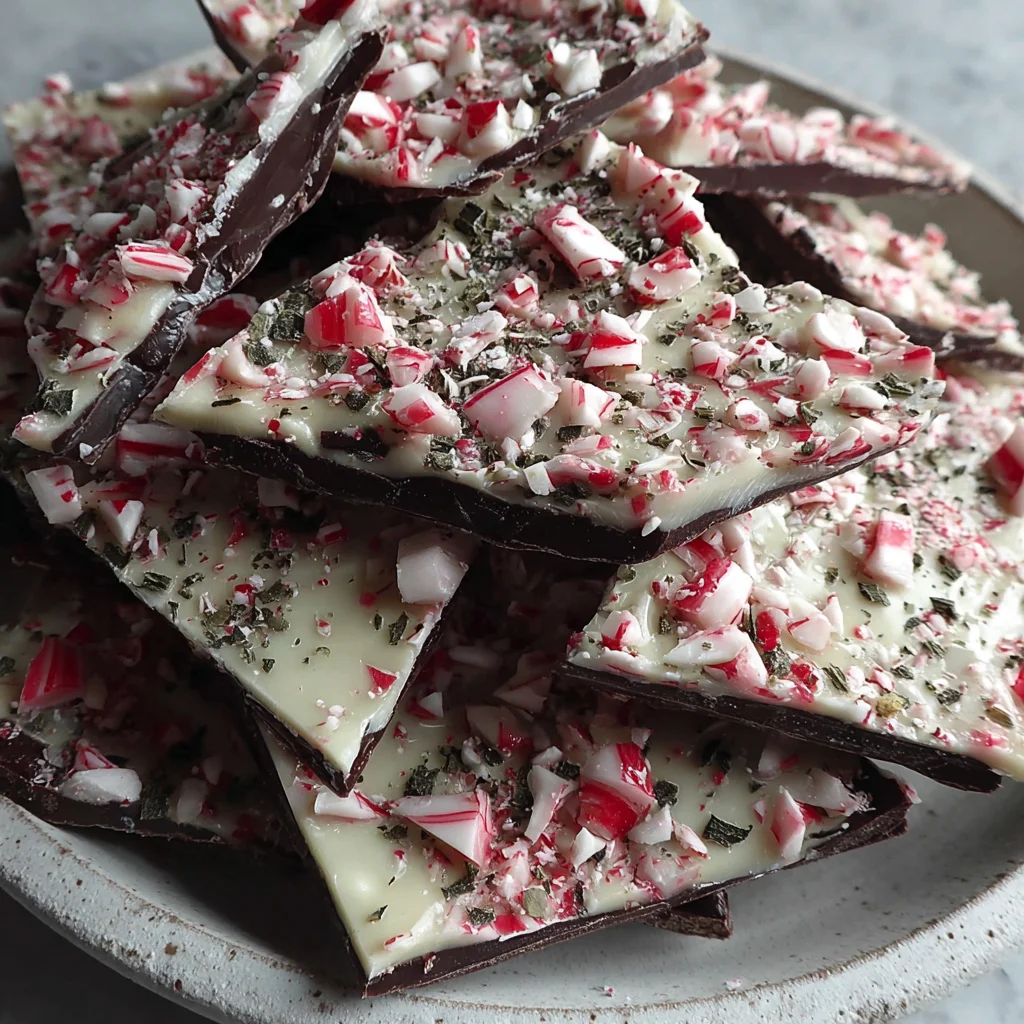
Homemade Peppermint Bark is arguably the ultimate holiday gift. It’s festive, travels well, and keeps for weeks. Breaking the large slab into irregular pieces creates a rustic, artisanal look that suggests hours of effort, even though it was incredibly easy to make. Package the irregular shards in clear cellophane bags tied with a bright ribbon, or place them in decorative tins. A batch made using this recipe yields a generous amount, meaning you can knock out gifts for neighbors, teachers, and coworkers all in one go. It’s a gift that speaks volumes personal, delicious, and deeply seasonal.
A Texture Sensation
The appeal of Peppermint Bark isn’t just about taste; it’s about the textural experience. The recipe ensures two distinct layers: the firm, deep chocolate base and the smooth, creamy white chocolate top. Sandwiched between your teeth, these layers melt beautifully, only to be interrupted by the delightful, crystalline crunch of the crushed candy canes. This combination of smooth and crisp, creamy and crunchy, dark and bright, is highly addictive and contributes significantly to its status as a seasonal favorite.
Embracing this recipe means embracing a low-stress, high-reward approach to holiday baking. It’s a delicious tradition waiting to be started or maintained, and the resulting Peppermint Bark is guaranteed to disappear fast, leaving behind nothing but compliments and requests for the recipe.
The Magic Behind Making Perfect Peppermint Bark
Many people hesitate to work with chocolate, fearing that it will seize, bloom, or simply fail to temper correctly. The beauty of this bark recipe is that it bypasses the complexities of professional tempering while still guaranteeing a beautiful, snappy finish. It relies on specific techniques and ingredient ratios to ensure both stability and flavor depth. Here is why investing a small amount of time in this process guarantees maximum holiday cheer.
Mastering the Double-Layer Contrast
The foundation of excellent Peppermint Bark is the strong contrast between the two chocolate layers. This recipe specifically calls for dark or semi-sweet chocolate for the bottom layer and white chocolate for the top. This isn’t arbitrary; it serves a functional purpose. The intense cocoa solids in the dark chocolate provide necessary structural integrity, ensuring a solid base that doesn’t melt instantly when touched. The white chocolate, which is technically cocoa butter solids rather than true chocolate, provides the perfect pale backdrop to highlight the vibrant red and white candy cane pieces.
Ensuring that the dark chocolate layer is completely set before the white chocolate is poured on is critical. This separation prevents the chocolates from mingling into a muddy, grey layer, which would compromise both the aesthetic appeal and the crisp texture. Achieving that distinct line is the key to professional-looking, homemade Peppermint Bark.
The Role of Peppermint Extract and Candy Canes
Using peppermint extract in both layers is a technique that amplifies the festive flavor without overpowering the chocolate. By dividing the extract half in the dark chocolate and half in the white chocolate you ensure that every bite offers a cool, minty flavor, even if the piece is mostly dark chocolate. This careful balancing act is essential, as too much extract can thin the chocolate or make the bark taste medicinal. The addition of the crushed candy canes provides the final burst of pure mint flavor and the satisfying crunch that the dessert is named for. The texture of the crushed canes is far superior to using crushed peppermint candies, as the cane bits tend to be lighter and more fragile.
Achieving the Perfect Snap and Storage Tips
The hallmark of well-made bark is the “snap” the clean, crisp sound and feel when you break a piece. This is achieved through proper cooling and the quality of the chocolate used. Using high-quality melting wafers or chips designed for melting helps stabilize the chocolate’s structure during the setting process. Furthermore, the final, long chill (at least 1 hour) in the refrigerator is essential for maximizing this rigidity. When the bark is completely firm, it breaks into elegant, sharp shards, instead of just bending or crumbling.
Once broken, Peppermint Bark is incredibly stable, making it a fantastic treat for gifting or storing. It holds its shape well at room temperature, provided your home isn’t excessively warm, and maintains its fresh flavor for up to two weeks when stored in an airtight container. This longevity means you can prepare large batches well in advance of the holidays, easing your December workload significantly. This recipe is just as reliable and easy as making Hot Chocolate Fudge, offering another quick dessert option when time is short.
Essential Ingredients for the Best Peppermint Bark
The simplicity of Peppermint Bark means that the quality of your few ingredients is paramount. Skimping on the chocolate or using low-grade extract will noticeably affect the flavor and texture of the final product. Below is a detailed look at the ingredients and the necessary tools to ensure your homemade bark is a runaway success.
Detailed Ingredient List for Peppermint Bark
- 16 oz white chocolate (high-quality melting wafers or chips recommended): The white chocolate forms the visually stunning, creamy top layer. Quantity is key here, as this layer must completely cover the dark base. We strongly recommend using high-quality melting wafers (like Ghirardelli or Guittard) or specialized coating chocolate, as standard white chocolate chips can sometimes seize or melt unevenly due to stabilizers. If using chips, ensure they are fresh.
- 8 oz semi-sweet or dark chocolate chips: This provides the rich, deep flavor base. The ratio here (2 parts white to 1 part dark) is designed for visual appeal and textural balance. Dark chocolate (60% or higher cocoa content) adds complexity and cuts the sweetness of the white layer beautifully.
- 1 teaspoon peppermint extract (divided): This small amount provides maximum flavor impact. It is crucial to use extract and not oil. Peppermint oil is highly concentrated and can cause the chocolate to seize or become overwhelmingly strong. We divide this half for the dark layer, half for the white layer to ensure uniform mint flavor across the entire bark.
- Approximately 1 cup candy canes, crushed: This is the crowning jewel of the Peppermint Bark. Ensure you use genuine candy canes, as their porous texture crushes easily and their flavor is pure peppermint. Crushing them yields better visual contrast than store-bought crushed candies, which are often too fine.
- 1 tablespoon shortening (optional, for thinning the white chocolate): This is a key secret weapon, especially if you are using standard white chocolate chips that tend to be thick when melted. Shortening (like Crisco) is 100% fat and helps lower the viscosity of the melted chocolate, making it much easier to spread into a thin, even layer without disturbing the dark chocolate underneath. Use only if needed.
Selecting the Best Chocolate for Peppermint Bark
The chocolate is the main character in this recipe, so quality matters immensely. Avoid “chocolate-flavored” or “baking chips” that list hydrogenated oils as their primary ingredient. These are candy coatings, not true chocolate, and they lack the deep flavor required for excellent Peppermint Bark. Look for high cocoa content (for the dark layer) and products labeled specifically for melting or tempering. The slight investment in better chocolate will elevate your bark from good to truly gourmet.
Necessary Tools and Utensils for Success
While this recipe is simple, having the right equipment ensures smooth execution and cleanup.
- 9×13 Inch Baking Sheet or Cookie Sheet: The size matters! This dimensions allow for a perfectly thin, snappy layer of bark. If you use a smaller sheet, the bark will be too thick and chewy; if you use a larger one, it might be too fragile.
- Parchment Paper or Wax Paper: Absolutely essential. This prevents the melted chocolate from sticking and, more importantly, provides “handles” to easily lift the fully set bark out of the pan.
- Microwave-Safe Bowls or Double Boiler Setup: You will need two separate vessels for melting the dark and white chocolates to prevent cross-contamination or seizing. A double boiler (a heatproof bowl placed over a pot of simmering water) offers the most gentle control, but the microwave method is faster and easier if done carefully.
- Rubber Spatulas or Silicone Spoons: Perfect for scraping the bowls clean and, critically, for spreading the chocolate layers thinly and evenly without damaging the parchment paper.
- Zip-Top Bag and Rolling Pin/Heavy Pot: The best tool for crushing the candy canes. The bag keeps the sugary mess contained, and the heavy object ensures the pieces are broken into ideal, manageable chunks.
- Sharp, Heavy Knife or Pizza Cutter: For breaking or cutting the final, chilled Peppermint Bark. A heavy chef’s knife works best for the clean cut look, while simply breaking it by hand gives that traditional, rustic bark appearance.
For more baking inspiration and visual guides on achieving perfectly melted chocolate, be sure to follow my Pinterest board: Cocinafacilita Blog on Pinterest.
Step-by-Step Guide to Layered Perfection: Crafting Your Peppermint Bark
Creating beautiful, layered Peppermint Bark requires precision in timing and temperature. Follow these detailed instructions closely to ensure distinct layers and a professional finish.
1. Preparation: The Foundation of Success
The success of this recipe hinges on swift execution once the chocolate is melted. Preparing your workspace beforehand is non-negotiable.
Line a 9×13 inch baking sheet or a standard cookie sheet with parchment paper or wax paper. Crucially, ensure the paper hangs over the sides slightly to create handles. This makes removing the large, rigid slab of bark effortless. Set the prepared pan aside.
Next, tackle the topping. Crush the candy canes. Place approximately 1 cup of whole candy canes inside a sturdy zip-top bag. Use a rolling pin, a meat tenderizer, or the bottom of a heavy pot to break them into small, varied pieces. You don’t want powder, but small, sharp pieces. Set the crushed peppermint aside in a small bowl; you will need to apply it quickly once the white chocolate is spread.
2. Melting the Dark Chocolate Layer (The Base)
In a microwave-safe bowl, place the 8 oz of semi-sweet or dark chocolate chips. We recommend melting gently to prevent burning or seizing.
Microwave in 30-second intervals, stirring vigorously after each interval. Continue this process until the chocolate is smooth and fully melted. It should flow easily but still hold its structure. Alternatively, you can use a double boiler over simmering (not boiling) water for the gentlest melt.
Once melted, stir in 1/2 teaspoon of the peppermint extract into the dark chocolate. Mix thoroughly until the extract is fully incorporated.
Pour the melted dark chocolate onto the prepared baking sheet. Use a spatula or the back of a spoon to spread the chocolate evenly into a thin layer, approximately 1/8 to 1/4 inch thick. Work quickly to spread it before it begins to set.
3. Setting the Dark Chocolate (A Critical Step)
Place the baking sheet containing the dark chocolate layer in the refrigerator for about 15 to 20 minutes, or until the chocolate is completely set and firm to the touch. This layer MUST be firm before you add the white chocolate. If the dark chocolate is still soft, the warmth of the white chocolate will melt it, causing the layers to mix and dulling the colors.
4. Melting the White Chocolate Layer (The Canvas)
While the dark chocolate is chilling, prepare the white chocolate layer. In a separate microwave-safe bowl, melt the 16 oz of white chocolate wafers or chips. White chocolate burns more easily than dark chocolate, so be extra cautious.
Use the same technique: 30-second intervals, stirring well between each one. If the white chocolate seems stiff or too thick (a common issue with chips), stir in the optional tablespoon of shortening to create a smoother, more spreadable consistency. This is crucial for a thin, even layer.
Stir in the remaining 1/2 teaspoon of peppermint extract into the melted white chocolate. Mix well.
5. Combining the Layers and Adding Topping
Remove the dark chocolate from the refrigerator once it is completely firm. Pour the warm, melted white chocolate directly over the set dark chocolate layer.
Quickly and gently spread the white chocolate layer evenly over the dark chocolate. Use a broad, offset spatula if possible. Work from the center outward, minimizing movements. Remember to work swiftly as the heat of the white chocolate may slightly soften the bottom layer.
Immediately sprinkle the crushed candy canes evenly over the entire surface of the warm white chocolate. Generosity counts here! Gently press them down with the back of a spoon or your hand to ensure they adhere firmly to the still-soft chocolate. You want maximum topping adherence before the chocolate sets. This process, much like achieving the perfect coating on treats like Cream Cheese Mints, relies on quick action.
6. Final Setting and the Perfect Snap
Return the baking sheet to the refrigerator and chill for at least 1 hour, or until both layers are completely hard and firm. Do not rush this step; the long chill is necessary for the Peppermint Bark to achieve its signature snap.
7. Breaking the Bark
Once fully set, remove the bark from the refrigerator. Lift the entire slab out of the pan using the parchment paper handles. Peel off the parchment paper and discard it.
Place the bark on a cutting board. You have two options for portioning:
- Rustic Bark: Simply break the slab into irregular pieces by hand. This gives the most traditional “bark” look.
- Clean Cuts: Use a sharp, heavy knife to cut the bark into uniform squares or rectangles. For the cleanest cuts, heat your knife slightly under hot water, dry it quickly, and slice down firmly.
Store the Peppermint Bark in an airtight container at cool room temperature or in the refrigerator for up to 2 weeks. Keep layers of bark separated by wax paper if stacking.
Troubleshooting and Creative Peppermint Bark Variations
While this recipe is straightforward, working with chocolate sometimes presents challenges. Knowing how to troubleshoot common issues and having a repertoire of variations ensures you can adapt this holiday staple to any need or preference.
Common Peppermint Bark Mistakes and How to Fix Them
The Layers Mixed Together!
This is usually due to pouring the white chocolate over a dark layer that wasn’t fully set. Solution: Ensure the dark layer is completely firm and cold (15-20 minutes minimum in the fridge). Additionally, make sure the white chocolate isn’t excessively hot; it should be warm enough to spread easily, but not so hot that it acts like a heat source, melting the bottom layer.
The Chocolate Is Seized (Thick and Grainy)
Seizing occurs when a tiny bit of water or steam interacts with melting chocolate, causing the cocoa solids to clump instantly. Solution: Always melt chocolate in a bone-dry bowl, and if using the double boiler, ensure the water never touches the bottom of the bowl. If it seizes slightly, sometimes stirring in a tablespoon of neutral oil or shortening (as recommended in the optional ingredient list) can save it, but this is a temporary fix. Prevention is key!
The Bark Is Chewy, Not Snappy
This is often the result of using low-quality chocolate (candy melts or chips heavy in stabilizers that don’t temper well) or not chilling the bark long enough. Solution: Use high-quality melting chocolate/wafers. Ensure the bark chills for a full hour minimum. Store leftovers in a cool environment; heat will make it softer.
Ingredient Alternatives and Dietary Variations
Vegan Peppermint Bark
This is easily achievable. Swap the dairy-based dark and white chocolates for vegan alternatives. Many high-quality dark chocolates (70% cocoa or more) are naturally dairy-free. For the white chocolate, seek out vegan white chocolate chips or wafers, which are typically made using rice milk powder or oat milk powder instead of cow’s milk solids. The peppermint extract and candy canes are usually vegan, but always check the label for gelatin or cochineal (red dye).
Gluten-Free Peppermint Bark
Since the base recipe uses only chocolate, extract, and candy canes, it is naturally gluten-free. Just ensure that the brand of candy canes used has no “may contain” cross-contamination warning if dealing with severe intolerance.
Changing the Topping and Layers
While classic Peppermint Bark is traditional, feel free to experiment:
- Triple Chocolate Bark: Use milk chocolate for the bottom layer, dark chocolate for the middle, and white chocolate on top.
- Spicy Mint Bark: Add a tiny pinch of cayenne pepper to the dark chocolate layer for a subtle heat that complements the mint.
- Nutty Crunch: Sprinkle chopped toasted pecans or almonds along with the candy canes for added crunch and richness.
- Extra Fancy Topping: Drizzle a final layer of melted dark chocolate over the white layer before sprinkling the candy canes, creating an elegant marbled look.
These variations prove that while the classic recipe is timeless, a little creativity can tailor the Peppermint Bark experience to any taste.
Health Snapshot: Understanding the Components of Peppermint Bark
While Peppermint Bark is undeniably an indulgent holiday treat, understanding its components allows for mindful enjoyment. This section provides a general nutritional overview based on typical commercial ingredients, focusing on the potential benefits derived from the primary ingredients.
Nutritional Values and Caloric Estimates
Since bark pieces vary greatly in size and chocolate composition, the following estimates are based on a typical 1-ounce (28g) serving of classic two-layer Peppermint Bark, equivalent to approximately two small, irregular shards.
| Nutrient | Estimated Value (per 1 oz serving) |
|---|---|
| Calories | 140 – 170 kcal |
| Total Fat | 8g – 11g |
| Saturated Fat | 5g – 7g |
| Carbohydrates | 15g – 18g |
| Sugars | 12g – 15g |
| Protein | 1g – 2g |
Note on Sugar Content: The high sugar content is derived primarily from the white chocolate layer (which contains milk solids and sugar) and the crushed candy canes, which are almost pure sugar. This is a treat best enjoyed in moderation!
The Benefits of Dark Chocolate
The dark chocolate layer provides more than just a rich flavor; it offers several health components that distinguish it from the white chocolate layer:
Antioxidant Power: High-quality dark chocolate (especially those with 70% cocoa or more) is packed with antioxidants, including flavanols, which are plant-based compounds that help protect cells from damage caused by free radicals. These compounds may contribute to cardiovascular health when consumed in moderate quantities.
Mineral Content: Dark chocolate is a decent source of essential minerals such as iron, magnesium, copper, and manganese. Magnesium, in particular, is vital for muscle and nerve function.
Mood Enhancement: Dark chocolate contains compounds like theobromine and phenylethylamine, which can mildly enhance mood and provide a sense of well-being. It truly is a holiday comfort food!
The Refreshing Aspect of Peppermint
Peppermint, derived from the mint extract and candy canes, brings its own set of notable characteristics:
Digestive Comfort: Peppermint has long been used traditionally to aid digestion. The menthol in peppermint can relax the muscles of the digestive tract, which is particularly useful during heavy holiday meals.
Aromatherapy Benefits: The potent aroma of peppermint is stimulating and refreshing. It is known to help improve concentration and alleviate symptoms of stress or fatigue. Simply smelling your fresh batch of Peppermint Bark can give a slight mental boost.
When indulging in your homemade Peppermint Bark, remember that it is a seasonal delight. By utilizing high-quality dark chocolate, you ensure that even your holiday indulgence offers a small dose of beneficial antioxidants alongside that delightful minty crunch.
FAQs about Peppermint Bark
To help you perfect and enjoy your holiday treat, here are some of the most frequently asked questions regarding the storage, preparation, and ingredients of homemade Peppermint Bark.
How should I store Peppermint Bark so it stays crunchy?
The best way to store Peppermint Bark is in an airtight container at cool room temperature (below 70°F) or in the refrigerator. If storing in the fridge, ensure it is completely sealed to prevent moisture absorption, which can cause the bark to soften and lose its signature snap. Layering pieces with wax paper helps prevent sticking.
Can I use vegetable oil instead of shortening to thin the white chocolate?
While you can use vegetable oil, shortening (like Crisco) is generally preferred because it is 100% solid fat at room temperature, which helps the bark re-solidify more cleanly and maintains the structure better than liquid oil. If you must use oil, choose a flavorless variety like canola or grapeseed oil, but use slightly less than the amount of shortening recommended.
How do I prevent the dark and white chocolate layers from mixing?
The crucial step is ensuring the dark chocolate layer is completely firm and cold before the white chocolate is poured on. Chill the dark layer for a full 15–20 minutes. Also, spread the warm white chocolate gently and quickly, minimizing agitation to the underlying layer. Use a spatula to guide the white chocolate rather than scraping or pushing heavily.
What is “blooming” in chocolate, and how can I avoid it in my Peppermint Bark?
Chocolate bloom is the white or grey film that appears on the surface, usually caused by temperature fluctuations that pull the cocoa fat or sugar to the surface. To avoid this in your Peppermint Bark, melt the chocolate gently, never overheating it, and store the finished product in a stable, cool environment. Avoid moving the bark repeatedly between cold refrigeration and warm room temperature.
How far in advance can I make homemade Peppermint Bark?
Homemade Peppermint Bark has an excellent shelf life. When stored properly in an airtight container, it can last for up to 2 weeks at room temperature, or even longer (3–4 weeks) if kept refrigerated. This makes it a perfect dessert to prepare early in the holiday season for gifting or serving later.
Can I use peppermint candies instead of candy canes for the topping?
Yes, you can use peppermint candies, but candy canes are often preferred for Peppermint Bark because they are lighter and fracture into sharper, more visually appealing shards. Peppermint candies tend to crush into a finer, dustier powder, which adheres less dramatically to the chocolate surface. Regardless of your choice, ensure they are coarsely crushed.
Final Thoughts on Your Decadent Peppermint Bark Creation
You have successfully mastered the art of homemade Peppermint Bark a confection that embodies the very essence of holiday cheer. We started with the simple goal of combining high-quality chocolate and refreshing mint, and through careful layering and chilling, we created a truly gourmet treat. The payoff is substantial: crisp, beautiful layers, a perfect balance of dark and white chocolate flavors, and that unmistakable, invigorating crunch of peppermint.
This recipe proves that the most impressive holiday treats don’t have to be the most complicated. The straightforward nature of melting and chilling makes this bark accessible to everyone, regardless of their culinary experience. It is a recipe built on quality ingredients and precise timing, ensuring that gorgeous, professional finish every time. Whether you choose the rustic, hand-broken look or the clean, sharp cuts of a knife, your Peppermint Bark is ready to impress.
As you package up your generous batch whether for gifting, sharing at a party, or simply enjoying during a quiet winter evening take pride in the festive tradition you’ve created in your own kitchen. There is something truly special about the process and presentation of this classic treat. We encourage you to share your finished Peppermint Bark creations with friends and family, and perhaps even pass along the recipe for this easy holiday magic.
If you loved the ease and result of this recipe, be sure to explore our other festive, easy-to-make desserts and appetizers. Don’t forget to leave a comment below telling us how your layers turned out, or what creative variations you tried! Happy holidays, and happy snacking!

Classic Two-Layer Peppermint Bark
Ingredients
Equipment
Method
- Line a 9x13 inch baking sheet or standard cookie sheet with parchment paper, ensuring the paper hangs over the sides slightly. Crush the candy canes by placing them in a zip-top bag and using a rolling pin. Set aside.
- In a microwave-safe bowl, melt the semi-sweet or dark chocolate chips. Microwave in 30-second intervals, stirring well after each interval, until the chocolate is smooth and fully melted. Alternatively, use a double boiler.
- Stir 1/2 teaspoon of the peppermint extract into the melted dark chocolate.
- Pour the melted dark chocolate onto the prepared baking sheet. Use a spatula to spread the chocolate evenly into a thin layer (approximately 1/8 to 1/4 inch thick).
- Place the baking sheet in the refrigerator for 15 to 20 minutes, or until the chocolate is completely set and firm to the touch.
- While the dark chocolate is chilling, melt the white chocolate wafers or chips in a separate microwave-safe bowl using the same 30-second interval technique. If the white chocolate seems too thick, stir in the optional tablespoon of shortening to create a smoother consistency.
- Stir in the remaining 1/2 teaspoon of peppermint extract into the melted white chocolate.
- Remove the set dark chocolate from the refrigerator. Pour the warm white chocolate directly over the dark chocolate layer. Quickly and gently spread the white chocolate evenly over the base layer.
- Immediately sprinkle the crushed candy canes evenly over the surface of the warm white chocolate. Gently press them down to ensure they adhere.
- Return the baking sheet to the refrigerator and chill for at least 1 hour, or until both layers are completely hard and firm.
- Once fully set, lift the entire slab out of the pan using the parchment paper handles. Peel off the parchment paper and break the bark into irregular pieces by hand, or use a sharp, heavy knife to cut it into squares.