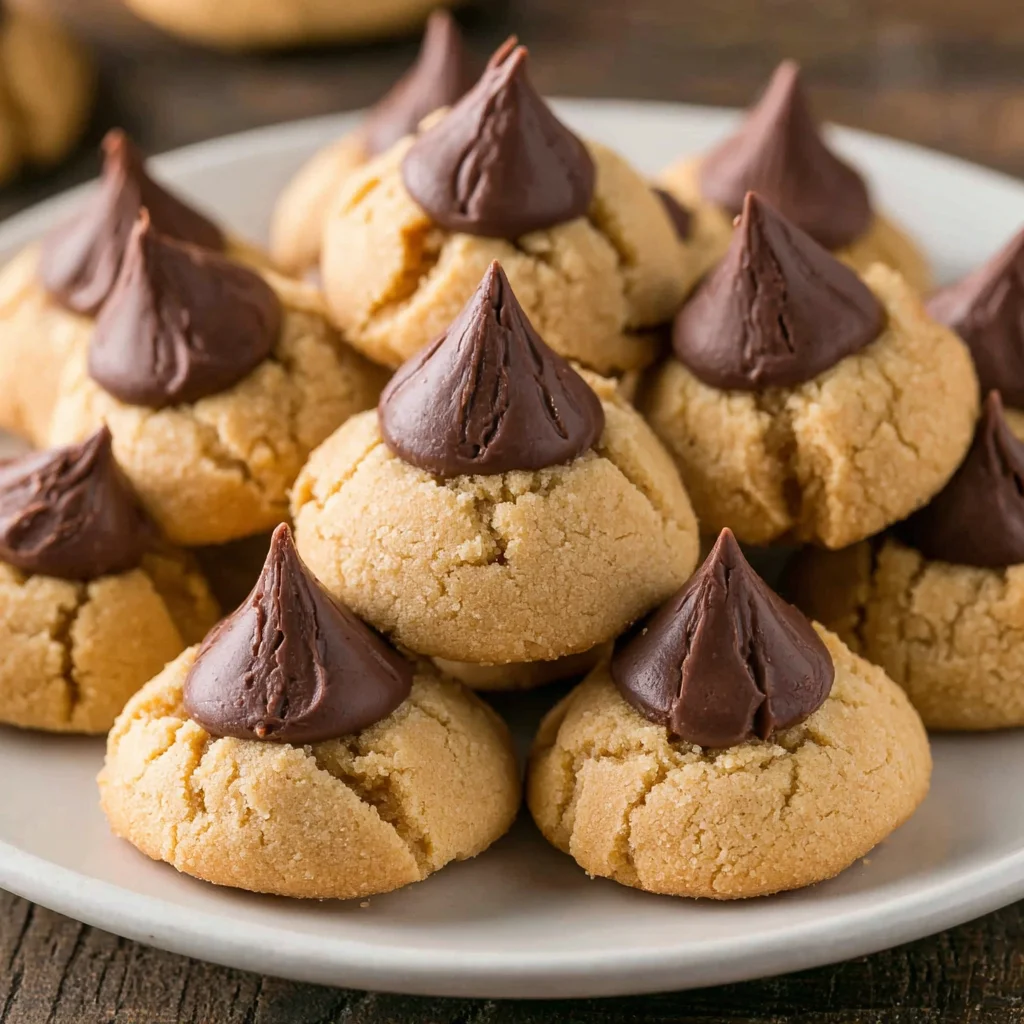
There are few cookies that evoke the warmth and nostalgia of the holidays quite like the Peanut Butter Blossom. That iconic combination of soft, chewy, slightly salty peanut butter dough, rolled in crunchy sugar, and crowned with a melting milk chocolate kiss is a timeless masterpiece. This isn’t just another cookie recipe; this is the definitive guide to creating Perfect Peanut Butter Blossoms the kind that are soft in the center, perfectly puffed, and stay moist for days.
For decades, this cookie has reigned supreme on holiday platters, bake sale tables, and family gatherings. But achieving true perfection requires precision. We’ve meticulously tested and optimized every step, from the exact creaming time to the temperature sensitivity of the Hershey’s Kiss, ensuring that your final result is nothing short of spectacular. If you are looking for that classic, unbeatable flavor and texture, look no further. Get ready to bake a batch of treats that will disappear as quickly as they emerge from the oven. These are genuinely the Perfect Peanut Butter Blossoms you’ve been searching for, and we’re going to walk you through every glorious detail.
The secret to these classic cookies lies in the balance. We use a precise ratio of both granulated and brown sugar to ensure the cookies spread just enough but remain incredibly tender, while the added baking soda provides that essential slight lift and crumbly texture. Follow this guide, and you’ll be armed with the knowledge and technique to make professional-quality peanut butter kiss cookies every single time. Let’s dive into what makes this particular recipe so irresistible.
Why You’ll Love These Perfect Peanut Butter Blossoms
The world is filled with peanut butter cookie recipes, but the Blossom stands apart, primarily due to its signature dramatic flair: the milk chocolate kiss pressed into the center. This specific preparation method ensures a delightful contrast that is unmatched in the cookie world. You will absolutely adore this recipe for several compelling reasons, centered around flavor, texture, and pure baking satisfaction.
Unbeatable Texture Contrast
The primary reason these cookies are so beloved is the textural interplay. When baked correctly as described in this guide the cookie base is remarkably soft, thick, and chewy. The slight tang of the peanut butter is beautifully countered by the crunchy, crystallized sugar coating that forms during the bake. But the magic truly happens when that warm, chewy base meets the cool, firm chocolate of the Hershey’s Kiss. When you bite into it, the soft cookie melts against the slightly warmed, creamy chocolate, creating a rich, luxurious mouthfeel. This dynamic contrast is key to achieving truly Perfect Peanut Butter Blossoms.
A Symphony of Sweet and Salty
Peanut butter cookies demand a perfect balance of flavors. Too sweet, and they lose their depth. Not salty enough, and the peanut butter flavor dulls. This recipe incorporates just the right amount of salt to enhance the natural nuttiness of the peanut butter, which in turn cuts through the sweetness provided by the two types of sugar and the milk chocolate. This complex flavor profile elevates the Peanut Butter Blossom far beyond a simple sugar cookie, making it an incredibly addictive treat that caters to all palates.
The Joy of Simple Ingredients
You don’t need exotic ingredients or complicated pastry skills to master these cookies. Everything required for Perfect Peanut Butter Blossoms is likely already in your pantry: flour, sugar, eggs, butter, and, of course, a fresh jar of creamy peanut butter. This accessibility makes the recipe a fantastic choice for last-minute baking sessions or when you have the kids home looking for a fun kitchen project. The ease of gathering ingredients translates directly into less stress and more enjoyment while baking.
A True Holiday Classic (and Year-Round Favorite)
While often associated with Christmas cookie exchanges, the Peanut Butter Blossom is a welcome addition to any dessert table, regardless of the season. They travel well, stack beautifully, and retain their freshness when stored properly. Their iconic look makes them instantly recognizable and universally loved. Whether you are prepping for a birthday party, a casual weekend snack, or assembling a huge holiday platter (perhaps alongside some classic Christmas Thumbprint Cookies), these Perfect Peanut Butter Blossoms are guaranteed to be the first to disappear. Their reputation as a crowd-pleaser is well-earned.
Why You Should Try This Exact Perfect Peanut Butter Blossoms Recipe
If you have struggled with peanut butter blossoms that spread too thin, turn out too crumbly, or have dry edges, this specific formulation is your solution. We’ve fine-tuned the ratio of fats to dry ingredients to ensure optimal structure and moisture retention. This recipe yields a thick, substantial cookie that proudly supports the weight of the chocolate kiss without collapsing or becoming brittle.
The Importance of Dual Sugars
Many cookie recipes call for one type of sugar, but our recipe requires both granulated white sugar and packed light brown sugar. Why? Granulated sugar provides crispness and aids in spreading, giving the cookie that classic sugary crunch on the outside. Light brown sugar, however, contains molasses, which is slightly acidic and, crucially, adds moisture. This molasses content is essential for a soft, chewy interior. By using both, we achieve the holy grail of cookie texture: slightly crisp edges and an incredibly soft, moist center. This is the foundation of baking Perfect Peanut Butter Blossoms.
The Unrivaled Quality of Creaming
We emphasize creaming the butter, peanut butter, and sugars together for a full two to three minutes. This step, Step 2 in the instructions, isn’t just about combining ingredients; it’s about incorporating air. When fat and sugar are beaten together, the sharp sugar crystals cut into the butter, creating tiny air pockets. These air pockets are vital for lift and tenderness during baking. Skipping or rushing this step results in denser, flatter cookies. For a true blossom that puffs up perfectly, proper aeration is non-negotiable.
Temperature Control and Timing
The difference between a good peanut butter blossom and a truly Perfect Peanut Butter Blossoms often comes down to timing. We provide a very specific instruction: press the Kisses immediately upon removal from the oven. If you wait even 60 seconds, the surface of the cookie will have set enough to resist the kiss, causing it to crack or crumble when pressed. Pressing immediately ensures the chocolate melts just enough at the base to adhere perfectly and create that beautiful, signature “blossom” shape without the entire kiss melting into a puddle. Furthermore, cooling the cookies directly on the sheet for 5 minutes allows the internal heat to complete the cooking process while the cookies firm up enough for stable transfer.
Simplified Preparation and Rolling
Some peanut butter cookie recipes require chilling the dough, which adds significant prep time. Our formula is designed to be rolled immediately after mixing, provided your ingredients were at the correct temperature (softened butter, not melted!). Rolling them thoroughly in the reserved granulated sugar adds a beautiful textural element and prevents the dough from sticking to your hands, making the process smoother and faster. If you enjoy quick, easy baking like whipping up some 3-Ingredient Peanut Butter Balls, you’ll appreciate the efficiency of this dough.
Ingredients and Essential Tools for Perfect Peanut Butter Blossoms
The simplicity of the ingredients list for these Perfect Peanut Butter Blossoms belies the depth of flavor they deliver. Success starts with accurate measurements and understanding the role each component plays.
Detailed Ingredients List
For the Cookies:
- 1/2 cup (1 stick) unsalted butter, softened: Butter must be truly softened not melted, but pliable to cream correctly. Using unsalted allows you to control the exact salt content.
- 1/2 cup creamy peanut butter: We strongly recommend using conventional processed creamy peanut butter (like Jif or Skippy) for this specific recipe. Natural peanut butter (the kind that separates) has inconsistent oil ratios and can cause the cookies to spread excessively or be too crumbly.
- 1/2 cup granulated white sugar: Provides structure, sweetness, and aids in the caramelization of the edges.
- 1/2 cup packed light brown sugar: Crucial for adding chewiness, moisture, and a subtle molasses flavor.
- 1 large egg: Acts as a binder, adding structure and richness. Ensure the egg is at room temperature for better emulsion with the creamed mixture.
- 1 teaspoon vanilla extract: An essential flavor enhancer that complements the peanut butter. Use pure vanilla for the best results.
- 1 3/4 cups all-purpose flour: The main dry binder. Accurate measurement is critical spoon the flour into the measuring cup and level it off; never scoop directly from the bag.
- 1 teaspoon baking soda: The primary leavening agent that causes the cookie to rise and spread slightly, contributing to the soft, cakey texture.
- 1/2 teaspoon salt: Balances the extreme sweetness and enhances the natural flavor of the peanuts.
For Coating and Topping:
- 1/4 cup granulated white sugar (for rolling the dough): This exterior coating crystallizes during baking, providing that beautiful sparkle and crisp contrast.
- 48 Hershey’s Kisses milk chocolates, unwrapped: The star topping. Make sure they are unwrapped and ready to go before the cookies come out of the oven.
Note on Ingredient Preparation: Bringing the butter and egg to room temperature (about 30 minutes before starting) is one of the most effective ways to ensure your ingredients blend into a smooth, emulsified dough, which is the secret to non-cracking, Perfect Peanut Butter Blossoms.
Recommended Tools and Utensils
Having the right equipment streamlines the process and contributes to consistent results, especially when baking delicate cookies.
Essential Baking Tools:
- Electric Mixer (Stand or Handheld): Absolutely necessary for thoroughly creaming the butter and sugars (Step 2). A stand mixer with a paddle attachment makes this heavy lifting easy.
- Large Mixing Bowl: For the wet ingredients and combining the dough.
- Medium Bowl: For whisking the dry ingredients. Distributing the baking soda evenly is key.
- Measuring Cups and Spoons: Accuracy is paramount in baking.
- Rubber Spatula or Scraper: Essential for scraping down the sides of the bowl during mixing to ensure all ingredients are uniformly incorporated.
- Two Large Baking Sheets: Using two sheets allows you to have the second batch ready while the first is baking, maximizing efficiency.
- Parchment Paper or Silicone Baking Mats: Highly recommended. These prevent sticking, encourage even baking, and make cleanup significantly easier.
- 1-inch Cookie Scoop (1 tablespoon size): Using a scoop ensures every cookie is exactly the same size, which guarantees uniform baking time for all your Perfect Peanut Butter Blossoms.
- Wire Cooling Rack: Necessary for the final cool-down, allowing air circulation underneath the cookies to prevent steaming and sogginess.
Investing in quality tools, like proper measuring cups and baking mats, can significantly improve your results and make achieving these delightful Perfect Peanut Butter Blossoms a routine success.
Detailed Step-by-Step Instructions for Perfect Peanut Butter Blossoms
Following these steps precisely will yield thick, chewy cookies with a flawless chocolate kiss topping. Pay close attention to temperature and timing.
Step 1: Prepare the Oven and Equipment
Preheat your oven to 375°F (190°C). Oven temperature accuracy is vital; consider using an oven thermometer if you suspect your oven runs hot or cold. Line two large baking sheets with parchment paper or silicone baking mats. This is essential for easy release and preventing the bottoms from burning.
Critical Prep Tip: Unwrap all 48 Hershey’s Kisses now. Seriously. If you wait until the cookies are out of the oven, they will cool too much, and you will miss the window for pressing the kisses perfectly. Set them aside in a cool location where they won’t accidentally start melting while you bake.
Step 2: Cream the Wet Ingredients
In a large mixing bowl, combine the softened butter, creamy peanut butter, granulated white sugar, and light brown sugar. Using an electric mixer (either stand or handheld), beat them together on medium-high speed. You must cream this mixture until it is noticeably light and fluffy. This typically requires a dedicated 2 to 3 minutes. Stop halfway to scrape down the sides of the bowl to ensure no sugar remains stuck to the bottom, which could lead to grainy pockets in your cookies.
Step 3: Add Egg and Vanilla
Reduce the mixer speed to low. Beat the large room-temperature egg into the creamed mixture until it is just combined meaning the yellow streak has disappeared. Overmixing at this stage can start developing gluten prematurely. Once the egg is incorporated, stir in the vanilla extract. Again, scrape down the sides of the bowl to maintain uniformity.
Step 4: Whisk Dry Ingredients
In a separate medium bowl, combine the all-purpose flour, baking soda, and salt. Use a whisk to mix these ingredients thoroughly for about 30 seconds. This mechanical whisking action is necessary to distribute the baking soda evenly throughout the flour, guaranteeing an even rise across all your peanut butter blossom cookies.
Step 5: Combine Wet and Dry
Gradually add the dry ingredient mixture to the wet mixture, starting with low speed. Mix only until the dough just comes together and no streaks of flour remain. Stop mixing immediately once the flour is incorporated. Overmixing the dough after the flour is added activates the gluten, resulting in tough, dry, and less chewy cookies. The final dough should be soft, pliable, and easy to handle, not sticky or crumbly.
Step 6: Roll the Cookie Dough
Pour the reserved 1/4 cup of granulated white sugar into a shallow bowl. Using a 1-inch cookie scoop (about 1 tablespoon of dough), scoop the cookie dough. Roll each portion quickly between your palms to form a smooth ball. Roll each dough ball thoroughly in the sugar until it is completely coated. This sugar crust is essential for texture and presentation. Place the sugar-coated dough balls onto the prepared baking sheets, ensuring you leave about 2 inches of space between each one to allow for slight spreading.
Step 7: Bake the Cookies
Bake in the preheated 375°F (190°C) oven for 8 to 10 minutes. The cookies are done when the edges look lightly golden brown and the center of the cookie looks set but still slightly soft or puffy. Crucially, they should look slightly underbaked when you pull them out the residual heat will finish the job. If you wait until they look fully golden, they will be overbaked and dry. This precise timing is essential for achieving soft, chewy Perfect Peanut Butter Blossoms.
Step 8: Press the Kisses Immediately
This is the most critical step. As soon as the cookies are removed from the oven (do not wait!), immediately and firmly press one unwrapped Hershey’s Kiss into the center of each hot cookie. You should press down enough that the cookie edges slightly crack and hug the base of the chocolate. The heat from the cookie will immediately start to soften and melt the bottom of the Kiss, ensuring it adheres and forms that beautiful signature blossom shape. If the cookie cracks too much, gently push the edges back together with a spoon.
Step 9: Cool and Serve
Allow the cookies to cool on the baking sheet for 5 minutes. This cooling period is necessary for the structure to firm up before moving them. After 5 minutes, carefully transfer the cookies using a spatula to a wire rack. They must cool completely before storing, which allows the chocolate kiss to set fully. This setting process usually takes about 20 to 30 minutes, depending on the temperature of your kitchen. Store cooled Perfect Peanut Butter Blossoms in an airtight container at room temperature. They are equally delicious dipped into a cup of cozy Hot Chocolate Fudge!
Tips, Variations, and Common Mistake Prevention
While this recipe provides the blueprint for Perfect Peanut Butter Blossoms, a few expert tips can ensure flawless results every single time, along with exciting ways to change things up.
Baking Success Tips
- Invest in a Thermometer: Both a kitchen thermometer (for ingredients) and an oven thermometer (for baking) are cheap tools that drastically improve baking consistency. Ensure your oven is truly 375°F.
- Rotate Baking Sheets: If you are baking two sheets at once, swap their positions halfway through (e.g., move the top sheet to the bottom rack and vice versa). This counteracts oven hotspots and ensures even coloring.
- The Flour Trick: If your dough feels too warm or sticky, put the whole bowl in the refrigerator for 10-15 minutes before rolling. A slightly cooler dough spreads less.
- Don’t Substitute Peanut Butter: As mentioned, natural, oily peanut butter is not recommended. If you must use it, compensate by adding an extra tablespoon of flour to absorb excess oil, though results may vary.
Troubleshooting Common Blossom Issues
- My Cookies Spread Too Thin! This is usually caused by ingredients that were too warm (especially the butter) or by measuring the flour incorrectly (too little flour). Ensure your butter is softened, not melted, and always spoon and level your flour measurement.
- My Kisses Keep Falling Off! You waited too long. The kiss must be pressed while the cookie is still piping hot. If you are baking many batches, consider pulling the cookies 30 seconds earlier than usual to give yourself more time.
- My Cookies Are Crumbly/Dry! The most likely culprit is overbaking (going past 10 minutes) or overmixing the dough once the flour was added.
Delicious Variations for Peanut Butter Kisses
You can easily adapt this base recipe for Perfect Peanut Butter Blossoms using alternative ingredients or flavors:
- Gluten-Free Blossoms: Substitute the all-purpose flour with an equal amount of a high-quality 1:1 gluten-free baking blend (ensure the blend contains xanthan gum). Follow the steps precisely.
- Vegan Option: Replace the butter with a solid plant-based butter stick (not margarine). Replace the large egg with a flax egg (1 tbsp flaxseed meal + 3 tbsp water, rested for 5 minutes). Ensure your sugar is vegan-certified, and use vegan chocolate kisses or chunks.
- Dark Chocolate Twist: Swap out the traditional Milk Chocolate Kisses for Special Dark Kisses or Rolo candies (press Rolo quickly and firmly). For a festive variation, try Peppermint Kisses during the holidays, pairing beautifully with the peanut butter base.
- Double Peanut Butter: Roll the dough balls in chopped, roasted peanuts instead of granulated sugar for an intensely nutty exterior crunch.
For more baking inspiration and seasonal treat ideas, be sure to check out our collection of recipes on our Pinterest page!
Nutritional Values and Benefits of Peanut Butter Cookies
While cookies are undeniably a treat, understanding the components of Perfect Peanut Butter Blossoms reveals some inherent nutritional elements, primarily driven by the star ingredient: peanut butter.
Estimated Nutritional Breakdown (Per Cookie)
Note: These values are estimated based on standard ingredient usage and yield 48 cookies. Serving sizes and brand choices may alter actual totals.
- Calories: Approximately 100–115 kcal
- Total Fat: Approximately 5–6g (Includes healthy monounsaturated and polyunsaturated fats from peanut butter)
- Saturated Fat: Approximately 2.5–3g (Primarily from butter and milk chocolate)
- Carbohydrates: Approximately 12–14g (Primarily from flour and sugars)
- Sugar: Approximately 8–10g
- Protein: Approximately 2–3g
- Fiber: Less than 1g
Ingredient Benefits and Energy
Power of Peanut Butter
The nutritional backbone of the Perfect Peanut Butter Blossoms is, naturally, the peanut butter. Peanuts are a fantastic source of plant-based protein. Each cookie provides a modest protein boost, which helps with satiety and muscle repair. Furthermore, peanut butter is rich in heart-healthy unsaturated fats, specifically monounsaturated and polyunsaturated fatty acids, which are beneficial for cardiovascular health.
Micronutrients
Peanuts also deliver several essential micronutrients, including Vitamin E (an antioxidant), Magnesium, and Phosphorus. While the total volume in one cookie is small, it still contributes to overall dietary intake.
Energy Source
The carbohydrates and fats in these peanut butter blossom cookies make them an excellent source of quick energy. The combination of sugars provides immediate fuel, while the fats slow down digestion, offering sustained energy. This makes them a great afternoon pick-me-up or a post-workout treat (in moderation, of course!).
Moderation is Key
As with all decadent baked goods, these Perfect Peanut Butter Blossoms should be enjoyed as part of a balanced diet. The main goal of this recipe is flavor and comfort, and the tiny nutritional benefits are simply a bonus! Enjoy the richness and texture of these classic peanut butter cookies knowing you baked them to perfection.
FAQs About Perfect Peanut Butter Blossoms
Here are answers to some of the most common questions people ask when baking the classic peanut butter kiss cookie, ensuring your batch of Perfect Peanut Butter Blossoms turns out flawlessly.
Can I use crunchy peanut butter instead of creamy for Perfect Peanut Butter Blossoms?
Yes, you can substitute crunchy peanut butter, but be aware it will change the cookie’s texture. The crunchy pieces will make the dough slightly more crumbly and the final cookie less uniform. For truly Perfect Peanut Butter Blossoms with a smooth, chewy interior, creamy peanut butter is preferred.
How do I prevent my peanut butter blossoms from cracking when I press the kiss?
Cracking happens when the cookie surface has set too much before the kiss is pressed. The trick is to press the kiss immediately upon removing the cookies from the oven while they are still extremely hot and pliable. If minor cracks occur, you can gently push the edges back together with a warm spoon before they cool down.
Do I need to chill the dough before baking these classic peanut butter kiss cookies?
No, chilling is not strictly necessary for this specific recipe, as the fat ratio is balanced to prevent excessive spreading. However, if your kitchen is very warm or if the dough seems sticky after mixing, a quick 15-minute chill in the refrigerator can help firm it up for easier rolling.
How long do Perfect Peanut Butter Blossoms stay fresh, and what is the best way to store them?
These cookies stay soft and fresh for about 5 to 7 days when stored correctly. Once the chocolate kisses have fully set, place the cookies in an airtight container at room temperature. To prevent the chocolate from marking the cookies, you may layer them with parchment paper.
Can I freeze the dough for these Perfect Peanut Butter Blossoms?
Yes, you can freeze the dough. Roll the dough into balls and coat them in sugar as directed. Place the balls on a baking sheet and freeze until solid. Transfer the frozen balls to a zip-top bag and store for up to 3 months. When ready to bake, place the frozen balls on a baking sheet and add 2–3 minutes to the baking time (do not thaw).
Conclusion: Your Path to the Perfect Peanut Butter Blossoms
The journey to baking the Perfect Peanut Butter Blossoms is a rewarding one. This recipe, a cornerstone of American baking, relies on the perfect marriage of simple, high-quality ingredients and adherence to precise timing and technique. We’ve emphasized the importance of creaming the butter and sugar thoroughly, the necessity of both brown and white sugars for optimal texture, and the critical timing required for pressing those chocolate kisses.
You now possess the ultimate guide to achieving cookies that are not just good, but exceptional cookies that are wonderfully soft, perfectly balanced between sweet and salty, and structurally sound enough to proudly carry that iconic chocolate crown. These are the cookies that define childhood memories, holiday gatherings, and the sheer pleasure of homemade treats.
Whether you are adding these beautiful blossoms to your holiday lineup alongside a festive White Chocolate Chip Pumpkin Cookie, or simply looking for a reliable, easy-to-master cookie recipe for a weeknight indulgence, this guide guarantees success. We encourage you to embrace the process, take joy in the kitchen aromas, and savor the moment you bite into your first perfectly baked peanut butter blossom.
We love seeing your kitchen creations! Try this recipe for Perfect Peanut Butter Blossoms, take a picture, and share your results. If you have any questions or secret tips of your own, please drop a comment below. Happy baking!
Perfect Peanut Butter Blossoms (Classic Holiday Cookie Recipe)
Ingredients
Equipment
Method
- Preheat your oven to 375°F (190°C). Line two large baking sheets with parchment paper or silicone baking mats. Unwrap all 48 Hershey's Kisses and set them aside in a cool location.
- In a large mixing bowl, using an electric mixer, cream together the softened butter, creamy peanut butter, 1/2 cup granulated white sugar, and light brown sugar until the mixture is light and fluffy (about 2 to 3 minutes).
- Beat the large egg into the creamed mixture until just combined. Stir in the vanilla extract until fully incorporated. Scrape down the sides of the bowl as needed.
- In a separate medium bowl, whisk together the all-purpose flour, baking soda, and salt. Whisk thoroughly for about 30 seconds to distribute the leavening agents evenly.
- Gradually add the dry ingredient mixture to the wet mixture, mixing on low speed until the dough just comes together. Be careful not to overmix the dough. The resulting dough should be soft and easy to handle.
- Place the reserved 1/4 cup of granulated white sugar in a shallow bowl. Scoop the cookie dough and roll it into small balls, approximately 1 inch in diameter (about 1 tablespoon of dough per cookie). Roll each dough ball thoroughly in the sugar until it is completely coated.
- Place the sugar-coated dough balls onto the prepared baking sheets, leaving about 2 inches of space between each cookie. Bake in the preheated oven for 8 to 10 minutes, or until the edges are lightly golden brown and the center of the cookie looks set but still soft.
- As soon as the cookies are removed from the oven, immediately and firmly press one unwrapped Hershey’s Kiss into the center of each hot cookie. The chocolate will soften and melt slightly, forming the signature blossom shape.
- Allow the cookies to cool on the baking sheet for 5 minutes before carefully transferring them to a wire rack to cool completely. The chocolate needs about 20 to 30 minutes to set fully before handling or storing. Store cooled cookies in an airtight container at room temperature.