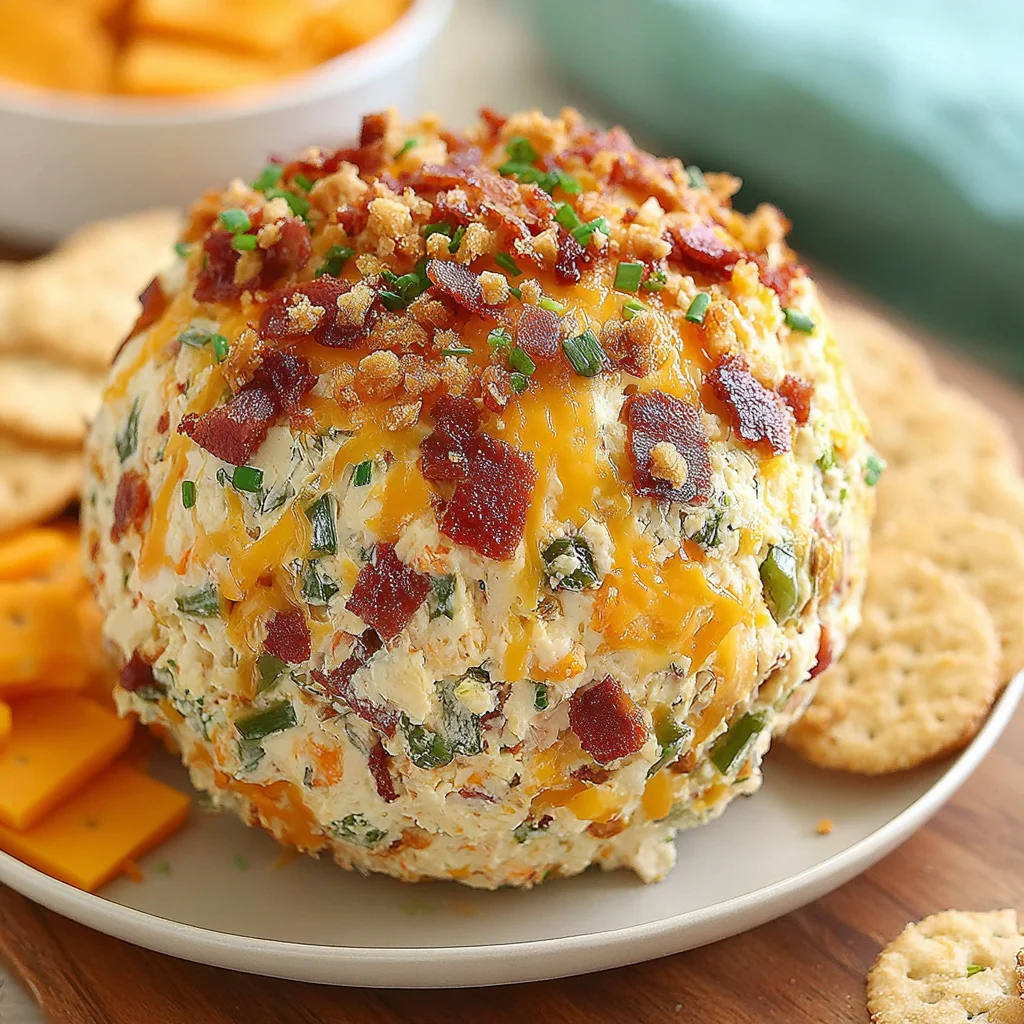
If there is one appetizer that defines comfort food meets party superstar, it is the classic cheese ball. But let’s face it: the traditional cheese ball can sometimes feel a bit… dated. We are here to revolutionize your appetizer game by merging that creamy, satisfying spread with the irresistible heat and crunch of everyone’s favorite bar snack: the jalapeño popper. Say hello to the show-stopping, flavor-packed, undeniably addictive Jalapeno Popper Cheese Ball.
This recipe isn’t just a simple mix-and-roll; it’s a meticulously designed appetizer engineered for maximum flavor impact and structural integrity. We’re talking about a perfectly smooth, rich cream cheese interior loaded with crispy bacon, sharp Monterey Jack, and a fiery burst of fresh jalapeño, all encased in a crunchy, savory crust of Panko and more bacon. Whether you are hosting a Super Bowl party, a holiday gathering, or just need the perfect centerpiece for a casual Friday night, this Jalapeno Popper Cheese Ball delivers every time. Best of all? It’s almost entirely a make-ahead marvel, reducing stress when crunch time arrives. Get ready to elevate your appetizer status and watch this creamy, spicy wonder disappear the moment it hits the serving platter.
Why You Will Love This Jalapeño Popper Cheese Ball Recipe
The culinary world is saturated with appetizers, but few possess the universal appeal and sheer decadence of a perfectly executed cheese ball. When you introduce the beloved flavors of the jalapeño popper creaminess, spice, and bacon into that spherical format, you create something truly iconic. Loving this Jalapeno Popper Cheese Ball isn’t just about enjoying the taste; it’s about appreciating the ingenuity of combining two legendary party foods into one magnificent, spreadable treat.
The Perfect Marriage of Flavor and Texture
What sets this recipe apart from standard spreads or dips is the masterful balance of competing elements. Traditional jalapeño poppers rely on deep-frying for their signature crunch. Since we aren’t deep-frying here, we achieve that satisfying textural contrast through the carefully chosen coating. The Panko breadcrumbs (crispier and flakier than standard breadcrumbs) combine with the reserved, finely crumbled crispy bacon to form a crust that provides delightful resistance before giving way to the velvety interior.
Inside the ball, the base is primarily full-fat cream cheese, guaranteeing richness. However, we enhance this richness by incorporating finely shredded Monterey Jack. This is key because Monterey Jack melts beautifully into the cream cheese when it hits room temperature, adding depth without making the ball oily. Then comes the trio of flavor bombs: the intensely savory and smoky bacon, the sharp, pungent bite of fresh garlic, and, of course, the vibrant, finely minced jalapeños. The heat is present but controlled, thanks to the thorough removal of seeds and membranes, making this a spicy cheese ball that everyone can enjoy without reaching immediately for milk.
Ease and Impressiveness: The Host’s Dream
If you’ve ever hosted a party, you know the value of an appetizer that looks incredibly impressive but requires minimal fuss right before guests arrive. This Jalapeno Popper Cheese Ball is the quintessential make-ahead recipe. The longest step the chilling time is completely passive. You can prepare the entire ball, wrap it, and refrigerate it up to 48 hours in advance. On the day of your event, all you need to do is roll it in the prepared coating and serve. This allows you, the host, to focus on the last-minute tasks or, better yet, relax and enjoy your own party.
Furthermore, cheese balls are inherently social food. They invite interaction and sharing, making them a fantastic conversation starter. Serving this beautifully textured, perfectly spiced creamy cheese ball guarantees compliments and prompts inquiries for the recipe which you can happily share! For those who love easy but bold appetizers, be sure to check out our Cranberry Jalapeño Dip for another sweet and spicy sensation.
Why You Should Try Making This Spicy Cheese Ball Today
If you are still on the fence about whether to dedicate time to mastering this recipe, consider this: the Jalapeno Popper Cheese Ball solves many of the common problems associated with party appetizers. It’s hardy, portable, exceptionally flavorful, and deeply satisfying. This isn’t just an appetizer; it’s a commitment to superior snacking.
A Solution for Every Season and Occasion
While the bold flavors of bacon and spice might make you initially think of game days (and yes, it is the ultimate game day appetizer), the truth is that a well-made cheese ball fits seamlessly into any seasonal rotation. Serve it during the summer months with fresh vegetable crudités for a lighter contrast to the richness. Present it during the holiday season, nestled among festive greenery, as a savory alternative to endless sweet treats. Because it holds its shape so well, it travels brilliantly, making it perfect for potlucks or tailgates.
The Customization Factor
This recipe provides a fantastic foundation, but it is also highly adaptable to your specific heat tolerance and ingredient preferences. Do you prefer smokiness? A tiny dash of smoked paprika mixed into the coating can enhance that depth. Do you need less heat? You can easily substitute the fresh jalapeños with milder diced bell peppers (red or green) for color, while still retaining the savory base flavor. This adaptability ensures that the Jalapeno Popper Cheese Ball can be tailored for absolutely any crowd or dietary necessity, allowing you to confidently serve a truly personalized dish.
Moreover, trying this recipe forces you to focus on an essential, but often neglected, technique: ensuring your cream cheese is completely softened. This might seem minor, but it is the secret weapon for a professional-grade cheese ball. When the cream cheese is truly at room temperature, it whips up light, smooth, and easily incorporates all the other chunky ingredients without resistance, preventing frustrating lumps. This simple technical mastery elevates your entire appetizer game. If you are looking for other creamy, indulgent dishes that rely on smooth texture, you might also enjoy our recipe for Creamy Cajun Chicken Pasta.
Outperforming the Competition
Why choose this over a standard dip? Dips, especially those served warm, require chafing dishes or slow cookers to maintain temperature and texture. This Jalapeno Popper Cheese Ball requires nothing more than a serving platter and a selection of sturdy dipping vessels. It serves as its own container, remaining deliciously spreadable and inviting for hours at room temperature, making it a low-maintenance superstar. It truly is the appetizer MVP.
Ingredients and Necessary Utensils for the Perfect Jalapeño Popper Cheese Ball
Achieving the perfect texture and flavor profile for this Jalapeno Popper Cheese Ball relies heavily on using quality ingredients and ensuring proper preparation, especially regarding temperature. Here is a comprehensive look at what you need and why each element is crucial.
Required Ingredients: Precision Matters
The ingredient list is straightforward, but the preparation of certain components specifically the cream cheese and the jalapeños is where we move from a good cheese ball to a great one.
For the Cream Cheese Base: The Foundation of Creaminess
- 2 (8-ounce) packages full-fat cream cheese: This must be completely softened to room temperature. I cannot stress this enough. If the cream cheese is even slightly cold, you will end up with a lumpy base, and the mixture will resist incorporating the shredded cheese and bacon smoothly. Plan to leave it out for a minimum of one hour, or even two, especially in a cooler kitchen.
- 1 cup finely shredded Monterey Jack cheese: Monterey Jack offers excellent melting properties and a mild, buttery flavor that complements the spice without competing with the cream cheese. Alternatively, using sharp white cheddar provides a tangier, more robust flavor if you prefer less mildness. Ensure it is finely shredded for better integration into the creamy base.
For the Jalapeño Popper Filling: The Flavor Core
- 8 slices thick-cut bacon: Thick-cut bacon yields more substantial crumbles and superior flavor. It must be cooked until very crispy not chewy so that it folds nicely into the cheese mixture and provides a definite textural element. Remember to reserve 2 tablespoons of the finest crumbles specifically for the exterior coating.
- 2 to 3 medium fresh jalapeños: This is the star ingredient. The instruction states stems, seeds, and membranes thoroughly removed. The vast majority of capsaicin (heat) resides in the membranes and seeds. Removing these ensures you get the fresh, vegetal, and fruity flavor of the pepper with a controllable level of heat. Use 2 peppers for a mild-to-medium kick; use 3 for a noticeable, mouth-warming spice. They must be very finely minced so they distribute evenly and don’t create disruptive, large chunks in the spreadable ball.
- 1/4 cup finely sliced green onions: Use the white and light green parts. These add a crucial, fresh, subtle onion flavor that cuts through the richness of the cheese and bacon.
- 1 teaspoon fresh garlic, finely minced: Always opt for fresh garlic over powder for appetizers like this. The fresh garlic provides a robust, sharp flavor that is integral to the popper profile.
- 1/2 teaspoon kosher salt: Kosher salt provides necessary seasoning without being overwhelmingly salty, especially when combined with the inherently salty bacon.
- 1/4 teaspoon freshly ground black pepper: Freshly ground pepper offers a superior aroma and bite compared to pre-ground pepper.
For the Outer Coating/Garnish: The Crunch Factor
- 1/2 cup crispy Panko breadcrumbs: Panko is non-negotiable for the coating. Unlike standard breadcrumbs, Panko is airier and maintains a crisp structure even after refrigeration, providing the necessary crunch that mimics a fried popper shell.
- The reserved 2 tablespoons of finely crumbled crispy bacon: This ensures the coating clearly signals the delicious flavors found inside the Jalapeno Popper Cheese Ball.
- 1/4 cup finely snipped fresh chives or finely diced fresh cilantro (optional, for color): This is primarily for visual appeal. Chives add a delicate onion flavor, while cilantro brings a sharp, herby freshness. Choose based on preference, or omit if you prefer just bacon and Panko.
Recommended Tools and Utensils for Success
While this recipe is simple, having the right equipment ensures the mixing process is quick and efficient, which prevents the cream cheese from getting too warm.
Essential Tools for Preparing the Jalapeño Popper Cheese Ball
- Stand Mixer or Hand Mixer: While a wooden spoon can work, a stand mixer fitted with a paddle attachment (or a quality hand mixer) will achieve that silky-smooth cream cheese base in under two minutes. This prevents overhandling the mixture with your hands, which can make it greasy.
- Large Mixing Bowl: Necessary for combining the base ingredients and the filling without spillage.
- Cutting Board and Sharp Knife: Crucial for the precise mincing of the jalapeños and garlic.
- Rubber Spatula: Ideal for scraping down the sides of the bowl and, most importantly, for gently folding the bacon and jalapeños into the mixture to ensure even distribution without crushing the ingredients.
- Plastic Wrap: Essential for forming the sphere and ensuring an airtight seal during the crucial chilling phase.
- Shallow Dish or Plate: Used specifically for holding and applying the final coating mixture.
Preparation is the key to minimizing time spent actively cooking. Ensure your bacon is cooked, drained, and cooled completely before starting the mixing process. Have all your minced ingredients prepped and measured a practice known as “mise en place” and the assembly of your incredible Jalapeno Popper Cheese Ball will be swift and flawless.
Detailed Instructions: Crafting Your Masterpiece
Following these instructions precisely will guarantee a cheese ball that is not only packed with flavor but also boasts the perfect firm, spreadable consistency and a beautiful, uniform coating.
Step 1: Preparing the Base Mixture and Ingredients
- The Critical Softening Stage: Reiterate the importance of temperature. Ensure the two packages of cream cheese have been sitting at room temperature for at least one hour. If you try to rush this step, you risk lumps and a broken, oily mixture.
- Whip the Cream Cheese: In a large mixing bowl, place the fully softened cream cheese. Using a stand mixer (paddle attachment) or hand mixer, beat the cream cheese on medium-low speed. The goal here is to incorporate air and make it velvety smooth, light, and completely uniform in texture. This should take about 1 to 2 minutes.
- Incorporate the Shredded Cheese: Add the 1 cup of shredded Monterey Jack cheese (or cheddar) to the cream cheese base. Mix thoroughly until the shredded cheese is just combined. Stop mixing immediately once the cheese is incorporated. Overmixing at this stage can start to warm the mixture too much. Remember to scrape down the sides of the bowl to ensure everything is evenly blended.
Step 2: Integrating the Popper Flavors
- Fold in the Bacon: Take the majority of the finely crumbled, crispy bacon. Gently fold it into the cream cheese mixture using a rubber spatula. Crucial Tip: Hold back the designated 2 tablespoons of bacon crumbles for the exterior coating don’t accidentally mix them in!
- Add the Heat and Aromatics: Add the very finely minced jalapeños (remembering that they must be fully deseeded and membrane-free), the minced fresh garlic, and the sliced green onions to the bowl. Safety First: Wash your hands thoroughly immediately after handling fresh jalapeños to avoid transferring capsaicin to your eyes or skin.
- Seasoning: Sprinkle the 1/2 teaspoon of kosher salt and the 1/4 teaspoon of black pepper over the ingredients. Proper seasoning is essential to lift the flavor profile of the cream cheese base.
- Gentle Mixing: Mix all the ingredients together very carefully. Use your rubber spatula to fold the ingredients from the bottom to the top. The objective is to ensure that the jalapeños and bacon are evenly distributed throughout the entire cheese mixture without compressing the mixture or allowing it to warm up excessively. Do not overmix.
Step 3: Forming and Chilling the Cheese Ball
- Prepare for Shaping: Lay out a large piece of plastic wrap on your counter surface. This wrap acts as your shaping tool and protective barrier.
- Form the Sphere: Scoop the entire cheese ball mixture onto the center of the plastic wrap. Using the plastic wrap to help guide the mixture, gently coax and press the cheese mixture into a round, spherical shape. Try to keep the shape as even and smooth as possible for the best final presentation.
- Tight Wrap and Chill: Once shaped, wrap the Jalapeno Popper Cheese Ball tightly in the plastic wrap, pressing out any remaining air bubbles, and seal the wrap completely. Place the tightly wrapped ball onto a small plate or baking sheet (this prevents flattening) and refrigerate for a minimum of 4 hours. Chilling is absolutely crucial. This extended refrigeration time allows all the rich flavors to meld beautifully together, but more importantly, it ensures the ball is firm enough to hold its shape and accept the outer coating without collapsing. For best results and easiest coating application, chill overnight.
Step 4: Preparing the Outer Coating and Finishing the Ball
- Prepare the Coating: About 20 minutes before you plan to serve, prepare the coating mixture. In a shallow dish or plate, combine the 1/2 cup of Panko breadcrumbs, the reserved 2 tablespoons of crispy bacon crumbles, and the optional snipped chives or cilantro. Stir these coating ingredients together until they are evenly mixed.
- Unwrap and Roll: Remove the firm Jalapeno Popper Cheese Ball from the refrigerator and discard the plastic wrap. Gently place the cold, firm cheese ball into the center of the coating mixture.
- Apply the Coating: Roll the cheese ball firmly in the coating. Use the palms of your hands to slightly press the coating onto the surface so that it adheres completely and evenly covers the entire sphere. Ensure there are no bald spots! The coating provides the texture and flavor announcement.
Step 5: Serving and Presentation
- Presentation: Transfer the finished Jalapeno Popper Cheese Ball to your favorite serving platter.
- Temper Before Serving: Allow the cheese ball to sit at room temperature for 15 to 20 minutes before serving. This is vital because a rock-hard, ice-cold cheese ball is difficult to spread. Tempering it slightly softens the exterior layer, making it easy for guests to scoop and ensuring the creamy texture shines through.
- Serve and Store: Serve immediately with sturdy crackers, crostini, bagel chips, pretzels, or sliced fresh vegetables. Leftovers, if any, can be wrapped tightly (preferably in fresh plastic wrap) and stored in the refrigerator for up to 5 days.
Tips, Troubleshooting, and Variations for Your Jalapeño Popper Cheese Ball
While the recipe above provides a blueprint for perfection, every kitchen has its variables. Here are essential tips for troubleshooting common issues and suggestions for creative variations on your favorite spicy cheese ball.
Troubleshooting Common Issues
Common Mistakes to Avoid When Making a Cheese Ball
- The Mixture is Too Soft/Sticky: If your base mixture feels too soft or sticky after mixing (usually due to working it too long or using warm hands), stop immediately. Cover the bowl and refrigerate for 30 minutes before attempting to form the ball. Chilling is the only remedy for an overly soft cream cheese base.
- Lumpy Texture: If your final ball is lumpy, it means the cream cheese was not sufficiently softened before mixing. There is no fix once the shredded cheese and filling are added. Next time, commit to the 60-90 minute room temperature wait!
- Coating Won’t Stick: This happens if the cheese ball has warmed up too much before coating, or if the exterior is damp. Ensure the ball is fully chilled (at least 4 hours). If you find it damp from condensation, lightly blot it with a paper towel immediately before rolling in the coating mixture.
- Too Much Heat: If you accidentally left too much membrane in the jalapeños, or your peppers were naturally extra hot, you can mitigate the heat slightly. Add a tiny splash (1/2 teaspoon) of fresh lime juice or a small pinch of sugar to the cream cheese mixture. Acidity and sugar can help balance overwhelming capsaicin.
Flavor and Ingredient Variations
The beauty of the Jalapeno Popper Cheese Ball is that it lends itself wonderfully to modifications based on seasonal availability or dietary needs.
Creative Flavor Twists
- Smoked Cheese Ball: For an intense smoky depth, replace the Monterey Jack with smoked Gouda or smoked Provolone. This works exceptionally well with the bacon and heightens the savory quality.
- Spice Level Increase: If you crave intense heat, leave some of the jalapeño seeds in, or add a pinch of cayenne pepper directly into the cream cheese mixture. For flavor without overpowering heat, try adding a few dashes of hot sauce (like Cholula or Tabasco) to the mix.
- Different Peppers: If jalapeños are too predictable, try using serrano peppers for significantly more heat, or use roasted, diced Poblano peppers for a smoky, milder, earthy flavor.
- Herbaceous Finish: Instead of chives, try coating the ball in a finely chopped mixture of parsley, thyme, and rosemary. This gives it a sophisticated, holiday-ready flavor profile.
Dietary Alternatives
Making it Accessible
- Vegetarian Cheese Ball: Easily omit the bacon entirely. To compensate for the lost savory flavor and crunch, increase the Panko to 3/4 cup and mix in 2 tablespoons of finely chopped sun-dried tomatoes or toasted, chopped pecans.
- Vegan Option: Vegan cream cheese is readily available today. Use 16 ounces of high-quality vegan cream cheese and swap the Monterey Jack for a finely shredded vegan cheddar alternative. Substitute the bacon with smoked paprika and liquid smoke, or use finely diced and crispy fried shallots for crunch.
- Gluten-Free Coating: Simply replace the Panko breadcrumbs with finely crushed gluten-free crackers, such as Chex or Rice Thins. Ensure the crackers are crushed uniformly to provide an even coating.
Remember, presentation matters just as much as flavor. For more visual ideas on how to plate and serve your appetizers, be sure to visit my Pinterest for inspiration: Find plating tips on Pinterest.
Nutritional Values and Benefits of the Jalapeño Popper Cheese Ball
As a rich appetizer primarily composed of dairy and protein, the Jalapeno Popper Cheese Ball is certainly an indulgent treat. However, understanding the core components can help you appreciate the nutritional contribution it makes to your party spread.
Estimated Nutritional Breakdown (Per serving, assuming 12 servings):
Please note that nutritional values are approximate and highly dependent on specific product brands and serving size. This estimate is based on the ingredients listed, excluding crackers or dipping items.
| Nutrient | Approximate Value (Per 1/12th Serving) |
|---|---|
| Calories | 280 – 320 kcal |
| Total Fat | 25 – 30 g |
| Saturated Fat | 14 – 18 g |
| Cholesterol | 70 – 90 mg |
| Sodium | 400 – 500 mg |
| Total Carbohydrates | 5 – 8 g |
| Fiber | 1 g |
| Protein | 10 – 14 g |
Benefits of Key Ingredients
While this appetizer is a treat, several components offer beneficial elements:
High-Quality Protein and Calcium
The base of the Jalapeno Popper Cheese Ball (cream cheese, Monterey Jack, and bacon) is rich in protein. Protein is essential for muscle maintenance and satiety. The cheeses are also excellent sources of calcium, vital for bone health. Serving this appetizer ensures your guests get a dose of satisfying protein alongside their snacks, which can help regulate blood sugar levels better than simple carbohydrate-based snacks.
The Power of Capsaicin (Jalapeños)
Even though we remove the seeds and membranes, jalapeños still contain residual capsaicin. Capsaicin is the compound responsible for the pepper’s heat and has been linked to potential health benefits, including minor metabolic boosting effects and anti-inflammatory properties. Furthermore, jalapeños are a good source of Vitamin C and Vitamin A, acting as powerful antioxidants.
Aromatics and Freshness
The inclusion of fresh garlic and green onions is not just for flavor. Garlic contains sulfur compounds, which have been widely studied for their potential cardiovascular benefits and immune-boosting properties. Green onions add vital freshness, fiber, and trace vitamins, cutting through the heavy richness of the dairy and bacon. Opting for fresh chives in the coating also boosts the overall antioxidant profile of the finished Jalapeno Popper Cheese Ball.
Moderation is key with any rich appetizer, but serving this Jalapeno Popper Cheese Ball ensures you are delivering a flavorful, protein-rich option that keeps guests satisfied and energized throughout your event.
Frequently Asked Questions (FAQs) About the Jalapeño Popper Cheese Ball
We’ve gathered the most common questions about preparing, storing, and serving this incredibly popular Jalapeno Popper Cheese Ball.
How far in advance can I make a Jalapeño Popper Cheese Ball?
You can prepare the entire cheese ball (Steps 1 through 3) up to 48 hours in advance. Keep it tightly wrapped in plastic wrap and stored in the refrigerator. Wait to apply the crunchy coating (Step 4) until about 20 minutes before you plan to serve it to ensure the coating stays as crisp as possible.
Can I use jarred jalapeños instead of fresh ones?
While fresh jalapeños are highly recommended for their bright, crisp flavor, you can substitute jarred, pickled jalapeños if necessary. Ensure they are thoroughly drained, patted dry with paper towels, and minced. Using pickled peppers will result in a slightly tangier flavor profile for the Jalapeno Popper Cheese Ball.
What is the best way to serve this spicy cheese ball?
The Jalapeno Popper Cheese Ball is best served with sturdy, unsalted dippers that can handle the thick texture. Excellent choices include bagel chips, hearty water crackers, pretzel sticks (for easy dipping), and sliced baguette rounds (crostini). For a low-carb option, serve with carrot sticks, celery, or thick slices of cucumber.
Why does the recipe insist on softening the cream cheese completely?
Softening the cream cheese is essential for two primary reasons. First, it allows the mixer to whip the base into a smooth, lump-free consistency. Second, a soft base ensures the shredded cheese, bacon, and minced jalapeños can be folded in evenly without tearing the mixture or resulting in inconsistent distribution of flavor throughout the Jalapeno Popper Cheese Ball.
Can I bake this cheese ball instead of serving it cold?
This particular recipe is formulated as a cold, spreadable cheese ball, and the long chilling time is structural. If you want a warm dip with similar flavors, you should prepare it as a hot dip in an oven-safe dish rather than baking the ball itself, as it will lose its shape and the coating may not adhere correctly.
Conclusion: The Ultimate Party Appetizer is Ready
The Jalapeno Popper Cheese Ball is more than just a novelty; it is a meticulously balanced appetizer that combines the nostalgia of the classic cheese ball with the undeniable addictive qualities of jalapeño poppers and bacon. We’ve covered everything from the critical importance of room-temperature cream cheese and precise mincing of the peppers to the optimal chilling time necessary to achieve that perfect sphere and superior texture.
By following these detailed steps, you ensure a final product that is creamy on the inside, wonderfully crunchy on the outside, and perfectly spiced a guaranteed crowd-pleaser that will disappear quickly. Its make-ahead capability ensures that you, the host, remain stress-free, proving that the best appetizers are both delicious and convenient.
Ready to impress your guests with the boldest, creamiest, spiciest party snack they’ve ever encountered? Grab your cream cheese and bacon, and start mixing today! If you love easy, no-bake recipes that deliver maximum indulgence, don’t forget to check out our recipe for Oreo Fudge. We invite you to try this ultimate Jalapeno Popper Cheese Ball and share your results in the comments below!

THE COPY-PASTE READY RECIPE FOR THE ULTIMATE JALAPEÑO POPPER CHEESE BALL
Ingredients
Equipment
Method
- Ensure the two packages of cream cheese have been sitting at room temperature for at least one hour. This guarantees a smooth mixture without lumps.
- In a large mixing bowl (or stand mixer), beat the fully softened cream cheese on medium-low speed until it is smooth, light, and completely uniform in texture, about 1 to 2 minutes.
- Add the 1 cup of shredded Monterey Jack cheese to the cream cheese base and mix thoroughly until just combined. Scrape down the sides of the bowl as needed.
- Take the majority of the finely crumbled, crispy bacon (reserving the 2 tablespoons designated for the coating) and gently fold it into the cream cheese mixture.
- Add the very finely minced jalapeños (remembering to wash your hands thoroughly after handling), the minced fresh garlic, the sliced green onions, the kosher salt, and the black pepper to the bowl.
- Mix all the ingredients together very carefully. Use a rubber spatula to fold the ingredients from the bottom to the top, ensuring that the jalapeños and bacon are evenly distributed throughout the entire cheese mixture. Do not overmix.
- Lay out a large piece of plastic wrap on your counter surface and scoop the entire cheese ball mixture onto the center.
- Using the plastic wrap to help guide the mixture, form the cheese mixture into a round, spherical shape. Wrap the cheese ball tightly, pressing out any air bubbles, and seal the wrap completely.
- Place the tightly wrapped cheese ball onto a small plate or baking sheet and refrigerate for a minimum of 4 hours. For best results, chill overnight.
- About 20 minutes before serving, prepare the coating mixture. In a shallow dish or plate, combine the Panko breadcrumbs, the reserved 2 tablespoons of crispy bacon crumbles, and the optional snipped chives. Stir the coating ingredients together until they are evenly mixed.
- Remove the firm cheese ball from the refrigerator and discard the plastic wrap.
- Gently place the cheese ball into the center of the coating mixture. Roll the cheese ball firmly in the coating, using the palms of your hands to lightly press the coating onto the surface so that it adheres completely and evenly covers the entire sphere.
- Transfer the finished Jalapeño Popper Cheese Ball to a serving platter.
- Allow the cheese ball to sit at room temperature for 15 to 20 minutes before serving, as this slightly softens the exterior, making it easier to spread.
- Serve immediately with sturdy crackers, crostini, bagel chips, pretzels, or sliced fresh vegetables.