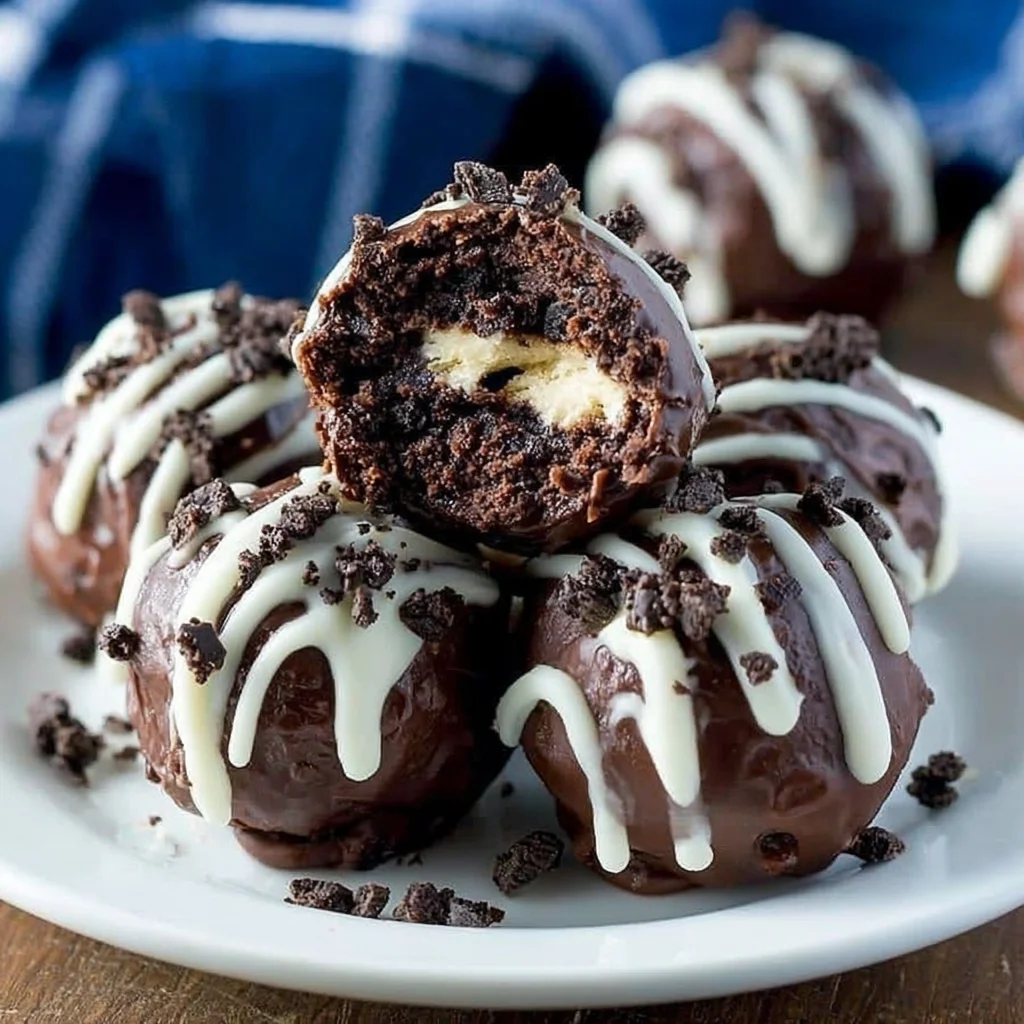
Welcome to the easiest dessert recipe you will ever master! If you are searching for a decadent, homemade treat that requires zero oven time, minimal cleanup, and only three simple ingredients, you’ve found your holy grail. These 3-Ingredient No-Bake Oreo Balls (often called Oreo Truffles) are legendary for a reason. They deliver all the rich, chocolatey flavor of the iconic cookie, combined with the creamy tang of cream cheese, all enveloped in a smooth, crisp chocolate shell.
This recipe is perfect for every occasion: holiday parties, quick after-dinner treats, or just satisfying that intense chocolate craving. Forget complicated baking; this straightforward method guarantees success even for absolute kitchen beginners. Within minutes, you’ll transform three humble items into gourmet-level chocolate delights that will disappear as soon as they hit the serving platter. Get ready to ditch the oven and embrace the magic of the 3-Ingredient No-Bake Oreo Balls.
Why You’ll Fall in Love with These No-Bake Oreo Truffles
The term “3-Ingredient” speaks volumes, but the sheer joy derived from making and eating these treats goes far beyond simplicity. These aren’t just easy; they are consistently delicious, fail-proof, and endlessly customizable, securing their spot as a permanent fixture in your dessert rotation.
Unbeatable Simplicity and Speed
In today’s busy world, time is precious. If you need a gorgeous dessert ready in under an hour (not including chilling time), this recipe is the answer. There is no measuring flour, no precise oven temperature, and zero risk of burning anything. The process involves just crushing, mixing, rolling, and dipping. This speed makes 3-Ingredient No-Bake Oreo Balls the ultimate last-minute recipe for unexpected guests or sudden party invitations.
Texture and Flavor Perfection
The texture profile of these homemade Oreo truffles is truly addictive. Inside, you get a dense, fudgy core that melts in your mouth, thanks to the perfect ratio of crushed Oreos to softened cream cheese. The outside provides a satisfying, snappy crack from the hardened chocolate coating. The flavor is an intense concentration of chocolate cookie and sweet cream filling, balanced beautifully by the slight tang of the cream cheese, which cuts through the sweetness and elevates the overall profile far beyond a standard cookie.
A Guaranteed Crowd-Pleaser
Name a person who doesn’t love Oreos. It’s nearly impossible! These no-bake desserts appeal to all ages, making them essential for family gatherings, potlucks, and bake sales. They are bite-sized, portable, and inherently shareable. Plus, the presentation is always impressive, especially when garnished with a simple drizzle or sprinkles. If you are looking for a recipe that ensures compliments and requests for the recipe, this is it.
Year-Round Versatility
While often associated with holiday dessert trays, these 3-Ingredient No-Bake Oreo Balls are fantastic any time of year. You can adapt the decoration instantly for any season: green and red sprinkles for Christmas, pastels for Easter, orange and black for Halloween, or simply a sophisticated white chocolate drizzle for an elegant summer dessert. Their robust nature means they travel well, making them ideal for picnics or school lunches, provided they are kept cool. We even have a fantastic recipe for Thanksgiving Oreo Turkey Cookies that uses a similar base for a fun, festive twist!
Why This Easy Dessert Recipe Is a Kitchen Must-Try
Beyond the delicious results, successfully preparing these 3-Ingredient No-Bake Oreo Balls provides a confidence boost for any home cook. This recipe is fundamentally forgiving and delivers high rewards for minimal effort. If you’ve ever hesitated to bake because of complexity or time constraints, this is the recipe that changes everything.
Minimal Equipment and Cleanup
One of the greatest joys of any no-bake recipe is avoiding the mountain of dishes associated with traditional baking. For this recipe, the heavy lifting is done by a food processor (or a zip-top bag) and one mixing bowl. Since you aren’t dealing with messy flours or sticky yeast, the cleanup is swift. Efficiency is key in the kitchen, and these cream cheese balls offer maximum impact with minimum mess.
Perfect for Beginner Cooks
If you are new to the world of culinary creation, this is the perfect starting point. The measurements are straightforward, and the instructions focus on simple physical processes: crushing, mixing, and shaping. There are no delicate folds or tricky temperature controls required. Mastering the technique of melting chocolate and dipping the balls successfully is an excellent gateway skill that will serve you well in future confectionery endeavors.
Budget-Friendly Indulgence
The core ingredients for this recipe Oreos, cream cheese, and chocolate are widely accessible and relatively inexpensive. This allows you to produce a large batch of high-quality treats without breaking the bank. It’s an economically smart choice for catering large parties or when gifting homemade food. You’ll find this recipe delivers a much more decadent experience than many pricier store-bought alternatives.
The Magic of Texture and Temperature
The secret to perfect 3-Ingredient No-Bake Oreo Balls lies in temperature control. The chilling steps are non-negotiable. Chilling the dough ensures the balls hold their shape perfectly and prevents them from dissolving in the warm melted chocolate. This simple, passive step is crucial to achieving that flawless, professional-looking coating.
Ingredients and Equipment for Perfect 3-Ingredient No-Bake Oreo Balls
The beauty of this recipe lies in its incredibly short ingredient list. Quality matters, however, especially when working with such few components. Choosing the right kind of cream cheese and chocolate coating will elevate your Oreo truffles from good to exceptional.
The Three Essential Ingredients
A standard batch yields approximately 40 to 45 truffle balls, depending on your scooping size.
- 1 (14.3 ounce) package of Oreo Cookies: (Approximately 36 cookies, including the cream filling).
- Tip: Use the classic, original flavor for the best results. The cream filling is crucial because it adds extra fat and sugar, which helps bind the crumbs into a cohesive dough. Do not discard the filling!
- 1 (8 ounce) block of full-fat cream cheese: Completely softened to room temperature.
- Critical Detail: Softened cream cheese is mandatory. If the cream cheese is cold, it will not incorporate evenly into the fine crumbs, resulting in a lumpy, difficult-to-roll mixture. Take it out of the refrigerator at least two hours before starting.
- Flavor Note: Full-fat cream cheese provides the necessary richness and structure. Low-fat or whipped cream cheese often contains too much water, which can make the dough overly sticky. This ingredient is also key in making other wonderful appetizers like our Cranberry Pecan Cheese Ball.
- 16 ounces of chocolate melting wafers, candy melts, or high-quality chocolate chips:
- Recommendation: Melting wafers (like Ghirardelli or Merckens) or candy melts are highly recommended. They contain stabilizers that allow them to melt smoothly and set quickly with a hard, shiny finish, eliminating the need for tempering.
- Chocolate Chips: If using standard chocolate chips, add 1 teaspoon of coconut oil or shortening per cup of chocolate to ensure a fluid, thin coating suitable for dipping.
Necessary Utensils and Equipment for No-Bake Perfection
While the ingredients are simple, having the correct tools streamlines the process and ensures a professional finish for your easy dessert recipe.
- Food Processor: This is the superstar tool for Step 1. It turns the Oreos into uniform, fine sand-like crumbs in seconds. Uniform crumbs lead to a smoother, less grainy truffle dough.
- Alternative Method (Rolling Pin): If you lack a food processor, use a large, heavy-duty zip-top bag. Ensure you release the air before sealing. Use a heavy rolling pin to crush the cookies until they resemble fine sand. This requires more effort but yields the same great results.
- Large Mixing Bowl: Essential for combining the crumbs and cream cheese.
- Small Cookie Scoop (1 to 1.5 tablespoons capacity): This tool is highly recommended for creating uniform balls, ensuring they look professional and bake (or in this case, chill) evenly. Consistency in size is key for presentation.
- Baking Sheet and Parchment or Wax Paper: Absolutely necessary for preventing the sticky balls from adhering to the sheet during chilling and for catching drips during the chocolate coating step.
- Microwave-Safe Bowl or Double Boiler: Used for melting the chocolate. A double boiler offers more controlled, gradual melting, which prevents scorching especially if you are using sensitive white chocolate.
- Dipping Tools: Specialty candy dipping tools are useful, but a simple fork (especially a seafood or carving fork with thin tines) or a bamboo skewer works perfectly for submerging and retrieving the Oreo balls from the melted coating.
Having all these items ready before you begin, often referred to as ‘mise en place,’ ensures a smooth, quick process when making these delightful 3-Ingredient No-Bake Oreo Balls.
Detailed Recipe Steps: How to Make the Ultimate 3-Ingredient No-Bake Oreo Balls
Follow these steps precisely to achieve firm, perfectly coated Oreo truffles every time. Remember, the chilling time is your friend!
Step 1: Crush the Oreo Cookies to Fine Crumbs
Precision here sets the stage for success. Place the entire package of Oreos cookies and cream filling into your food processor. Pulse a few times to break down the large pieces, then process continuously on high speed. You are looking for a texture similar to fine sand or fine dirt. Ensure there are absolutely no large chunks remaining. If using the rolling pin method, crush thoroughly, focusing on breaking down any hidden hard pieces within the plastic bag.
Pro Tip: Reserve about 2 tablespoons of the fine crumbs before mixing them with the cream cheese. These reserved crumbs can be used later to garnish the finished chocolate-coated balls, adding a professional touch.
Step 2: Combine Crumb and Cream Cheese to Form Dough
Transfer the pulverized Oreo crumbs into a large mixing bowl. Add the 8 ounces of fully softened cream cheese. Use a sturdy spatula, a wooden spoon, or an electric mixer (on low speed). Mix thoroughly until the cream cheese is completely incorporated. Initially, the mixture may seem crumbly, but as you continue mixing, the fat from the cream cheese and the cookie filling will bind everything together.
The resulting mixture should be a thick, dark brown, truffle-like dough. The dough is ready when you can easily pinch off a piece and roll it into a smooth ball without it sticking excessively to your hands or crumbling apart. If it feels too dry, add a tiny splash of milk (1 teaspoon at a time). If it feels too sticky, it might be due to slightly warm room temperature move quickly to the next step.
Step 3: Scoop and Shape the Balls
Line a large baking sheet with parchment paper or wax paper. Using your small cookie scoop (about 1 to 1.5 tablespoons), scoop out uniform portions. Roll each portion quickly between your palms to form a smooth, round ball, aiming for approximately 1 inch in diameter. Placing the scoop on the sheet first and then rolling provides the best results.
Consistency Tip: Uniform size is crucial for dipping and presentation. If the dough starts feeling too soft while rolling, pop the mixing bowl back into the fridge for 10 minutes.
Step 4: Chill the Balls (The Non-Negotiable Step)
Place the prepared baking sheet into the refrigerator. Chill the Oreo balls for a minimum of 30 minutes, or up to 2 hours. This chilling step is absolutely essential. It hardens the fat in the cream cheese and chocolate filling, making the balls firm. If you skip this step, the warm truffle dough will fall apart or slide off the dipping tool when exposed to the warm melted chocolate, resulting in a frustrating, messy coating process. For even quicker chilling, you can place them in the freezer for 15-20 minutes.
Step 5: Melt the Chocolate Coating Perfectly
Transfer your chocolate melting wafers or high-quality chips into a deep, microwave-safe bowl. Melt the chocolate in short, controlled bursts. Microwave for 30 seconds, then remove and stir vigorously, even if it doesn’t look melted. Repeat in 15-20 second intervals, stirring well after each. Stop microwaving when there are still a few small lumps remaining; the residual heat will melt them as you stir. The goal is a smooth, liquid consistency.
Caution: Avoid overheating the chocolate, as this causes it to seize (thicken and become grainy). If you notice the chocolate thickening too much, you can add half a teaspoon of coconut oil or shortening to thin it out. Melting chocolate is an art, but careful, slow microwaving makes it easy. For more quick dessert inspiration, be sure to check out our boards on Pinterest: Easy Dessert Recipes.
Step 6: Dip and Coat for a Smooth Finish
Remove the chilled 3-Ingredient No-Bake Oreo Balls from the refrigerator. Work in small batches (about 5-6 balls at a time) to keep the rest cold. Using a dipping fork or skewer, completely submerge one ball into the melted chocolate. Turn it gently to ensure full coverage.
Lift the ball out and gently tap the fork against the edge of the bowl. This allows excess chocolate to drip away, leaving a thin, even, and professional coating. A thin coating is always better than a thick, clumpy one.
Step 7: Final Set and Decorate
Place the coated Oreo ball back onto the clean section of the parchment-lined baking sheet. Repeat until all balls are coated. If you plan to decorate with sprinkles, reserved Oreo crumbs, or a contrasting white chocolate drizzle you must do this immediately, before the chocolate coating sets. Once the chocolate loses its wet sheen, the decorations will not adhere.
Step 8: Store and Serve These No-Bake Treats
Allow the chocolate coating to fully harden. This can take 1 to 2 hours at cool room temperature. To speed up the process, you can place the tray back into the refrigerator for 15 to 20 minutes until the coating is completely firm and non-sticky. Once set, transfer the 3-Ingredient No-Bake Oreo Balls to an airtight container. Store them in the refrigerator, as the cream cheese requires chilling. They will keep beautifully for up to 1 week, though they rarely last that long!
Tips, Variations, and Troubleshooting for Oreo Truffles
While the basic recipe for 3-Ingredient No-Bake Oreo Balls is perfect as is, part of the fun is adapting it to seasonal flavors or dietary needs. Here are some ways to customize your batch and solve common dipping issues.
Creative Flavor and Coating Variations
- Holiday Spice: Add 1/2 teaspoon of pure vanilla extract or a small dash of peppermint extract (1/4 teaspoon) to the cream cheese mixture for a festive twist.
- Peanut Butter Boost: For those who love the classic combo, fold in 1/4 cup of smooth peanut butter along with the cream cheese. This adds a lovely nutty depth. For another great peanut butter no-bake option, check out our recipe for 3-Ingredient Peanut Butter Balls!
- Liquor-Infused Balls: For an adult treat, add 1-2 tablespoons of coffee liqueur (like Kahlúa) or Irish cream (like Bailey’s) to the cream cheese mixture. If using liquid, you may need to chill the dough slightly longer to achieve the right firmness.
- White Chocolate Coating: Use white chocolate melting wafers for a striking visual contrast. Drizzle the finished white chocolate balls with melted dark chocolate, or vice versa.
- Different Oreo Flavors: Experiment with seasonal Oreo flavors! Lemon, Mint, Birthday Cake, or even Peanut Butter Oreos can drastically change the resulting truffle flavor. Adjust the amount of cream cheese slightly if the filling density differs.
Making Gluten-Free and Vegan Oreo Balls
The beauty of the Oreo brand is that they offer several alternatives, making this 3-Ingredient No-Bake Oreo Balls recipe adaptable:
Gluten-Free: Simply swap out the standard Oreos for the certified Gluten-Free Oreos (available in both original and Double Stuf). The structure and binding power remain identical.
Vegan: Standard Oreos are “accidentally” vegan. To make the recipe completely vegan, use a plant-based cream cheese alternative (ensure it is a firm, block style, not spreadable tub style) and use high-quality vegan chocolate melting wafers or chocolate chips.
Troubleshooting Common Dipping Mistakes
Dipping can sometimes feel tricky, but these fixes will ensure a smooth process:
- Problem: The chocolate is too thick or seizing.
Fix: Your chocolate was likely overheated or got water/steam into it. Stir in 1 teaspoon of coconut oil or vegetable shortening at a time until the mixture reaches a smooth, liquid consistency. Alternatively, if it seized completely, discard it and start a new batch, using slower, more controlled heat.
- Problem: The ball keeps falling off the fork into the chocolate.
Fix: The ball is too warm. Immediately stop dipping, place the remaining balls back in the freezer for 10-15 minutes, and then resume dipping quickly. Work with very cold balls in small batches.
- Problem: The finished coating looks dull or has streaks.
Fix: This usually happens when the coating is too warm or not stirred properly. Using high-quality melting wafers (instead of chips) dramatically improves the shine. Ensure the chocolate is consistently warm throughout the dipping process, adding quick bursts of heat if necessary.
Nutritional Values and the Benefits of Indulging in Homemade Treats
While the 3-Ingredient No-Bake Oreo Balls are certainly an indulgent dessert, making them at home allows you complete control over the ingredients, ensuring quality and freshness benefits you won’t always find in store-bought options.
Estimated Nutritional Breakdown (Per 1.5-inch Ball)
Please note that these values are estimates and can vary based on the type of chocolate used (e.g., milk vs. dark chocolate) and the exact size of the ball. This recipe yields approximately 40 servings.
| Nutrient | Estimated Amount (Per Ball) |
|---|---|
| Calories | 100-120 kcal |
| Total Fat | 6-8 g |
| Saturated Fat | 4-5 g |
| Carbohydrates | 10-12 g |
| Sugar | 8-10 g |
| Protein | 1-2 g |
The Benefits of Homemade No-Bake Desserts
While we won’t claim that Oreo truffles are a health food, there are distinct advantages to choosing this homemade version over processed, packaged treats:
Control Over Ingredients: When you make 3-Ingredient No-Bake Oreo Balls at home, you select the specific chocolate quality. Opting for dark chocolate melting wafers, for example, increases the antioxidant content compared to milk chocolate. You also control the freshness of the cream cheese, which ensures the best flavor and texture.
Energy Boost: The primary components sugar and carbohydrates from the cookies and fats from the cream cheese provide a quick source of energy. This makes them a great, small post-workout indulgence or a necessary sugar boost during a long afternoon, especially compared to items like our more savory appetizer options, such as 3-Ingredient Sausage Cream Cheese Dip.
Dairy Source: The cream cheese contributes a small amount of calcium and protein, essential macronutrients that support bone health and satiety, respectively. Choosing full-fat cream cheese also ensures maximum vitamin absorption.
Mindful Indulgence: Making these treats yourself encourages mindful eating. Since they are so rich and satisfying, you are likely to enjoy one or two, rather than mindlessly consuming a whole box of less flavorful snacks. The sensory experience of biting into a perfectly coated, dense truffle is highly rewarding.
FAQs about 3-Ingredient No-Bake Oreo Balls
Here are answers to the most common questions people ask when making these popular no-bake desserts.
How long do 3-Ingredient No-Bake Oreo Balls last?
Since they contain cream cheese, these Oreo truffles must be stored in an airtight container in the refrigerator. When properly stored, they will last beautifully for up to 7 days. If you need to store them longer, they freeze excellently (see below).
Can I freeze Oreo balls?
Yes! Oreo balls freeze very well. You can freeze them either before or after dipping. If freezing after dipping, ensure the chocolate coating is completely set. Place them in a single layer in an airtight container or freezer bag, separated by parchment paper, and they will keep for up to 2 months. Thaw them overnight in the refrigerator before serving.
Why are my Oreo balls sticky and hard to roll?
Stickiness is usually caused by warm cream cheese or warm ambient kitchen temperature. Ensure your cream cheese is soft, but not warm or melted. If the dough gets too sticky during rolling, stop immediately and place the dough back in the refrigerator for 10-15 minutes to firm up. Working quickly also helps.
What is the best type of chocolate for coating these treats?
The best option is chocolate melting wafers or high-quality candy melts. These products are formulated to melt smoothly without tempering and set quickly with a glossy, hard shell. If you only have chocolate chips, stir in a teaspoon of coconut oil per cup of chocolate to improve the fluidity for dipping the 3-Ingredient No-Bake Oreo Balls.
Can I use low-fat cream cheese?
It is highly recommended to use full-fat cream cheese. Low-fat versions contain more water, which results in a softer, stickier dough that may not hold its shape as well, especially after rolling and chilling. If you must use low-fat, be prepared to add a few more tablespoons of reserved dry Oreo crumbs to stiffen the mixture.
Do I need a food processor for this 3-Ingredient No-Bake Oreo Balls recipe?
While a food processor makes achieving fine crumbs effortless, it is not strictly necessary. You can place the cookies in a heavy-duty Ziploc bag and crush them with a rolling pin. The key is ensuring the resulting crumbs are uniformly fine, like sand, to create the best truffle texture.
Conclusion: The Easiest Gourmet Dessert You’ll Ever Make
The journey from three simple pantry staples to a tray of professional-looking, decadent chocolate truffles is surprisingly short and incredibly rewarding. These 3-Ingredient No-Bake Oreo Balls truly live up to their hype they are quick, economical, and a guaranteed showstopper at any gathering. We’ve covered everything from achieving the perfect crumb texture and mastering the all-important chilling step, to the techniques for a flawless chocolate coating.
Whether you’re celebrating a holiday, preparing for a party, or simply treating yourself to an easy homemade dessert, this recipe eliminates the stress of baking without compromising on flavor. The rich, creamy center and snappy chocolate shell are proof that the best recipes are often the simplest ones.
Now that you have the ultimate guide to making these delicious Oreo truffles, it’s time to get rolling! Give this recipe for 3-Ingredient No-Bake Oreo Balls a try and prepare to amaze your friends and family with your confectionery prowess. Don’t forget to share your results and tell us your favorite variations in the comments below!

3-Ingredient No-Bake Oreo Balls (Classic Oreo Truffles)
Ingredients
Equipment
Method
- Place the entire contents of the Oreo package (cookies and filling) into a food processor. Process the cookies on high speed until they are finely ground into uniform crumbs, resembling fine sand. Alternatively, crush them thoroughly in a zip-top bag using a rolling pin.
- Transfer the fine Oreo crumbs into a large mixing bowl. Add the fully softened cream cheese. Use a sturdy spatula or an electric mixer on low speed to thoroughly combine the mixture until a thick, dark brown, truffle-like dough is formed. Ensure the cream cheese is fully incorporated.
- Line a large baking sheet with parchment paper or wax paper. Using a small cookie scoop (1 to 1.5 tablespoons capacity), scoop out uniform portions of the Oreo mixture. Roll the portions between your palms to form smooth, round balls, approximately 1 inch in diameter. Place the formed balls onto the prepared baking sheet.
- Place the baking sheet containing the Oreo balls into the refrigerator. Chill the balls for a minimum of 30 minutes, or up to 2 hours. This chilling step is essential as it hardens the mixture, making them firm and easy to dip without falling apart in the warm melted chocolate.
- Place the chocolate melting wafers into a microwave-safe bowl. Microwave the chocolate in 30-second intervals, stirring thoroughly after each interval. Continue this process until the chocolate is smooth, fully melted, and has no lumps. Alternatively, melt the chocolate using a double boiler for a more gradual, controlled melt.
- Remove the chilled Oreo balls from the refrigerator. Using a dipping fork or specialized tool, completely submerge one ball at a time into the melted chocolate. Tap the fork gently against the side of the bowl to allow any excess coating to drip back into the bowl. The coating should be thin and even.
- Place the coated Oreo ball back onto the parchment-lined baking sheet. Repeat the dipping process until all balls are coated. If desired, immediately sprinkle the tops with additional Oreo crumbs, sprinkles, or a contrasting drizzle of white chocolate before the coating sets.
- Allow the chocolate coating to fully harden. This can take about 1 to 2 hours at cool room temperature, or about 15 to 20 minutes if placed back in the refrigerator. Once the coating is firm, transfer the Oreo balls to an airtight container. Store the No-Bake Oreo Balls in the refrigerator for up to 1 week.