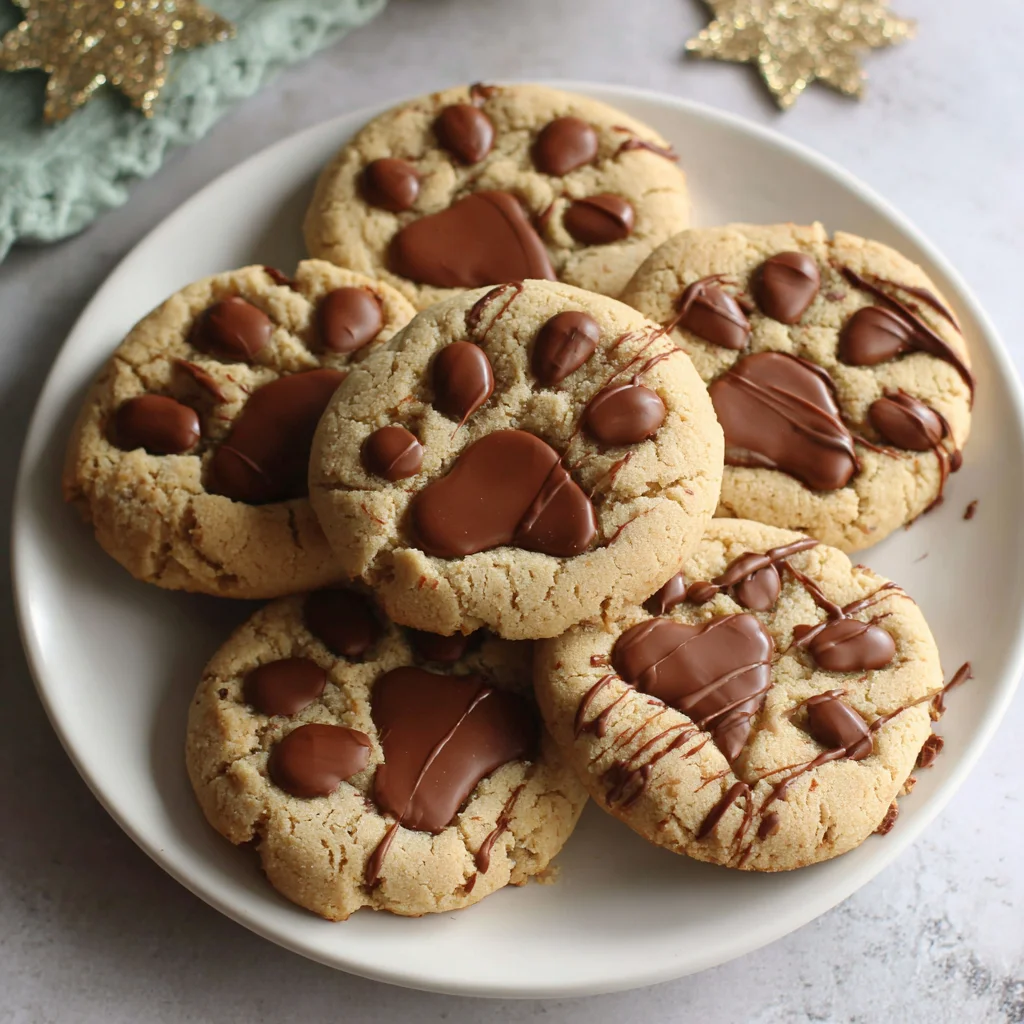
Welcome to the ultimate cookie adventure! If you are searching for a dessert that perfectly marries rich, salty peanut butter flavor with decadent chocolate goodness, and manages to look absolutely adorable doing it, look no further. These Peanut Butter Paw Print Cookies are a viral sensation waiting to happen in your kitchen. They are soft, wonderfully chewy, loaded with flavor, and feature a signature design that makes them perfect for parties, bake sales, or just brightening up a cloudy afternoon.
Forget the classic cross-hatch pattern; we are leveling up our peanut butter cookie game with charming chocolate paw prints. This recipe takes the foundational elements of a truly great peanut butter cookie the perfect blend of white and brown sugars for chewiness and moisture, combined with rich, creamy peanut butter and adds a delightful decorative touch using standard and mini chocolate chips. The secret to the design? Pressing the chocolate chips immediately after baking while the cookies are still piping hot and malleable. This simple technique transforms a delicious cookie into a delightful, eye-catching treat.
Whether you’re a seasoned baker or just starting out, this guide for Peanut Butter Paw Print Cookies is meticulously detailed to ensure success. Get ready to bake a batch of cookies that are almost too cute to eat almost! We will walk through every step, from creaming the perfect dough to placing those tiny, perfect chocolate toes. Prepare yourself for the irresistible aroma of warm peanut butter and melting chocolate filling your home. This is more than just a recipe; it’s an invitation to create joy, one paw print at a time.
Why You’ll Absolutely Love These Peanut Butter Paw Print Cookies
There are countless peanut butter cookie recipes out there, but few combine the nostalgic comfort of the classic flavor profile with such an endearing presentation. These Peanut Butter Paw Print Cookies stand head and shoulders above the rest, offering specific reasons why they will become a permanent fixture in your baking rotation. Achieving a perfect balance of texture and taste is paramount, and this recipe nails it every single time.
The Perfect Chew Factor
One of the most common complaints about homemade peanut butter cookies is that they often turn out too dry or crumbly. Not these! We use a strategic combination of softened butter, creamy peanut butter, and the right ratio of brown to white sugar. The brown sugar locks in moisture, resulting in a cookie that is gloriously chewy at the center, with just the slightest crisp around the edges. This texture ensures that every bite is satisfyingly dense and rich. The moment you sink your teeth into one, you’ll understand why chewiness is key to a truly fantastic cookie.
A Flavor Combination That Can’t Be Beat
Peanut butter and chocolate are a match made in culinary heaven, and these cookies showcase that pairing beautifully. The strong, nutty flavor of the peanut butter dough acts as the perfect canvas for the semi-sweet chocolate chips. By adding the chocolate chips after baking, we ensure the chocolate remains soft and slightly melty, providing a distinct, intense burst of chocolate flavor right in the middle of the warm cookie. The contrast between the rich, salty dough and the sweet, dark chocolate pad is pure bliss. It’s the ultimate expression of a peanut butter chocolate cookie.
The ‘Wow’ Factor Presentation
Let’s be honest: the paw print design is what makes these cookies truly special. They are inherently whimsical and fun. This unique decoration makes them instant crowd-pleasers at birthday parties, themed events, or even just as a cute addition to a dessert platter. It’s a simple technique just four chocolate chips per cookie but the visual payoff is enormous. They elicit smiles and delight from everyone, young and old. If you are looking for a dessert that sparks conversation and joy, these Peanut Butter Paw Print Cookies are your answer. Plus, the ease of assembly means you get a professional-looking dessert without any complicated piping or decorating skills.
Easy and Efficient Baking Process
Despite their elaborate appearance, the actual process of making these cookies is straightforward. The dough is quick to mix, requires no chilling (though chilling is always an option if you prefer), and the rolling and sugar-coating steps are simple. The key step the paw print creation happens while the cookies are hot, which minimizes cooling time and maximizes efficiency. You can have a full batch of these adorable Peanut Butter Paw Print Cookies ready in under an hour, making them ideal for last-minute cravings or spontaneous baking sessions. This hassle-free approach ensures that the joy of baking remains front and center.
Why You Should Try This Recipe Today
If you need further convincing, consider the versatility, psychological comfort, and sheer joy that baking and sharing these delightful cookies brings. Beyond the simple enjoyment of eating them, baking these Peanut Butter Paw Print Cookies offers a wonderful experience. They are more than just a treat; they are a project, a mood booster, and a guaranteed success story in your kitchen.
A Perfect Activity for All Ages
Baking is a fantastic family activity, and this recipe is particularly great for involving children. Kids love rolling the dough balls and, most importantly, they will adore placing the chocolate chips to form the paw prints! The immediacy of the decoration right out of the oven keeps their attention and allows them to see the immediate result of their effort. Teaching precision in measuring and patience in baking, all while creating something charming and delicious, is a wonderful lesson. Make it a tradition to bake these “P-B Paws” together, creating memories as sweet as the cookies themselves.
The Ultimate Comfort Food
Peanut butter cookies tap into deep culinary nostalgia. They remind us of childhood, simple pleasures, and warm kitchens. When life feels hectic, reaching for a recipe that offers guaranteed comfort is essential. The smell of baking peanut butter and vanilla is profoundly comforting, instantly reducing stress and elevating your mood. Pair one of these chewy treats with a glass of cold milk or a hot cup of coffee, and you have the perfect antidote to a long day. If you enjoy other deeply comforting desserts, you might also like our recipe for No Bake Peanut Butter Pie another irresistible use of this favorite legume spread.
Customizable for Dietary Needs
While the classic recipe is magnificent, the nature of peanut butter cookies makes them highly adaptable. For those seeking alternatives, it’s relatively easy to modify this recipe to be gluten-free (using a good quality GF flour blend) or even dairy-free (substituting plant-based butter). We will discuss these variations in detail later, ensuring that almost everyone can enjoy the magic of these Peanut Butter Paw Print Cookies. This adaptability means you can confidently bake a batch knowing you can cater to various friends and family members.
Ideal for Gifting and Sharing
Looking for a thoughtful, handmade gift? These cookies travel well, keep fresh for several days when stored in an airtight container, and their unique look makes them stand out in a cookie swap or gift basket. Package a half-dozen with a cute ribbon, and you have a personalized present that shows you put in genuine effort. They are fantastic for teachers, neighbors, or as a delightful treat to take to your next potluck. Their charm guarantees they will be the first cookies gone from any platter.
SEO & Internal Linking Note
For more delicious, comforting recipes that utilize simple ingredients and offer maximum flavor, explore our collection, including a fantastic recipe for Peanut Butter Chocolate Chip Cookies, a slightly different approach to this classic flavor profile. Or perhaps try our Classic Peanut Butter Cookies if you are looking for traditional simplicity. We strive to provide easy, high-quality recipes that become staples in your kitchen.
Essential Ingredients and Utensils for Peanut Butter Paw Print Cookies Success
Creating the perfect chewy, flavorful Peanut Butter Paw Print Cookies starts with using high-quality ingredients and ensuring you have the right tools for precision baking. Baking is a science, and adherence to measurements especially in this recipe will guarantee that your cookies come out soft, perfectly textured, and hold their charming paw print shape.
The Precise Ingredient List
Accuracy is vital here. We need specific types of sugar and chocolate chips to achieve the correct moisture and aesthetic.
Dry Ingredients for Structure
- 1 ¾ cups All-Purpose Flour: Use standard, unbleached all-purpose flour. Measure using the spoon-and-level method (spoon flour into the measuring cup, then level off the excess with a straight edge) to avoid packing, which can result in dense, dry cookies.
- 1 teaspoon Baking Soda: This is our primary leavener, providing the rise and helping achieve that desirable chewy texture. Ensure your baking soda is fresh for maximum efficacy.
- ½ teaspoon Salt: Essential for balancing the sweetness and enhancing the rich flavor of the peanut butter.
Fats, Sweeteners, and Flavor
- ½ cup (1 stick) Unsalted Butter, softened: Softened butter creams easily, incorporating air that provides lift and tenderness. Ensure it’s truly softened, not melted.
- ½ cup Creamy Peanut Butter: Use standard, processed creamy peanut butter (like Jif or Skippy). Natural peanut butter, which often separates and contains less sugar/stabilizers, can significantly alter the cookie’s texture and cause excessive spreading.
- ½ cup Granulated Sugar, plus extra for rolling: Provides structure and contributes to crispness on the edges. The extra sugar for rolling adds sparkle and crunch.
- ½ cup Packed Light Brown Sugar: Crucial for chewiness and moisture retention. Always pack brown sugar firmly into the measuring cup.
- 1 large Egg: The binding agent, adding richness and helping emulsify the fats and liquids.
- 1 teaspoon Vanilla Extract: A necessary flavor enhancer that complements both the peanut butter and the chocolate.
The Signature Chocolate Paws
The success of the visual element relies on using the correct sizes of chocolate chips. Do not substitute these with baking bars or chunks, as the chips’ shape is essential for the paw print definition.
- 36 Standard Semi-Sweet Chocolate Chips (for the main pad): These are used for the large central pad of the paw. Since the recipe yields 12 cookies, you need exactly three dozen.
- 108 Mini Semi-Sweet Chocolate Chips (for the toes): Used for the three smaller toe pads on each cookie (3 minis per cookie 12 cookies = 36 total sets, or 108 chips).
Recommended Tools for Baking Success
Having the right equipment streamlines the process and helps you achieve professional results with your Peanut Butter Paw Print Cookies.
Mixing Equipment
- Stand Mixer or Hand Mixer: While this dough can be mixed by hand, a mixer is essential for properly creaming the butter, peanut butter, and sugars until “light and fluffy” (Step 3). This aeration step is vital for the cookie’s final texture.
- Medium Mixing Bowl: Used for whisking together the dry ingredients.
- Rubber Spatula: Necessary for scraping down the sides of the mixer bowl during the creaming process, ensuring all ingredients are fully incorporated.
Baking Tools
- Two Large Baking Sheets: Using two sheets allows you to keep the process moving efficiently.
- Parchment Paper or Silicone Baking Mats: Highly recommended. These prevent sticking and promote even baking, resulting in a cleaner look for your Peanut Butter Paw Print Cookies.
- Small Cookie Scoop (1.5 inches / standard tablespoon size): This tool is non-negotiable for achieving uniformly sized cookies (approximately 1.5 inches in diameter). Uniform size ensures all cookies bake at the same rate and look consistent for that perfect paw print display.
- Wire Cooling Rack: Essential for allowing the cookies to cool completely and prevent the bottoms from becoming soggy after they are removed from the pan.
- Shallow Dish: For holding the extra granulated sugar used to coat the dough balls before baking.
By preparing these exact ingredients and having your specialized tools ready, you lay the foundation for a seamless and successful baking experience. The focus is now on the technique: ensuring the dough is properly combined and executing the paw print decoration at the precise moment they emerge from the oven.
Detailed Instructions for Perfect Peanut Butter Paw Print Cookies
The difference between a good cookie and a truly great cookie often lies in the details of the process. Follow these steps precisely to ensure your Peanut Butter Paw Print Cookies are chewy, perfectly shaped, and utterly charming.
Step-by-Step Preparation and Baking
The journey to the perfect paw print begins before the oven even turns on.
1. Preheat and Prep (The Setup)
Preheat your oven to 350°F (175°C). Proper oven temperature is critical for ensuring the edges set before the center fully bakes, preserving the soft interior. Line two large baking sheets with parchment paper or silicone baking mats. This step prevents sticking and facilitates easy removal of the hot cookies, which is crucial for the next decorating steps.
2. Combine Dry Ingredients (Structure First)
In a medium bowl, whisk together the flour, baking soda, and salt. Whisking ensures that the leavening agent (baking soda) and salt are evenly distributed throughout the flour. Set this bowl aside, ready for integration.
3. Cream Fats and Sugars (The Foundation of Texture)
In the bowl of a stand mixer fitted with the paddle attachment, or using a large bowl and a hand mixer, combine the softened butter, creamy peanut butter, granulated sugar, and brown sugar. Beat on medium speed for 3 to 4 minutes. This is arguably the most crucial step: creaming should continue until the mixture is visibly lightened in color and appears fluffy. This process incorporates necessary air, leading to a tender cookie. Stop and scrape down the sides of the bowl often don’t neglect this! Unincorporated ingredients lead to an inconsistent dough.
4. Add Egg and Vanilla (Binding and Flavor)
Reduce the speed to low. Beat in the large egg until just combined. Over-beating the egg can activate too much gluten. Next, stir in the vanilla extract until fully dispersed. The mixture should remain creamy and homogenous.
5. Mix Dough (Gentle Incorporation)
Gradually add the dry ingredient mixture (from Step 2) to the wet ingredients, mixing on low speed. Mix only until the dough comes together and no streaks of flour remain. Stop immediately at this point. Overmixing the flour will develop too much gluten, resulting in tough, dry cookies instead of the desired chewy Peanut Butter Paw Print Cookies.
6. Roll the Dough (Uniformity is Key)
Place a small amount of extra granulated sugar in a shallow dish for rolling. Scoop the dough using a standard tablespoon or a small cookie scoop (about 1.5 inches in diameter). Use the scoop to ensure all cookies are the exact same size. Roll each portion quickly into a smooth ball between your palms.
7. Sugar Coat and Place (Prepping for the Oven)
Lightly roll each dough ball in the extra granulated sugar, ensuring it is fully coated. This coating provides that delightful sugary crust and helps the cookies spread perfectly. Place the dough balls onto the prepared baking sheets, spacing them approximately 2 inches apart to allow room for spreading.
8. Bake (The Transformation)
Bake for 10 to 12 minutes. The cookies are done when the edges are set and lightly golden brown, but the center still looks slightly soft and puffy. This slightly under-baked center is what guarantees that delicious chewiness. Do not overbake!
The Critical Paw Print Decoration
The next two steps must happen quickly, immediately after the cookies exit the oven, while they are still hot and pliable.
9. Create the Paw Prints – The Main Pad (Immediate Action)
As soon as the cookies come out of the oven, gently press one standard semi-sweet chocolate chip into the center of each cookie to form the main pad of the paw. Press just deep enough that the chip is embedded and adheres, but not so deep that you push through to the bottom of the cookie sheet. The residual heat will slightly melt the base of the chip, locking it into place.
10. Add the Toes (The Finishing Touch)
Immediately follow by pressing three mini semi-sweet chocolate chips above the standard chip. These form the smaller toe pads. Arrange them in a slight arc, mirroring the natural curvature of a paw. Press gently, ensuring they adhere without cracking the fragile, hot cookie surface. Speed is essential here; if the cookies cool too much, they will harden, and the chips won’t stick or will crack the cookie when pressed.
11. Cool and Set (Patience Pays Off)
Allow the cookies to cool completely on the baking sheet for 5 minutes. This vital step allows the structure to firm up and ensures the hot chocolate chips set firmly into the dough. After 5 minutes, use a thin spatula to transfer them carefully to a wire rack to finish cooling completely. Cooling on a rack prevents steam buildup, maintaining the crisp edge and chewy interior of your fresh Peanut Butter Paw Print Cookies.
12. Serve (Enjoy!)
Once fully cooled and the chocolate is set, your charming and delicious Peanut Butter Paw Print Cookies are ready to serve and impress! Store them in an airtight container at room temperature for up to five days.
Tips, Tricks, and Variations for Peanut Butter Paw Print Cookies
Mastering any cookie recipe often involves knowing the small tricks that prevent common mishaps and understanding how to adapt the recipe to different needs or flavor preferences. Here are essential tips for success and creative variations for your new favorite Peanut Butter Paw Print Cookies.
Common Baking Troubleshooting
How to Prevent Over-Spreading
If your cookies spread too much and lose their perfect circular shape, the issue is usually one of two things: too much fat or too little flour. Ensure your butter is softened, not melted, as melted fat causes immediate spreading. Additionally, if you live in a humid environment or scooped your flour incorrectly, the dough may be too slack. If your dough feels overly sticky or wet after mixing, try chilling the dough balls for 15-20 minutes before rolling in sugar and baking. This firms up the fat, which helps the cookies hold their shape longer in the oven.
Ensuring Perfect Paw Prints
The timing is everything. If you wait even a minute too long after the cookies exit the oven, the surface will set, making it impossible to press the chips without cracking the cookie. Work quickly, one pan at a time. If you notice the chips aren’t sticking well, you can lightly mist the back of the chip with a tiny bit of water using a clean spray bottle before pressing, or gently press the chip and hold it for a few seconds as it melts slightly into the surface.
Flavor and Decoration Variations
Nut Butter Swaps (Caution Required)
While this is the recipe for Peanut Butter Paw Print Cookies, you can experiment with other nut and seed butters. Almond butter or cashew butter can be used, but note that the consistency might change, requiring minor adjustments to the flour or sugar (you may need a tablespoon or two less liquid/fat). If using sunflower seed butter, be aware that it can sometimes react with baking soda, giving your baked goods a surprising green hue they are safe to eat, but perhaps less appealing!
Chocolate Chip Alternatives
If semi-sweet isn’t your favorite, you can use milk chocolate chips or dark chocolate chips for the paw prints. The critical factor is retaining the size difference: a standard chip for the main pad and mini chips for the toes. You could also try white chocolate chips for a lighter contrast, although they may melt faster.
Beyond the Paw Print
While the paw prints are adorable, the technique of pressing warm dough allows for other decorations. You could press Hershey’s Kisses into the center for classic “Blossom” cookies, or use small jelly beans or M&Ms for festive holiday colors.
Dietary Modifications
Gluten-Free Adaptation
To make gluten-free Peanut Butter Paw Print Cookies, substitute the All-Purpose Flour with a high-quality 1:1 gluten-free baking blend that includes xanthan gum. No other ingredient modifications should be necessary. Follow the instructions exactly, but watch the baking time closely, as GF cookies can sometimes take a minute or two less or more, depending on the blend.
Dairy-Free/Vegan Adaptation
The only ingredients needing substitution for a vegan version are the butter and the egg. Use a reliable plant-based butter (sticks work best, not tub margarine). For the egg, try a flax egg (1 tablespoon ground flaxseed + 3 tablespoons water, stirred and rested for 5 minutes) or a commercial egg replacer. Ensure your chosen chocolate chips are also certified vegan, as many standard brands contain dairy.
For more baking inspiration and visual guides on achieving perfect texture, be sure to follow our baking boards. Visit our Pinterest page for great baking tips and tricks!
Nutritional Values and Ingredient Benefits
While cookies are undeniably a treat and should be enjoyed in moderation, understanding the basic nutritional breakdown and the benefits certain ingredients offer can be helpful. These Peanut Butter Paw Print Cookies are high in energy, making them excellent for fueling active days or providing a satisfying afternoon snack.
General Nutritional Breakdown (Estimated per Cookie)
Based on the ingredients and yielding approximately 36 standard cookies, the estimated nutritional content for a single Peanut Butter Paw Print Cookie is:
- Calories: Approximately 140-160 kcal
- Total Fat: Approximately 8-10g (primarily healthy monounsaturated fats from peanut butter and saturated fats from butter/chocolate)
- Carbohydrates: Approximately 15-18g (mostly sugars and complex carbs from flour)
- Protein: Approximately 3-4g
Note: These values are estimates and can vary based on the specific brands of peanut butter and chocolate chips used.
Benefits of Key Ingredients
The Power of Peanut Butter
Peanut butter is the star of these Peanut Butter Paw Print Cookies, and it offers more than just delicious flavor. Peanuts are a fantastic source of plant-based protein, which is essential for building and repairing tissues. They also contain heart-healthy monounsaturated fats, which can help lower bad cholesterol levels. Additionally, peanuts are rich in crucial micronutrients such as Niacin (Vitamin B3), which supports energy metabolism, and Vitamin E, a potent antioxidant.
Sweeteners and Energy
The combination of granulated and brown sugar not only dictates the flavor and texture but also provides immediate energy (glucose). While sugar intake should be monitored, a cookie offers a quick energy boost. Brown sugar, specifically, contains molasses, which adds minimal trace minerals like calcium and iron, and, critically for baking, contributes hygroscopicity, meaning it helps the cookie retain moisture and stay soft and chewy over time.
Chocolate Benefits
The semi-sweet chocolate chips used for the paw prints contribute intense flavor and a dose of antioxidants. Cocoa solids are known to contain flavanols, which are linked to improved blood flow. Enjoying these delicious Peanut Butter Paw Print Cookies in moderation allows you to benefit from the small lift in mood and energy provided by the cocoa.
These cookies offer a comforting treat that satisfies sweet cravings while providing a source of healthy fats and protein from the peanut butter. Portion control is easy thanks to the precise scooping method, ensuring you can indulge without excess.
FAQs About Peanut Butter Paw Print Cookies
Can I use natural peanut butter for the Peanut Butter Paw Print Cookies recipe?
It is highly recommended to use standard, stabilized creamy peanut butter (like Jif or Skippy) for this recipe. Natural peanut butter tends to be runnier and contains more oil separation, which can lead to the cookies spreading excessively in the oven, resulting in a drier and flatter final product.
Why did my cookies crack when I pressed the chocolate chips in?
The cookies cracked because their surface had already begun to set and cool. You must press the chocolate chips (the standard chip first, then the three mini chips) immediately as the cookies exit the oven. If you wait even 60 seconds, the surface integrity hardens, making the dough brittle. Work quickly and decorate one pan at a time.
How long do Peanut Butter Paw Print Cookies stay fresh?
When stored in an airtight container at room temperature, these cookies will remain fresh and chewy for 4 to 5 days. For longer storage, the baked and cooled cookies can be frozen for up to three months. Thaw them overnight at room temperature before serving.
Can I freeze the dough before baking?
Yes! You can roll the dough into balls, coat them in sugar, and freeze them on a baking sheet. Once frozen solid, transfer the dough balls to a freezer-safe bag. When ready to bake, place the frozen dough balls on a lined baking sheet and add 2–3 minutes to the total baking time. Decorate the paw prints immediately after removing them from the oven, as usual.
Do I have to roll the dough balls in extra sugar?
While not strictly mandatory, rolling the dough balls in sugar is highly recommended for these Peanut Butter Paw Print Cookies. The sugar coating adds a subtle, pleasant crunch to the outside crust and helps the cookie hold its shape slightly better during baking, contrasting beautifully with the chewy interior.
Conclusion: The Ultimate Treat for Peanut Butter Lovers
We’ve successfully navigated the path to creating the most charming and delicious peanut butter treat imaginable. These Peanut Butter Paw Print Cookies are truly special a perfect blend of rich, salty, chewy cookie dough and melting semi-sweet chocolate. They deliver on flavor, texture, and, most importantly, on fun.
This recipe provides a delightful alternative to the traditional crisscross cookie, offering an unforgettable visual appeal that makes them perfect for any gathering. Remember the key techniques for success: properly creaming your fats and sugars to achieve that tender fluffiness, and acting immediately after the cookies exit the oven to embed those tiny chocolate paw prints. This immediacy ensures the chocolate adheres perfectly and the design is crisp and clean.
Whether you’re baking these for a school event, a holiday platter, or simply to satisfy a serious craving, these Peanut Butter Paw Print Cookies are a guaranteed hit. They prove that simple ingredients, when handled with care and a touch of creativity, can produce truly exceptional results. The warmth of the peanut butter, the hint of vanilla, and the sweet embrace of the chocolate combine to create a cookie experience that is hard to beat.
We encourage you to try this recipe today and share the joy of these adorable treats with your loved ones. Don’t forget to take a photo of your finished batch of Peanut Butter Paw Print Cookies! Let us know in the comments how your paw prints turned out, or if you tried any of our variations (maybe the gluten-free option!). If you enjoyed this recipe, you might also be interested in another crowd-pleasing dessert, like our recipe for 3-Ingredient Peanut Butter Balls for a quick no-bake fix. Happy baking!
Peanut Butter Paw Print Cookies
Ingredients
Equipment
Method
- Preheat your oven to 350°F (175°C). Line two large baking sheets with parchment paper or silicone baking mats.
- In a medium bowl, whisk together the flour, baking soda, and salt. Set aside.
- In the bowl of a stand mixer, cream together the softened butter, peanut butter, granulated sugar, and brown sugar until the mixture is light and fluffy (3 to 4 minutes). Scrape down the sides of the bowl as needed.
- Beat in the large egg until just combined, then stir in the vanilla extract.
- Gradually add the dry ingredient mixture to the wet ingredients, mixing on low speed until the dough comes together and no streaks of flour remain. Be careful not to overmix.
- Place a small amount of extra granulated sugar in a shallow dish. Scoop the dough using a small cookie scoop (about 1.5 inches in diameter). Roll each portion into a smooth ball and lightly coat it in the extra sugar.
- Place the dough balls onto the prepared baking sheets, spacing them approximately 2 inches apart. Bake for 10 to 12 minutes, or until the edges are set and lightly golden brown, but the center still looks slightly soft.
- Create the Paw Prints: As soon as the cookies come out of the oven, while they are still hot, gently press one standard semi-sweet chocolate chip into the center of each cookie to form the main pad.
- Add the Toes: Immediately follow by pressing three mini semi-sweet chocolate chips above the standard chip to form the smaller toe pads. Arrange them in a slight arc, pressing gently to adhere.
- Cool: Allow the cookies to cool completely on the baking sheet for 5 minutes before transferring them to a wire rack to finish cooling. Serve once the chocolate chips are set.