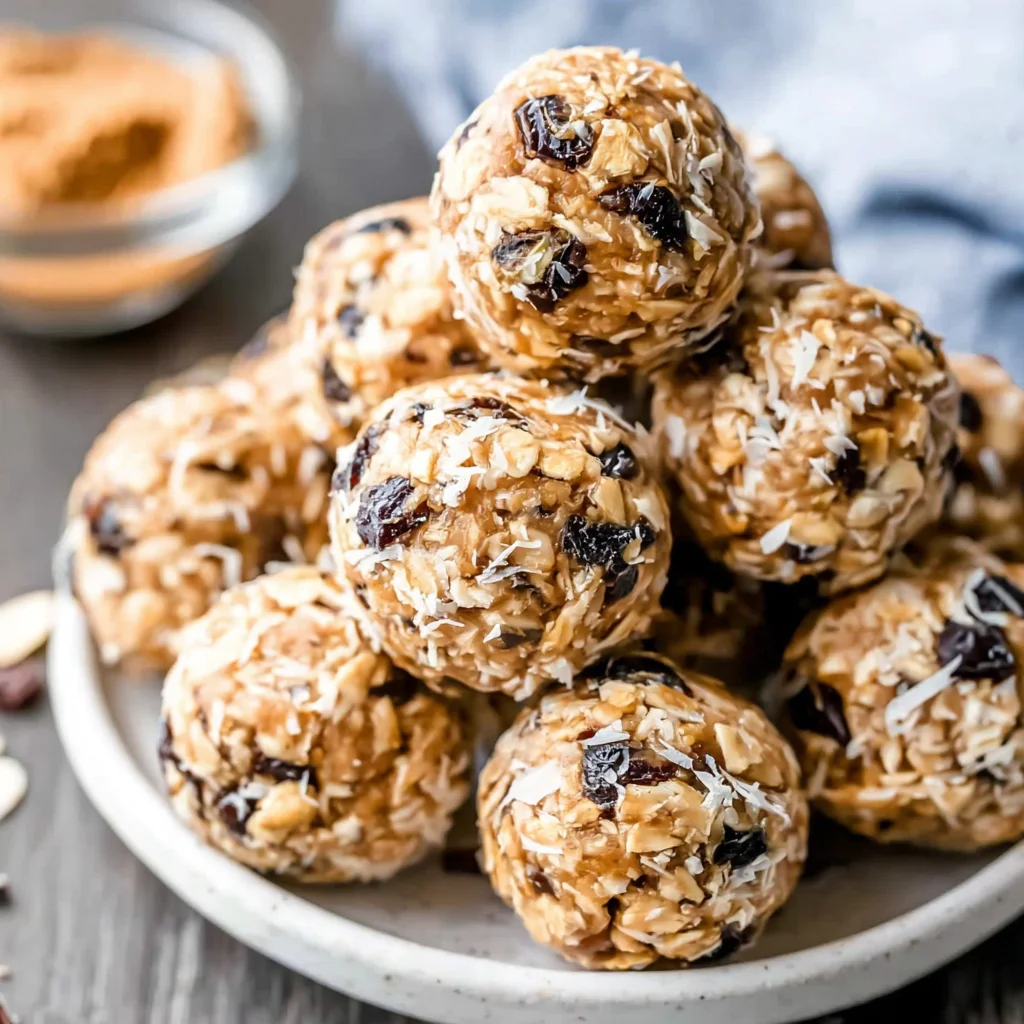
In the whirlwind of modern life, finding snacks that are both genuinely healthy, satisfying, and require zero cooking time often feels like an impossible quest. But what if we told you that the perfect solution involves combining the universally beloved flavors of peanut butter and coconut into one incredible, high-powered bite? Welcome to the ultimate recipe for Peanut Butter Coconut Protein Balls.
These delightful, energy-packed bites are the busy professional’s dream, the active parent’s saving grace, and the fitness enthusiast’s best friend. Ready in just 15 minutes of active preparation, followed by a quick chill, these balls deliver a serious protein punch, healthy fats, and sustained energy, making them far superior to any processed granola bar you might grab off the shelf. Forget turning on the oven; these are completely no-bake, requiring just one bowl and a few common ingredients. If you’re searching for a simple, delicious, and highly effective way to fuel your day, stop scrolling you’ve found it.
Why You’ll Absolutely Love These Peanut Butter Coconut Protein Balls
These Peanut Butter Coconut Protein Balls aren’t just a recipe; they are a lifestyle solution wrapped in a delicious, chewy sphere. The combination of rich, creamy peanut butter with the textural contrast and tropical hint of shredded coconut is truly irresistible. But the appeal goes far beyond flavor. Here are the undeniable reasons why this recipe will become a staple in your meal prep routine:
Unbeatable Convenience: Prep in 15 Minutes
In today’s fast-paced world, time is the most precious commodity. Unlike complex baking projects that require precise measurements, multiple mixing steps, and long cook times, this recipe for no-bake energy bites is lightning-fast. You can whip up a batch of 18 to 20 balls in less time than it takes to decide what to order for delivery. The bulk of the time commitment is passive the 30-minute chill time, which is essential for texture but requires zero effort from you. This makes them ideal for Sunday meal prepping, ensuring you have healthy snacks ready to go throughout the week.
Perfectly Balanced Macros for Sustained Energy
Whether you need a post-workout recovery boost or a midday slump antidote, these protein balls are nutritionally balanced to keep you feeling full and energized. They combine three key macronutrients:
- High Protein: The vanilla protein powder delivers the necessary building blocks for muscle repair and excellent satiety.
- Healthy Fats: Creamy peanut butter provides monounsaturated fats, crucial for brain health and long-lasting energy.
- Complex Carbohydrates: Old-fashioned rolled oats offer fiber and complex carbs that release energy slowly, preventing sugar spikes and crashes.
This balanced profile means these homemade protein balls won’t leave you hungry an hour later a common failing of low-fiber, high-sugar packaged snacks.
Totally Customizable and Diet-Friendly
Flexibility is a major benefit of this recipe. The base mixture is robust enough to handle various swaps and additions. Need them to be vegan? Use maple syrup or agave and ensure your protein powder and milk are plant-based. Gluten-free? Simply use certified gluten-free rolled oats. Don’t like peanuts? Almond butter or cashew butter works just as well (though they won’t be true Peanut Butter Coconut Protein Balls, they will still be delicious!). This adaptability ensures that everyone, regardless of dietary restrictions, can enjoy these healthy, delectable treats.
For more flexible snack options, you might enjoy checking out our recipe for 3 Ingredient Peanut Butter Balls, which offers a even more minimalist approach to snacking.
Why You Should Try These No-Bake Energy Bites Today
If you are tired of spending money on overpriced, minimally nutritious protein bars filled with artificial ingredients and strange stabilizers, making your own Peanut Butter Coconut Protein Balls is the essential step you need to take toward healthier snacking. This isn’t just about saving money; it’s about controlling what goes into your body and maximizing the quality of your fuel.
Control Over Ingredients and Sweetness
One of the biggest advantages of making these coconut energy balls at home is complete ingredient control. Store-bought protein bars often contain excessive amounts of refined sugar, sugar alcohols that cause digestive distress, or highly processed oils. With this recipe, you choose the quality of the peanut butter (natural, low-sugar style is recommended) and the type and amount of sweetener. Whether you opt for honey for its natural goodness or maple syrup for a touch of refined sweetness, you dictate the flavor profile.
Ideal for Meal Prep and Portion Control
These snacks are perfect for anyone committed to meal prepping. Because they store beautifully in the refrigerator for up to 10 days (and freeze even longer!), you can dedicate a small amount of time on the weekend to make a large batch. Having these pre-portioned Peanut Butter Coconut Protein Balls ready eliminates the stress of grabbing unhealthy options when hunger strikes. They are inherently designed for portion control one or two balls satisfy a craving without derailing your nutritional goals.
A Delicious Alternative to Baking
Let’s face it: sometimes you crave a treat but don’t want the complexity or mess of baking. These healthy peanut butter recipes bypass the oven entirely. The mixture comes together into a dense, almost dough-like consistency that is firm, fudgy, and intensely flavored. They satisfy that craving for something rich and sweet, while still packing a powerful nutritional punch. The fact that they are covered in a beautiful, crunchy layer of shredded coconut simply elevates them from a functional snack to a genuinely enjoyable treat.
Furthermore, if you’re looking for more quick, grab-and-go options that require minimal cooking, we often feature similar easy recipes on our site. For example, check out our guide to Peanut Butter Oat Balls for inspiration on related, simple snacks.
Ingredients and Necessary Utensils for Success
The beauty of these Peanut Butter Coconut Protein Balls lies in their simplicity. You likely already have many of these staples in your pantry. However, using high-quality ingredients, especially the peanut butter and protein powder, can significantly impact the final texture and nutritional value.
Detailed Ingredient List
For the Protein Ball Base
- 1 cup Creamy Peanut Butter (Natural Style)
- Why it’s essential: This is the binding agent and the primary flavor. We highly recommend using natural peanut butter (the kind that requires stirring) because it has less sugar and typically separates into oil, which helps moisten the dough. If using processed, non-separating peanut butter (like Jif or Skippy), you may need to add slightly more milk to achieve the correct texture.
- 1/2 cup Old-Fashioned Rolled Oats (Uncooked)
- Why it’s essential: Oats provide structure, fiber, and complex carbohydrates. Do not use instant oats, as they absorb liquid too quickly and can result in a gummy texture. Rolled oats give the balls a pleasant, chewy density.
- 1/2 cup Vanilla Protein Powder
- Why it’s essential: The main source of protein. Vanilla flavor complements the peanut butter and coconut perfectly. Whey, Casein, or plant-based proteins (like pea or brown rice protein) all work, but be mindful that plant-based powders tend to absorb more moisture, so you might need extra liquid.
- 1/4 cup Unsweetened Shredded Coconut (Mixed into the batter)
- Why it’s essential: Incorporated directly into the dough for flavor and internal texture. Using unsweetened coconut keeps the overall sugar count down, relying on the liquid sweetener for taste.
- 1/4 cup Liquid Sweetener (Honey, Maple Syrup, or Agave)
- Why it’s essential: Provides necessary sweetness and is crucial for binding the dry ingredients. Honey gives a deeper, classic flavor, while maple syrup is excellent for maintaining a vegan-friendly profile.
- 1 teaspoon Pure Vanilla Extract
- Why it’s essential: Enhances the flavor profile, adding warmth and depth that complements the peanut butter.
- 1 to 2 tablespoons Milk (Any variety, optional)
- Why it’s essential: Used solely for adjusting the consistency. If your mixture is too dry and crumbly (often the case when using highly absorbent protein powders), milk adds the necessary moisture to make the dough pliable. Start with one tablespoon and increase only if needed.
For Coating (Optional, but highly recommended)
- 1/2 cup Extra Unsweetened Shredded Coconut: This provides the beautiful, white, tropical coating and adds a satisfying crunch.
Essential Tools for Perfect Protein Balls
The best part about making these Peanut Butter Coconut Protein Balls is the minimal equipment required. You won’t need a heavy stand mixer, though it certainly speeds things up.
- Large Mixing Bowl: Necessary for combining all the ingredients easily.
- Sturdy Mixing Implement: A strong wooden spoon, rubber spatula, or stiff silicone spatula is crucial. The dough gets incredibly thick and sticky, making a flimsy whisk useless. If available, a stand mixer with a paddle attachment works best.
- Measuring Cups and Spoons: For accurate ingredient ratios, ensuring the correct dough consistency.
- Small Cookie Scoop or Measuring Tablespoon: This is the secret weapon for creating uniform, neat balls. Using a scoop ensures consistent serving sizes and helps with portion control.
- Parchment Paper or Wax Paper: Highly recommended for lining the baking sheet where the finished balls will chill, preventing sticking.
Detailed Recipe Instructions: Making Your Homemade Protein Balls
Follow these steps precisely to ensure your dough for the Peanut Butter Coconut Protein Balls achieves the ideal fudgy texture, making them easy to roll and incredibly satisfying to eat.
Step 1: Combine the Dry Ingredients
In your large mixing bowl, measure and pour in the 1/2 cup of Old-Fashioned Rolled Oats and the 1/2 cup of Vanilla Protein Powder. Using a whisk or a dry spoon, thoroughly mix these two components together. The goal here is to evenly distribute the protein powder, preventing clumps later on. This also starts the absorption process for the oats.
Step 2: Add the Wet Ingredients
To the combined dry ingredients, now add the primary binding agents and sweeteners: the full 1 cup of Creamy Peanut Butter, the 1/4 cup of Liquid Sweetener (Honey, Maple Syrup, or Agave Nectar), and the 1 teaspoon of Vanilla Extract. Try to scrape the peanut butter cleanly into the middle of the bowl.
Step 3: Mix the Dough to Uniform Consistency
Using your sturdy spoon, spatula, or stand mixer (on low speed), begin mixing the ingredients. Start slowly especially if using a mixer to prevent the lightweight protein powder from puffing up and spilling out of the bowl. Continue mixing vigorously. This mixing phase requires effort as the dough will rapidly become very thick. Mix until all ingredients are completely incorporated, and you see no dry powder streaks or separate blobs of peanut butter. The mixture should resemble a very thick cookie dough.
Step 4: Test and Adjust Consistency
Once the base dough is uniform, it’s time to incorporate the internal coconut and test the pliability. Add the 1/4 cup of Shredded Coconut (designated for the base). Mix thoroughly.
Now, test the dough. Pinch a small amount between your fingers.
- If it holds together perfectly and feels sticky but workable, proceed to Step 5.
- If the mixture feels crumbly, stiff, or breaks apart easily when pressed, it needs more moisture. Add 1 tablespoon of milk (any variety) and mix again until incorporated. Repeat this process, adding the second tablespoon of milk only if the dough is still too dry. The final consistency should be sticky but easily rollable.
Step 5: Chill the Dough (A Crucial Step)
Cover the mixing bowl tightly with plastic wrap, pressing the wrap directly onto the surface of the dough, or transfer the mixture to an airtight container. Do not skip the chilling process. Place the dough into the refrigerator for a minimum of 30 minutes. Chilling is essential because it allows the oats and protein powder time to fully hydrate and absorb the liquid, resulting in a firm, non-sticky dough that rolls beautifully into perfect Peanut Butter Coconut Protein Balls.
Step 6: Prepare the Coating
While the dough chills, prepare your coating station. Pour the additional 1/2 cup of Shredded Coconut onto a shallow plate or a wide, rimmed baking sheet. This shallow depth makes rolling and coating much easier.
Step 7: Roll the Balls
Remove the chilled dough. Using a small cookie scoop (about 1 to 1.5 tablespoons) or a standard measuring tablespoon, portion out the dough. Scoop the mixture and then roll it quickly between the palms of your hands. Aim for smooth, round balls, roughly one inch in diameter. Work quickly, as the dough will soften the longer it sits out at room temperature.
Step 8: Coat and Finish
Immediately after rolling each ball, place it gently onto the plate of shredded coconut. Roll the ball gently until the exterior is completely covered with the white flakes. Transfer the finished, coated Peanut Butter Coconut Protein Balls onto a clean plate or a baking sheet lined with parchment paper.
Step 9: Store the Protein Balls
For optimal texture, place the plate of finished balls back into the refrigerator for another 10 to 15 minutes. This final short chill allows the exterior coconut coating to adhere firmly and helps the balls maintain their shape. Once set, they are ready to be stored.
Tips and Variations for Your Coconut Energy Balls
While the classic Peanut Butter Coconut Protein Balls are phenomenal as written, part of the joy of homemade snacks is the ability to customize. Use these tips to perfect your batch and explore new flavor profiles.
Solving Consistency Issues
Consistency is everything with no-bake energy bites. The biggest variable is the type of protein powder used, as absorption rates vary wildly:
- If the Dough is Too Dry/Crumbly: Your powder likely absorbed too much moisture. Add liquid one teaspoon at a time (milk, water, or even a tiny splash of additional liquid sweetener) until the dough holds together when squeezed.
- If the Dough is Too Sticky/Soft: This usually means your peanut butter was too runny, or you used too much liquid sweetener/milk. The solution is simple: Add more dry binder. Stir in an extra tablespoon of rolled oats or an extra teaspoon of protein powder (if the macros allow) until the stickiness subsides. Always chill thoroughly; chilling solves 80% of stickiness issues.
Flavor and Ingredient Variations
Get creative with your homemade protein balls:
- Chocolate Chip Delight: Fold 1/4 cup of mini chocolate chips or cocoa nibs into the dough in Step 4 for a burst of rich chocolate flavor.
- Seed Power: Add 1-2 tablespoons of chia seeds or flax seeds for an omega-3 boost. Be warned that these seeds absorb moisture quickly, so you may need an extra splash of milk.
- Nut Butter Swap (Gluten-Free Option): Easily substitute almond butter, cashew butter, or sunflower seed butter for the peanut butter to cater to allergies or simply change the flavor. Ensure you use certified gluten-free oats if making them for those with Celiac disease.
- Make Them Vegan: This recipe is already easily vegan-friendly. Simply use maple syrup or agave nectar as your liquid sweetener and choose a plant-based protein powder (like soy, pea, or hemp). Use a non-dairy milk alternative (almond, oat, or soy) for consistency adjustments.
Storage and Freezer Tips
If you make a very large batch, these Peanut Butter Coconut Protein Balls freeze exceptionally well. Lay them out on a parchment-lined sheet after coating, flash-freeze them for about 2 hours until solid, and then transfer them to a freezer-safe zip-top bag or container. This prevents them from sticking together. Thaw individual portions in the refrigerator overnight or simply enjoy them frozen they are quite tasty straight from the freezer!
For more inspiration on quick, nutritious, no-bake snacks and meal prep ideas, feel free to visit our Pinterest profile for Cocina Facilita, where we share dozens of healthy recipes just like these!
Nutritional Values and the Benefits of Each Ingredient
One of the main reasons to choose these Peanut Butter Coconut Protein Balls over a commercial snack bar is the high-quality nutrition they deliver. While exact nutritional information will vary significantly based on your specific choices (especially the brand of protein powder and type of liquid sweetener used), we can break down the key benefits. Assuming a yield of 20 balls, each ball typically contains approximately 100-120 calories, providing a powerful balance of macros.
Key Nutritional Breakdown (Estimated per Ball)
- Calories: ~110 kcal
- Protein: 5-7 grams
- Total Fat: 6-8 grams (mostly healthy unsaturated fats)
- Net Carbs: 5-7 grams
- Fiber: 1-2 grams
Ingredient Spotlight: Health Benefits
Peanut Butter (Healthy Fats & Protein)
Peanut butter is rich in heart-healthy monounsaturated and polyunsaturated fats. These fats are vital for absorbing fat-soluble vitamins and contributing to satiety. It also provides niacin (Vitamin B3) and Vitamin E, which are powerful antioxidants. Choosing a natural style ensures you maximize these benefits while minimizing added sugars and hydrogenated oils.
Rolled Oats (Fiber Champion)
Oats are a fantastic source of soluble fiber, specifically beta-glucan. This type of fiber is known to help lower LDL (bad) cholesterol levels and stabilize blood sugar. In the Peanut Butter Coconut Protein Balls, the oats provide a sustained release of energy, making them excellent fuel for long work days or pre-workout sessions.
Protein Powder (Muscle Repair)
Protein powder is the core driver of the “protein” in these energy bites. It aids in muscle repair, growth, and overall metabolic function. Since protein requires more energy to digest than fats or carbs, incorporating it into snacks like these boosts thermogenesis and increases feelings of fullness, helping manage weight and prevent overeating.
Shredded Coconut (MCTs)
Coconut contributes healthy saturated fats, primarily in the form of Medium-Chain Triglycerides (MCTs). Unlike long-chain fats, MCTs are quickly converted into energy by the body, offering an immediate energy boost that complements the slow-release energy from the oats. Furthermore, the shredded coconut provides valuable dietary fiber.
Frequently Asked Questions (FAQs) about Peanut Butter Coconut Protein Balls
How long do Peanut Butter Coconut Protein Balls last in the refrigerator?
When stored in an airtight container, these protein balls will stay fresh and delicious in the refrigerator for up to 10 days. The high concentration of fats and sugar/sweetener acts as a natural preservative, keeping them stable. For longer storage, they can be frozen for up to 3 months.
Can I use different types of nut butter instead of peanut butter?
Absolutely. Almond butter, cashew butter, or even sunflower seed butter are great alternatives. Be aware that the consistency may change slightly; you might need to adjust the amount of liquid (milk) added, as different nut butters have varying degrees of runniness or stiffness. Always aim for a dough that is sticky but easily rollable.
Is it necessary to use old-fashioned rolled oats, or can I substitute instant oats?
It is strongly recommended to use old-fashioned rolled oats. Instant or quick oats are cut smaller and highly processed, causing them to absorb moisture too quickly and result in a mushy or gummy texture. Rolled oats provide the necessary hearty structure and chewiness required for these homemade protein balls to hold their shape.
What is the best way to make these Peanut Butter Coconut Protein Balls vegan?
To make this recipe vegan, ensure two key swaps: use maple syrup or agave nectar instead of honey for the liquid sweetener, and select a certified plant-based protein powder (such as pea or soy protein). Also, use a non-dairy milk (like almond or oat milk) if you need to adjust the consistency. All other ingredients are naturally vegan.
Why do I need to chill the dough before rolling?
Chilling is a mandatory step in this no-bake recipe. The cold temperature allows the protein powder and oats to fully hydrate, absorbing the moisture from the peanut butter and sweetener. This process firms up the dough significantly, making it less sticky, easier to handle, and crucial for achieving neat, uniform Peanut Butter Coconut Protein Balls that don’t fall apart.
Conclusion: Your New Favorite Meal Prep Snack
The journey to healthier eating doesn’t require complicated, time-consuming recipes. Sometimes, the best snacks are the simplest, and these Peanut Butter Coconut Protein Balls are definitive proof. With just 15 minutes of hands-on time, you create a batch of approximately 20 perfectly portioned, high-protein energy bites that will sustain you through busy mornings, power your workouts, and satisfy those persistent afternoon sweet cravings.
These coconut energy balls blend the comforting, familiar flavor of peanut butter with the exotic sweetness of shredded coconut, all while delivering top-tier nutrition thanks to the added oats and protein powder. They are the epitome of smart snacking: delicious, customizable, affordable, and incredibly easy to make. Once you taste how simple and effective these are, you’ll never reach for an overpriced, factory-made protein bar again.
We encourage you to try this recipe today and make meal prepping a little more delicious! If you enjoyed learning how to make these wonderful Peanut Butter Coconut Protein Balls, please share this article with friends and family who could use a healthy snack boost. And don’t forget to leave a comment below telling us your favorite flavor variation!

Peanut Butter Coconut Protein Balls (No-Bake Energy Bites)
Ingredients
Equipment
Method
- In a large mixing bowl, measure and combine the Rolled Oats and the Vanilla Protein Powder. Use a whisk or a spoon to thoroughly mix these two dry ingredients together to ensure the protein powder is evenly distributed.
- To the dry ingredients, add the full cup of Creamy Peanut Butter, the measured Liquid Sweetener (Honey or Maple Syrup), and the Vanilla Extract.
- Using a sturdy spoon, spatula, or a stand mixer fitted with a paddle attachment, mix all ingredients until a uniform, thick dough forms. Continue mixing until no streaks of peanut butter or dry powder remain. Scrape down the sides of the bowl as needed.
- If the mixture appears too thick and sticky, add the 1/4 cup of Shredded Coconut (the amount designated for the base). If, after adding the coconut, the mixture still feels crumbly or is difficult to stick together, add the milk, one tablespoon at a time, until the dough reaches a pliable consistency that can be easily rolled without falling apart.
- Cover the mixing bowl tightly with plastic wrap or transfer the dough to a sealable container. Place the dough into the refrigerator and allow it to chill for a minimum of 30 minutes. Chilling the mixture makes the dough firmer and significantly easier to roll.
- While the dough is chilling, pour the additional 1/2 cup of Shredded Coconut (for coating) onto a shallow plate or baking sheet. Line a separate baking sheet with parchment paper.
- Remove the chilled dough from the refrigerator. Use a small cookie scoop (about 1-inch) or a measuring tablespoon to measure out equal portions of the dough. Roll each portion between the palms of your hands to form smooth, round balls.
- Immediately roll each protein ball gently through the plate of extra shredded coconut until the exterior is fully coated. Place the finished coated balls onto the parchment-lined baking sheet.
- For best results, place the finished balls back into the refrigerator for an additional 10 to 15 minutes to allow them to fully set before serving.