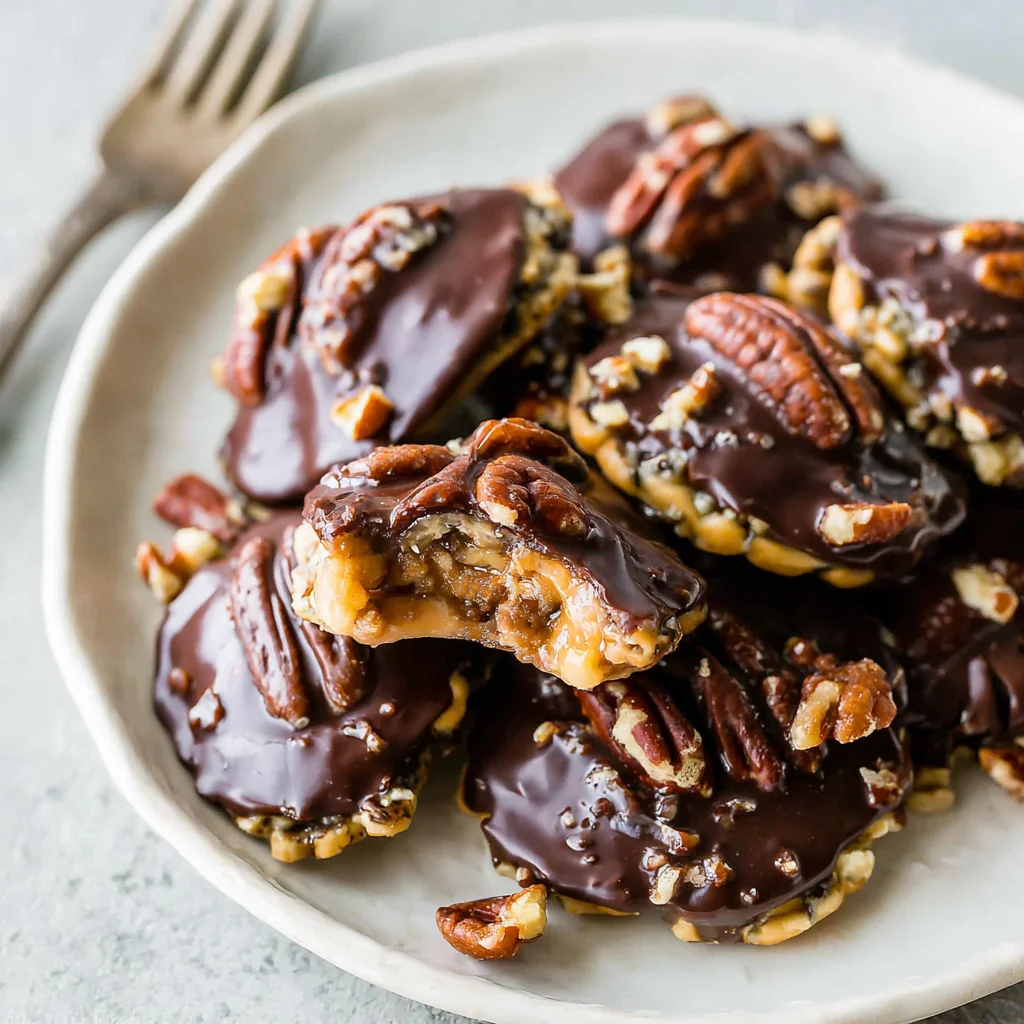
There are few candies in the world that inspire the same level of blissful indulgence as the classic turtle candy. That harmonious combination of crunchy, toasted pecans, gooey, rich caramel, and a decadent blanket of silky chocolate is simply irresistible. While store-bought versions are always a treat, nothing compares to the fresh, customizable perfection of Homemade Chocolate Turtles. Forget those days of hunting down expensive gift boxes; with this comprehensive guide, you can create professional-quality, irresistible turtle candy right in your kitchen.
Whether you’re looking for the perfect edible gift during the holidays, a show-stopping dessert for a gathering, or just a deeply satisfying treat for yourself, this recipe for easy caramel turtles delivers every time. We break down the process into simple, manageable steps, ensuring that even novice candy makers can achieve glossy, deeply flavorful results. Get ready to transform basic ingredients into extraordinary, beautiful, and utterly delicious Homemade Chocolate Turtles!
Why You’ll Fall in Love with this Homemade Chocolate Turtles Recipe
Making candy at home might sound daunting, but this specific recipe for Homemade Chocolate Turtles simplifies the process without sacrificing flavor or quality. You are not just making a dessert; you are crafting a culinary experience that hits all the right notes sweet, salty, crunchy, and smooth. Here is why this DIY turtle candy will become your new favorite obsession:
- Unmatched Freshness: The flavor difference between store-bought and homemade is staggering. When you toast your pecans just before assembly, their nutty aroma and deep crunch are maximized. The caramel is warm and gooey, melting in your mouth, unlike the stiff texture often found in pre-packaged candy.
- Customization is Key: Unlike mass-produced versions, you are in control. Prefer dark chocolate to milk chocolate? Go for it! Want to add a gourmet touch with smoked sea salt? Absolutely! This recipe is a template for your own creativity.
- Simple Ingredients, Incredible Results: You only need five core ingredients pecans, caramel, chocolate, and a bit of cream. These accessible staples transform through simple techniques into a complex, multi-layered confection.
- The Perfect Gift: Few homemade treats are as impressive as a box of polished chocolate covered caramels. They travel well, last long, and look incredibly elegant, making them ideal for holiday baskets, thank you gifts, or party favors.
- Stress-Free Candy Making: We utilize shortcut methods for both the caramel (using store-bought chews or sauce) and the chocolate melting (microwave method), eliminating the need for complicated sugar thermometers or tempering processes, though we still achieve that beautiful, glossy finish.
This recipe provides the structure to make something truly special. The process is satisfying, and the reward a perfectly structured, deeply satisfying pecan caramel cluster is absolutely worth the minimal effort. If you enjoy making other comforting sweets, you might also love perfecting your Hot Chocolate Fudge or whipping up some Chewy Pecan Pie Cookies, showing how versatile these foundational flavors are.
Why You Should Try Making Easy Caramel Turtles Today
Beyond the delicious outcome, there are many practical reasons why diving into this recipe for Homemade Chocolate Turtles is a fantastic idea. It addresses cravings, provides an excellent activity, and often saves you money compared to buying premium candy brands.
A Rewarding and Cost-Effective Project
One of the main reasons people hesitate to make gourmet candy is the perceived difficulty. However, Homemade Chocolate Turtles are fundamentally simple assembly projects. You are combining three prepared elements (toasted pecans, melted caramel, and melted chocolate) in a creative way. This makes the project highly rewarding, especially when you see the professional-looking results laid out on the baking sheet.
Economically, buying bulk ingredients often far outweighs the cost of purchasing pre-made turtle candy. A bag of pecans, chocolate chips, and caramel chews can yield 15–20 high-quality turtles, often for less than the price of a small box from a specialty store. This makes DIY pecan caramel clusters an incredibly smart choice for gifting or for large parties.
Perfect for Seasonal Gifting and Holidays
Turtles are undeniably a holiday favorite, but they are wonderful year-round. Because they are relatively sturdy and hold their shape well, they are excellent candidates for shipping or assembling into personalized holiday tins. If you are looking for simple, stunning treats for your next event, these Homemade Chocolate Turtles are a guaranteed crowd-pleaser.
The structured nature of the recipe also makes it great for cooking with children or as a mindful baking project. The repetitive assembly placing the pecans, scooping the caramel, dipping in chocolate is relaxing and results in beautiful, uniform pieces.
Don’t forget to elevate your finished product with a tiny touch of flaky sea salt. That hint of salinity cuts through the sweetness of the caramel and chocolate, amplifying the rich flavors and transforming your candy from simply delicious to truly exceptional. While these chocolate covered caramels are great for special occasions, if you’re craving something creamy and simple for a weeknight, consider making a No-Bake Peanut Butter Pie sometimes, simple and chilled is just what you need!
Essential Ingredients and Tools for the Best Chocolate Covered Caramels
Success in making perfect Homemade Chocolate Turtles starts with quality ingredients. Since there are only a few components, choosing the best versions of each will dramatically impact the final taste and texture. We will walk through exactly what you need and why each element is crucial.
Ingredients Breakdown (Yields 15-20 Turtles)
This recipe provides a solid yield, perfect for sharing or storing. Remember to use measuring cups accurately for best results.
For the Pecan Base:
- 1 cup pecan halves: Pecans are non-negotiable for true turtles. Using halves allows you to form the distinct “legs” of the turtle shape. Toasting is absolutely vital for maximum flavor and crunch.
For the Caramel Filling (The Gooey Center):
- 1 cup caramel chews (about 40 pieces) or pre-made caramel sauce: If using chews (like Kraft Caramels), they provide a thicker, firmer caramel that sets beautifully. If using a jarred, pre-made caramel sauce, ensure it is a thick sauce, not a runny ice cream topping, or your turtles will spread too much.
- 2 tablespoons heavy cream or milk (if using caramel chews): This liquid is necessary to help the chews melt smoothly into a pourable, yet still thick, consistency.
For the Chocolate Coating (The Shell):
- 1 cup milk chocolate chips (or dark chocolate, depending on preference): Milk chocolate is traditional, but dark chocolate turtles offer a more sophisticated, less sweet flavor profile. Choose high-quality melting chocolate or chips for the smoothest finish.
- 1 teaspoon coconut oil or vegetable shortening (optional, for smoother melting): This is the secret to getting a professional, glossy finish on your chocolate without the need for complex tempering. It helps the chocolate set smoothly and quickly.
- Flaky sea salt (optional, for topping): A garnish that makes all the difference. Maldon or another large-crystal sea salt provides the perfect flavor contrast and a beautiful visual appeal.
Deep Dive into Ingredient Selection
When creating premium Homemade Chocolate Turtles, the details matter:
- The Power of Pecans: Why toast? Untoasted nuts are bland. Toasting them at 350°F releases their natural oils, intensifying their nutty, buttery flavor. This also ensures they retain a satisfying crunch, which stands up well against the soft caramel.
- Caramel Consistency: If you opt for making your own caramel from scratch a glorious, but time-consuming process ensure it reaches the soft-ball stage (235°F–245°F) for the perfect chewy texture. If you’re sticking to the quick method, melting the chews with cream yields a fantastic, sturdy filling that won’t ooze out when you dip the turtle.
- Chocolate Choice: If using chips, remember they contain stabilizers designed to help them hold their shape during baking. Adding the coconut oil is essential when using chips for melting, as it helps break down these stabilizers, allowing for a more fluid, dippable consistency. If you want the absolute best snap, use melting wafers (like Ghirardelli or Callebaut), which are specifically designed for confectionery dipping.
Recommended Kitchen Utensils
Having the right tools ensures the assembly process is smooth, quick, and clean, which is crucial when dealing with sticky caramel and melting chocolate.
- Baking Sheets and Parchment Paper/Silicone Mats: Absolutely essential for setting the turtles. Parchment paper or silicone baking mats prevent sticking and make cleanup a breeze.
- Small Microwave-Safe Bowls: Needed for melting both the caramel and the chocolate in controlled bursts.
- Small Saucepan (Alternative Method): Useful if you prefer melting the caramel or chocolate over a low heat double boiler.
- Small Cookie Scoop (or Teaspoon): The key to uniform turtles! A small scoop (about 1–1.5 teaspoons) ensures you use the same amount of caramel for every pecan cluster.
- Dipping Tools (Forks or Specialty Dippers): Using two forks or a specialty chocolate dipping tool allows the excess chocolate to drain completely, preventing puddles on your parchment paper.
- Airtight Container: For proper storage of your finished DIY turtle candy.
For more inspiration and visual guidance on crafting beautiful homemade treats, be sure to follow my candy board on Pinterest!
Step-by-Step Guide to Crafting Perfect Homemade Chocolate Turtles
Follow these detailed steps closely to ensure your Homemade Chocolate Turtles have the ideal crunch, gooey center, and glossy coating. Timing and temperature management are key for success.
Step 1: Prepare the Pecan Bases (The Toasting Phase)
- Preheat and Prep: Preheat your oven to 350°F (175°C). Line one or two large baking sheets with parchment paper or a silicone baking mat. Do not skip the lining, as the caramel is incredibly sticky.
- Toast the Pecans: Spread the pecan halves in a single layer on a separate, unlined baking sheet. Toast for about 5 to 8 minutes. Watch closely! Pecans burn quickly. They are ready when they smell richly fragrant and have taken on a slightly deeper golden color.
- Cool Completely: Remove the toasted pecans and allow them to cool completely. Warm nuts can melt the caramel prematurely, making assembly messy.
- Assemble the Bases: Arrange clusters of three or four toasted pecan halves on the prepared, lined baking sheets. Fan them out slightly to mimic the shape of a turtle’s legs and head. Leave about 2 inches of space between each cluster.
Step 2: Make the Caramel Filling (The Gooey Center)
If you are using pre-made jarred caramel sauce, skip to Step 3, but ensure the sauce is slightly warmed to make it scooping easier.
- Combine Ingredients: Place the caramel chews (around 40 pieces) and the heavy cream or milk into a microwave-safe bowl.
- Melt Slowly: Microwave the mixture in 30-second intervals. Stir thoroughly after each interval. This even distribution of heat prevents the caramel from burning or becoming granular. It should take about 1 to 2 minutes total until the caramel is completely smooth, shiny, and lump-free.
- Cool Slightly: Remove the melted caramel from the heat and allow it to cool for about 5 to 7 minutes. Crucial Tip: The caramel must be warm enough to scoop, but cool enough that it holds its shape and doesn’t immediately run off the pecans.
Step 3: Assemble the Caramel and Pecans (The Shell Forming)
- Scoop the Caramel: Using a small spoon or a 1-teaspoon cookie scoop, place a dollop of the warm, slightly thickened caramel directly over the center of each pecan cluster. The caramel should act as the glue, holding the “legs” together and forming the smooth, dome-like shell.
- Shape (if necessary): If the caramel is spreading too thin, let the bowl sit for another minute or two and try again. If it is too stiff, microwave for 10 seconds. You want a consistency that holds its dome shape.
- Chill to Set: Once all turtles are covered in caramel, place the baking sheets into the refrigerator for about 15 to 20 minutes. This step is non-negotiable! The caramel must firm up significantly before being dipped, or it will pull off the pecans and mix with the chocolate.
Step 4: Melt the Chocolate Coating (Achieving Glossy Perfection)
- Combine Chocolate and Oil: Place the chocolate chips and the coconut oil (or vegetable shortening) into a microwave-safe bowl. The oil is important for achieving that professional, glossy look on your finished Homemade Chocolate Turtles.
- Melt Carefully: Microwave in 30-second intervals, stirring well after each one. Chocolate retains its shape even after melting, so stirring is essential to check the true consistency. Stop heating when there are still a few small lumps remaining; stirring will melt these residual pieces using the chocolate’s latent heat. Never overheat chocolate, as this causes it to seize (thicken and become grainy).
- Keep Warm: If your chocolate starts to cool and thicken during dipping, microwave it again for 10–15 seconds and stir until smooth.
Step 5: Coat and Finish the Turtles (The Final Transformation)
- Dip the Clusters: Take the chilled caramel pecan clusters out of the refrigerator. Working quickly, dip each caramel turtle into the melted chocolate. Use two forks or a dipping tool to gently submerge the candy and then lift it. Allow the excess chocolate to drip off completely before moving the turtle.
- Place and Salt: Carefully place the fully coated turtle back onto the parchment-lined baking sheet. Immediately sprinkle a tiny pinch of flaky sea salt (if desired) onto the wet chocolate shell of each turtle. The chocolate sets quickly, so sprinkle immediately after coating.
- Final Set: Place the baking sheets back into the refrigerator for another 15 to 30 minutes, or until the chocolate is completely set and hardened. The final result should have a satisfying “snap.”
- Storage: Store your finished Homemade Chocolate Turtles in an airtight container at room temperature (if your kitchen is cool) or in the refrigerator for up to one week.
When you achieve that perfect balance of set caramel, crunchy pecan, and snappy chocolate, you’ll realize why making your own pecan caramel clusters is truly superior. This recipe is also great when you want to make other no-bake items, ensuring you have delicious, ready-to-eat desserts like our Easy No-Bake Peanut Butter Pie ready for unexpected guests.
Tips, Variations, and Troubleshooting for Your DIY Turtle Candy
While this recipe for Homemade Chocolate Turtles is straightforward, a few common issues can arise. Knowing how to prevent these problems and offering exciting variations will ensure your candy-making experience is a smashing success.
Common Mistakes to Avoid
- Caramel Runs Off the Pecans: This happens if the caramel is too hot or too thin. Ensure you allow the melted caramel to cool for at least 5 minutes before scooping (Step 2). If it’s still too runny, put the bowl back for a few more minutes until it thickens slightly.
- Chocolate Seizes During Melting: This usually happens due to overheating or the introduction of a tiny drop of water. Always use short, 30-second bursts in the microwave and stir carefully. If your chocolate seizes, you can sometimes rescue it by stirring in a teaspoon of neutral oil (like vegetable or coconut oil) or melted shortening, though the texture may not be quite as perfect.
- Turtles Stick to the Pan: Did you use parchment paper or a silicone mat? If not, the caramel will fuse to the pan. If the chocolate-dipped turtles are tacky when you take them out of the fridge, let them warm up for just one minute before gently peeling them off the liner.
- The Coating Looks Dull: This is generally due to not adding the coconut oil/shortening (Step 4) or not cooling the chocolate quickly enough. Chilling the chocolate covered caramels immediately after dipping helps lock in that glossy shine.
Delicious Variations to Explore
Once you’ve mastered the basic Homemade Chocolate Turtles recipe, feel free to experiment!
Chocolate Variations:
- Dark Chocolate Turtles: Swap out the milk chocolate for high-quality dark chocolate (60% or 70% cacao) for a more intense, sophisticated flavor that balances the ultra-sweet caramel perfectly.
- White Chocolate Drizzle: Dip the turtles in milk or dark chocolate, let them set, and then drizzle melted white chocolate over the top for a beautiful contrast and added sweetness.
Nut and Caramel Variations:
- Nut Alternatives: While pecans are traditional, you can make delicious variations using toasted walnuts, almonds, or even macadamia nuts.
- Spice Infusion: Add a tiny pinch of cinnamon or a drop of vanilla extract to your melted caramel for an extra layer of warmth.
Dietary Alternatives:
- Vegan Turtles: Swap traditional dairy caramel chews for store-bought vegan caramels (made with coconut cream or maple syrup). Use a high-quality vegan milk or dark chocolate coating. Be sure to use plant-based milk (like almond or oat milk) instead of heavy cream in the caramel step.
- Gluten-Free: These pecan caramel clusters are naturally gluten-free, making them an excellent choice for those with dietary restrictions.
Nutritional Insights and Benefits of Pecan Caramel Clusters
While Homemade Chocolate Turtles are a decadent indulgence, understanding the components of this treat allows us to appreciate the nutritional contributions of its primary ingredients, particularly the pecans and dark chocolate.
General Nutritional Profile (Per Serving/Turtle Estimate)
Since serving sizes vary greatly in homemade candy, these are general estimates based on a medium-sized turtle made with milk chocolate:
- Calories: Approximately 150-200 calories per turtle.
- Fats: 10-15g (Primarily from the healthy fats found in pecans and cocoa butter).
- Carbohydrates: 18-25g (Mostly sugar from the caramel and chocolate).
- Protein: 1-2g.
- Fiber: 1-2g (Contributed mainly by the nuts and cocoa solids).
As a confectionery item, DIY turtle candy should be enjoyed in moderation. However, unlike many empty-calorie sweets, turtles derive genuine benefits from the nuts they contain.
The Mighty Pecan: Health Benefits
Pecans are more than just a crunchy vehicle for caramel; they are nutritional powerhouses:
- Heart Health: Pecans are rich in monounsaturated fats, such as oleic acid, which are associated with lowering bad (LDL) cholesterol levels.
- Antioxidant Rich: Pecans are packed with antioxidants, including Vitamin E, which help the body fight oxidative damage and reduce inflammation.
- Minerals and Vitamins: They are a good source of manganese and copper, which support metabolic health and immune function. The fiber content also aids in digestive health.
The Magic of Chocolate
If you choose to use dark chocolate for your dark chocolate turtles, the benefits increase significantly:
- Flavonoids: Dark chocolate contains high levels of cocoa solids, which are rich in flavanols. These compounds have been shown to improve blood flow, lower blood pressure, and boost brain function.
- Mineral Content: Quality dark chocolate is a good source of iron, magnesium, and zinc.
Ultimately, while these pecan caramel clusters are a treat, choosing high-quality ingredients allows you to maximize flavor while providing small, beneficial components from the nuts and cocoa solids. Enjoy your Homemade Chocolate Turtles thoughtfully, savoring every handcrafted bite.
Frequently Asked Questions
Here are some of the most common questions people ask when making Homemade Chocolate Turtles at home.
How long do Homemade Chocolate Turtles last and how should I store them?
When stored in an airtight container, pecan caramel clusters last well for up to one week at cool room temperature (below 70°F). For extended freshness, especially if your kitchen is warm, store them in the refrigerator for up to three weeks. If refrigerated, allow them to sit out for about 10 minutes before serving for the best texture.
Why did my caramel run all over the baking sheet after dipping?
The caramel was likely too warm or too thin during assembly, or you didn’t chill the clusters long enough before dipping. Ensure you let the melted caramel cool slightly until it’s thick and holds a dome shape. The crucial step is chilling the easy caramel turtles for 15-20 minutes in the refrigerator (Step 3) so the caramel is firm and stable when it hits the warm chocolate.
Can I use dark chocolate instead of milk chocolate for this turtle recipe?
Absolutely! Many connoisseurs prefer dark chocolate turtles as the slight bitterness of the dark chocolate (60% cocoa or higher) provides a wonderful balance to the sweetness of the caramel. Follow the exact same melting instructions, using the optional coconut oil to ensure a glossy, snappy finish on your coating.
Is tempering the chocolate necessary for chocolate covered caramels?
While true tempering provides the absolute best snap and shine, it is not strictly necessary for this home recipe. By using high-quality melting chocolate or adding a teaspoon of coconut oil or vegetable shortening, as outlined in Step 4, you can achieve a very stable and glossy coating without the complexity of traditional tempering methods.
How can I make sure my pecans are perfectly toasted?
Perfectly toasted pecans are key to the best Homemade Chocolate Turtles. Spread them in a single layer and watch them constantly while they bake at 350°F (175°C) for 5-8 minutes. The best indicator is smell: once they smell richly fragrant and nutty, they are done. Remove them immediately to prevent carryover cooking.
Can I freeze DIY turtle candy?
Yes, Homemade Chocolate Turtles freeze very well. Place the set candies in a freezer-safe, airtight container, separating layers with parchment paper. They can last up to three months. To thaw, move them to the refrigerator overnight, then let them come to room temperature for about an hour before serving.
Conclusion: Enjoying Your Homemade Chocolate Turtles
Congratulations! You have successfully mastered the art of making glorious Homemade Chocolate Turtles. This recipe proves that you don’t need expensive equipment or specialized training to produce confectionery masterpieces. With just a few simple ingredients and controlled cooling periods, you have created a classic candy that is rich, textural, and bursting with fresh, nutty flavor.
The satisfaction of biting into a crisp, toasted pecan cluster, followed by that luscious, chewy caramel, and finished with a sharp snap of professional-grade chocolate, is unbeatable. These chocolate covered caramels are not just a holiday treat; they are a delightful indulgence that elevates any ordinary moment.
Remember that the secret to truly outstanding results lies in the details: perfectly toasting the pecans, ensuring the caramel has time to cool and set, and utilizing the coconut oil for that unbeatable glossy sheen on your chocolate. Whether you chose the traditional milk chocolate or embraced the sophistication of dark chocolate turtles, the final product is a testament to your excellent candy-making skills.
We hope this detailed guide encourages you to make these pecan caramel clusters again and again. They are perfect for gifting, marvelous for dessert platters, and ideal for treating yourself. We invite you to try this recipe and share your results! Did you use sea salt? Did you try the dark chocolate variation? Let us know in the comments below. Happy candy making!
Homemade Salted Chocolate Pecan Turtles
Ingredients
Equipment
Method
- Preheat your oven to 350°F (175°C). Spread the pecan halves in a single layer on a baking sheet. Toast for about 5 to 8 minutes, watching carefully to prevent burning. Allow pecans to cool completely.
- Line one or two large baking sheets with parchment paper or a silicone baking mat. Arrange clusters of three or four toasted pecan halves on the sheets, spreading them slightly outwards to resemble the legs of a turtle. Leave about 2 inches of space between each cluster.
- If using caramel chews, place them and the heavy cream into a microwave-safe bowl. Microwave in 30-second intervals, stirring thoroughly after each interval, until the caramel is completely smooth (1-2 minutes total). If using jarred sauce, skip this step.
- Remove the caramel from the heat and allow it to cool slightly (about 5 minutes). This prevents the caramel from running too much when scooped.
- Using a small spoon or scoop, place a dollop of the warm caramel directly over the center of each pecan cluster. This forms the turtle's 'shell.'
- Place the baking sheets into the refrigerator for about 15 to 20 minutes, or until the caramel has firmed up slightly and holds its shape.
- Melt the Chocolate: Place the chocolate chips and the coconut oil (if using) into a microwave-safe bowl. Microwave in 30-second intervals, stirring well after each one, until the chocolate is fully melted and smooth.
- Dip each chilled caramel turtle into the melted chocolate, ensuring it is completely covered. Use a fork or dipping tool to gently lift the candy and let the excess chocolate drip off.
- Immediately place the coated turtle back onto the parchment paper. Sprinkle a tiny pinch of flaky sea salt (if desired) onto the wet chocolate shell of each turtle.
- Refrigerate the finished turtles for another 15 to 30 minutes, or until the chocolate is completely set and hardened. Store in an airtight container at room temperature or in the refrigerator for up to one week.