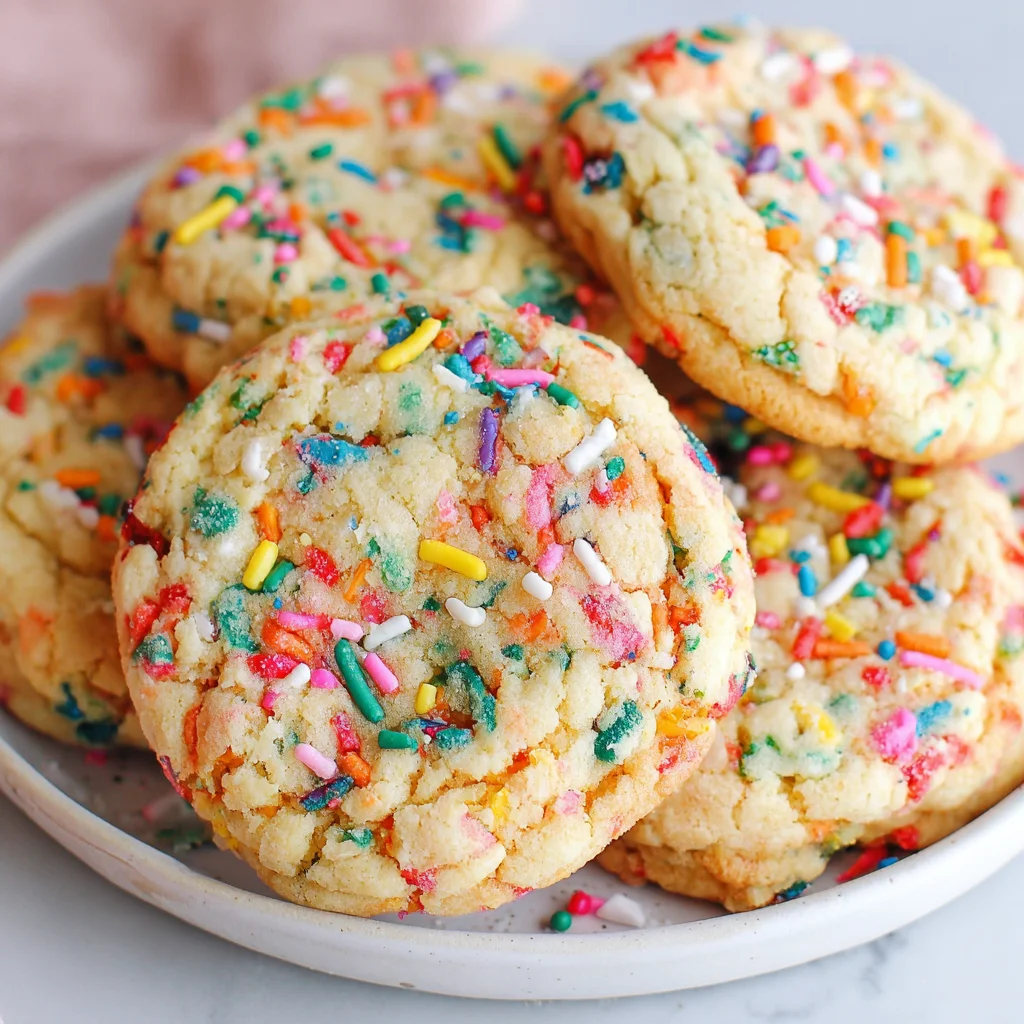
There are few desserts that instantly evoke pure, unadulterated joy quite like a homemade Funfetti Cookie. These aren’t just sugar cookies speckled with color; these are soft, chewy, thick, and bursting with buttery vanilla flavor, wrapped up in a rainbow party dress. Whether you call them confetti cookies, sprinkle cookies, or Funfetti Cookies, this classic recipe delivers that perfect nostalgic bite every single time.
Forget the box mix! We’re going back to basics with this recipe to create the absolute best chewy Funfetti Cookies you’ve ever tasted. We focus on specific techniques like proper creaming and precise ingredient temperatures to ensure your cookies come out thick, soft in the center, and perfectly golden around the edges. Get ready to bake a batch of happiness!
Why You’ll Love These Chewy Funfetti Cookies
These aren’t just good cookies; they are an experience. If you’ve been searching for that bakery-style cookie thick, slightly underbaked in the middle, and perfectly balanced between vanilla sweetness and a hint of salt you’ve found it. The magic of these homemade Funfetti Cookies lies not only in their dazzling appearance but in their flawless texture. Here’s why this recipe deserves a permanent spot in your baking rotation:
1. Unmatched Chewy Texture
The goal of a great cookie is never flatness or dryness. We aim for chewiness, and this recipe absolutely nails it. By using a slightly higher ratio of brown sugar (if substituting, which we discuss later) or, in this case, a precise mix of granulated sugar and proper chilling, we control the spread. The result is a substantial cookie that holds its shape, remaining soft and moist for days. The secret to maintaining this chew is slightly underbaking them the residual heat on the baking sheet finishes the cooking process, guaranteeing a tender, gooey center.
2. The Perfect Nostalgic Flavor Profile
The flavor is modeled after classic cake batter, which is why Funfetti is so beloved. The key flavor component here is high-quality pure vanilla extract, often used generously (1 Tablespoon, which is more than many recipes call for). This vanilla punch, combined with the rich flavor of real butter, mimics that quintessential “white cake with sprinkles” taste. This isn’t a complex flavor, but it is deeply comforting and utterly delicious.
3. Visually Stunning and Party Ready
Let’s be honest: the sprinkles are the star! The contrast between the soft, pale dough and the vibrant, embedded jimmies makes these homemade Funfetti Cookies ideal for birthdays, holidays, or just brightening a Tuesday. They are automatically festive and require zero decorating skills beyond adding the sprinkles themselves. They travel well and make excellent gifts.
4. Beginner-Friendly Baking
While we emphasize precise techniques like creaming the butter and sugar for the full 3-4 minutes, the actual steps are incredibly straightforward. If you know how to use a mixer, you can master this recipe. We detail every step below, ensuring even novice bakers can achieve spectacular results. If you are looking for other simple yet delicious baked goods, check out our guide on Cinnamon Roll Muffins.
Why You Should Try This Recipe for Homemade Funfetti Cookies
In a world saturated with complex desserts, the simple, vibrant charm of the Funfetti Cookie stands out. This particular recipe moves beyond simply adding sprinkles to a generic sugar cookie base; it’s engineered for maximum flavor and texture retention. Trying this recipe means committing to a superior baking outcome that outshines store-bought versions.
Precision in Preparation Means Perfection in Product
We’ve structured this recipe to eliminate common cookie errors. Have you ever had a cookie spread into a flat puddle? That often happens when ingredients are too warm or the flour isn’t measured correctly. We tackle these issues head-on:
- Room Temperature Ingredients: We insist on room temperature butter and eggs. Why? When cold ingredients are mixed, they don’t emulsify properly. Softened butter creams easily with sugar, trapping air needed for lift. This air pocket is vital for a light, chewy texture.
- The Art of Creaming: The instruction to cream the butter and sugar for 3 to 4 minutes is non-negotiable. This process, known as creaming, is what transforms the ingredients into a “light, fluffy, and pale yellow” mixture. This aeration provides the essential structure that allows the cookies to rise slightly before settling into that perfect chewy disk.
- Avoiding Overmixing: Once the flour hits the wet ingredients, we mix only until “just combined.” Overmixing develops gluten, resulting in tough, cakey cookies. The secret to tender, chewy Funfetti Cookies is always a light hand once the dry ingredients are introduced.
A Treat for All Ages and Occasions
The universal appeal of these Funfetti Cookies cannot be overstated. They are excellent for:
- Birthday Celebrations: They bring the spirit of birthday cake into a convenient, handheld form.
- Holiday Baking: Swap out the rainbow jimmies for seasonal colors (red/green for Christmas, pastels for Easter) to create themed sprinkle cookies.
- Stress-Free Dessert: The recipe is fast enough to whip up for an unexpected craving, especially if you skip the chilling step (though chilling is highly recommended for best shape!).
Furthermore, mastering this base dough gives you endless potential for creativity. Whether you fold in white chocolate chips, add citrus zest, or dunk them partially in glaze, the foundation remains this incredibly versatile and delicious classic Funfetti dough. These homemade Funfetti Cookies truly are the best way to brighten any day.
Ingredients and Essential Utensils for Perfect Funfetti Cookies
Success in baking begins long before the oven preheats; it starts with accurate measurements and having the right tools. For these decadent, chewy Funfetti Cookies, quality ingredients make a noticeable difference, especially when it comes to the vanilla and the butter. Below is a detailed breakdown of what you need and why each element is crucial for achieving that classic soft-batch texture.
The Essential Ingredients List
| Item | Quantity | Notes |
| :— | :— | :— |
| Fats | | |
| Unsalted Butter, softened | 1 cup (2 sticks) | Must be softened to room temperature the single most important step for creaming. |
| Sugars | | |
| Granulated White Sugar | 1 ½ cups | Provides structure and that signature crisp edge. |
| Wet Ingredients | | |
| Large Eggs | 2 | Room temperature recommended; helps with emulsification and richness. |
| Pure Vanilla Extract | 1 Tablespoon | Use high quality extract! This is the core flavor of Funfetti Cookies. |
| Dry Ingredients | | |
| All-Purpose Flour | 3 cups | Measured accurately (spooned and leveled). Too much flour equals dry cookies. |
| Baking Soda | 1 teaspoon | The primary leavener for rise and spread control. |
| Salt | ½ teaspoon | Fine grain; balances the sweetness and enhances the butter and vanilla flavor. |
| The Fun | | |
| Rainbow Sprinkles (Jimmies) | ½ cup | Crucial Tip: Use Jimmies (rod shape). Avoid nonpareils (tiny balls) as they bleed color easily. |
Ingredient Deep Dive and Preparation Tips
Fats: Room Temperature Butter is Key
When the recipe calls for softened butter, it means truly room temperature butter soft enough to easily dent with your finger, but not melted or greasy. If the butter is too cold, it won’t incorporate enough air during creaming, resulting in dense cookies. If it’s too warm, the dough will be oily and spread too much during baking. Aim for butter that has sat out for about 1 hour.
Sugar’s Role in Chewy Funfetti Cookies
We use granulated white sugar to provide sweetness and structure. The sugar crystals cut into the softened butter during creaming, creating tiny air pockets. When these pockets expand in the heat, they give the cookies lift. While some chewy cookie recipes rely heavily on brown sugar for moisture (due to molasses content), this classic Funfetti Cookie recipe uses just white sugar, relying on accurate creaming and timing to achieve the softness.
Eggs and Vanilla: Flavor Foundations
Just like butter, eggs should be at room temperature for optimal mixing. They bind the ingredients and add moisture and richness. The vanilla extract is the backbone of the Funfetti flavor. Don’t skimp here; that tablespoon of pure vanilla extract ensures your cookies taste like classic cake batter, distinguishing these truly phenomenal sprinkle cookies from bland sugar cookies.
Measuring Flour Accurately
This is often where recipes go wrong. If you scoop flour directly from the bag with your measuring cup, you compact it, potentially adding 25% more flour than required. This extra flour makes the dough dry and results in crumbly, tough cookies. Always use the “spoon and level” method: lightly spoon the flour into your measuring cup until overflowing, then use a straight edge (like the back of a knife) to sweep the excess off the top. This precision is essential for soft, moist homemade Funfetti Cookies.
Choosing the Right Sprinkles
The type of sprinkles matters immensely. We strongly recommend using jimmies (the long, cylindrical shape). Nonpareils (the tiny balls) have a greater tendency to dissolve and bleed color into the dough when mixed, turning your beautiful white dough into a gray or muddy mess. The jimmies hold their color and structure much better during the quick fold-in step.
Essential Tools and Utensils
Having the right equipment streamlines the baking process and improves results. You don’t need fancy tools, but these are highly recommended for baking these Funfetti Cookies:
- Stand Mixer or Hand Mixer: The 3-4 minutes of creaming time is crucial and tedious to do by hand. A stand mixer with a paddle attachment ensures consistent, even mixing.
- Parchment Paper or Silicone Baking Mats: Essential for preventing sticking and promoting even heat distribution. Silicone mats, in particular, help regulate the heat and can contribute to a slightly chewier base.
- Rubber Spatula: Necessary for scraping down the bowl during mixing and, most importantly, for gently folding in the sprinkles without overmixing.
- Medium Cookie Scoop (1.5 – 2 tablespoons): Using a scoop ensures uniform size and shape, which is critical for even baking times. If your cookies are different sizes, some will burn while others are undercooked. You can find excellent scoops that will make all your cookie baking projects, including our delicious Peanut Butter Chocolate Chip Cookies, far easier.
- Wire Cooling Rack: Allowing the cookies to cool completely on a rack stops the baking process immediately and prevents a soggy bottom.
- Measuring Cups and Spoons: Accuracy is the foundation of baking!
Step-by-Step Instructions: Baking Perfect Classic Chewy Funfetti Cookies
Follow these detailed steps carefully, paying special attention to ingredient temperatures and mixing times. These techniques guarantee the chewy texture and vibrant appearance characteristic of the best homemade Funfetti Cookies.
Step 1: Preparation is Key
- Preheat: Preheat your oven to 350°F (175°C). Having the oven at the correct temperature before the dough is ready is important for minimizing the time the dough sits out.
- Prep Baking Sheets: Line two large baking sheets with parchment paper or silicone baking mats. This prevents sticking and ensures easy cleanup. Set these aside where they are ready for scooping.
- Temper Ingredients: Ensure the unsalted butter (1 cup) and large eggs (2) are truly at room temperature. This step, as highlighted above, is critical for achieving the necessary light and fluffy texture in Step 2.
Step 2: Cream Wet Ingredients for Aeration
The creaming process is the secret to a thick, tender, chewy cookie. Do not rush this step.
- Beat Butter: In the bowl of a stand mixer fitted with the paddle attachment (or using a large mixing bowl and a hand mixer), beat the softened butter until it is smooth and creamy this usually takes about 1 minute.
- Add Sugar and Cream: Add the granulated sugar (1 ½ cups) to the butter. Beat on medium speed for 3 to 4 minutes. Listen for the sound: initially, it will sound gritty; after three minutes, the sound should soften as the sugar dissolves slightly and the mixture lightens in color and texture. The mixture must look light, fluffy, and pale yellow.
- Scrape: Stop the mixer and scrape down the sides and bottom of the bowl thoroughly with a rubber spatula. This ensures all the sugar is incorporated.
- Add Eggs and Vanilla: Beat in the eggs, one at a time, mixing well after each addition. Finally, stir in the generous 1 Tablespoon of pure vanilla extract until fully combined. The mixture should still look voluminous.
Step 3: Combine Dry Ingredients
This is the quick stage where you introduce structure while being careful not to overdevelop gluten.
- Whisk Dry: In a separate medium bowl, whisk together the accurately measured all-purpose flour (3 cups), baking soda (1 teaspoon), and salt (½ teaspoon). Whisking ensures the leavening agent (baking soda) is evenly distributed throughout the flour.
- Slowly Incorporate: With the mixer running on the lowest speed possible, gradually add the dry ingredients to the wet mixture. Mix only until the flour streaks have just disappeared. The dough should be soft, slightly sticky, and shaggy.
- Stop Immediately: Once the flour is incorporated, turn the mixer off. Do not overmix, or your chewy Funfetti Cookies will turn out tough and dry.
Step 4: Gently Fold in Sprinkles
Handle the sprinkles with care to preserve their color and integrity.
- Remove from Mixer: Remove the bowl from the mixer stand.
- Fold in Jimmies: Gently fold in the ½ cup of rainbow sprinkles using a rubber spatula. Use minimal strokes just enough to distribute the sprinkles evenly throughout the dough. Avoid excessive stirring during this step; friction can cause the sprinkle colors (especially the red ones) to bleed into the dough, compromising the classic Funfetti appearance.
Step 5: Scoop and Chill (Optional but Highly Recommended)
The chilling step is essential for thick, chewy cookies that resist spreading too much.
- Chill Dough: For the best, thickest Funfetti Cookies, cover the dough tightly (or transfer to an airtight container) and chill in the refrigerator for at least 30 minutes. If chilling for longer (up to 24 hours), let it sit at room temperature for 10 minutes before scooping. If you skip chilling, your cookies will spread more and be thinner.
- Scoop Portions: Use a medium cookie scoop (about 1.5 to 2 tablespoons) to portion the dough. Roll the scooped dough into smooth, uniform balls.
- Place on Sheets: Place the dough balls two inches apart on the prepared baking sheets. Give them plenty of room to expand.
Step 6: Bake to Perfection
Baking one sheet at a time is crucial for temperature consistency.
- Bake Time: Bake one sheet at a time in the preheated 350°F (175°C) oven for 9 to 12 minutes.
- Look for Cues: The cookies are perfectly done when the edges look set and lightly golden brown, but the centers still look soft, slightly glossy, and perhaps a touch underbaked. This is key to achieving that ultimate chewiness.
- Remove: Remove the baking sheet from the oven.
Step 7: Cool and Store
- Initial Cooling: Allow the hot cookies to cool on the baking sheet for 5 minutes. They will continue to set up during this time.
- Transfer: Carefully transfer the cookies to a wire rack to cool completely.
- Repeat: Repeat the baking process with the remaining dough.
- Storage: Store completely cooled Funfetti Cookies in an airtight container at room temperature for up to 5 days. They freeze exceptionally well, too!
Tips, Tricks, and Delicious Variations for Your Funfetti Cookies
While the classic recipe is perfect as is, incorporating a few expert tips can elevate your baking, and knowing how to adapt the recipe ensures you can enjoy these delicious treats, regardless of dietary needs.
Pro Tips for the Chewiest Results
Tip 1: Always Chill (If Time Allows)
Chilling the dough accomplishes two things: it solidifies the butter, reducing spread during baking, and it allows the flour to fully hydrate. Hydrated flour yields a softer, more cohesive texture. Even 30 minutes makes a huge difference in achieving thick, bakery-style Funfetti Cookies.
Tip 2: The Importance of Accurate Oven Temperature
If your cookies are spreading too much even after chilling, your oven might be running cold. Invest in an inexpensive oven thermometer to check for accuracy. If the oven is too cool, the fat melts before the leavening agents activate, resulting in flat, greasy cookies.
Tip 3: The Rolling Trick
After scooping the dough balls, roll them briefly between your palms to smooth them out. For an extra bakery flourish, gently press 3-4 extra sprinkles onto the top of the dough ball just before baking. This ensures maximum visual appeal, as some internal sprinkles might not be visible.
Delicious Recipe Variations
Chocolate Chip Funfetti
Fold in ¼ cup of mini white chocolate chips or semi-sweet chocolate chips alongside the sprinkles in Step 4. The chocolate adds another layer of decadent chewiness and flavor complexity.
Almond Funfetti Cookies
For a richer, deeper “cake batter” flavor, swap out ½ teaspoon of the pure vanilla extract for ½ teaspoon of almond extract. Almond extract dramatically intensifies the flavor profile, making these confetti cookies taste even more like professional birthday cake.
Gluten-Free Funfetti Cookies
To make these cookies gluten-free, simply replace the 3 cups of all-purpose flour with a high-quality 1:1 gluten-free baking blend that contains xanthan gum. No other adjustments should be necessary. Follow the instructions precisely, paying extra care not to overmix the dough.
Dairy-Free/Vegan Funfetti Cookies
The main substitution is the butter and eggs. Replace the 1 cup of unsalted butter with a high-quality plant-based butter (like Miyoko’s or Earth Balance sticks) that is meant for baking. Replace the 2 large eggs with two “flax eggs” (2 Tablespoons ground flaxseed mixed with 6 Tablespoons water, allowed to sit for 5 minutes until gelled), or use a commercial egg replacer like Bob’s Red Mill. Baking time may increase slightly to 11–13 minutes, depending on the egg substitute used. If you enjoy making simple, delicious vegan treats, you might also like our recipe for 3 Ingredient Peanut Butter Balls.
Avoiding Common Mistakes
- Bleeding Sprinkles: As mentioned, use JIMMIES. Also, avoid chilling the dough for an extremely long time (multiple days) with the sprinkles already folded in, as moisture can eventually cause bleeding.
- Flat Cookies: This is caused by warm ingredients, too little flour, or skipping the chilling step. Always start with cold bowls and room-temperature butter, measure your flour accurately, and chill!
- Tough Cookies: The enemy is overmixing. Stop the mixer the second you see the last streak of flour vanish. Everything else, including the sprinkles, should be folded in by hand.
Nutritional Values and Benefits of Homemade Baking
While Funfetti Cookies are undeniably a dessert and should be enjoyed in moderation, understanding the ingredients and the benefits of home baking can add value to your experience. The nutritional information provided here is an estimate based on approximately 36 servings (medium 1.5-2 Tablespoon scoops).
Estimated Nutritional Breakdown (Per Cookie, assuming 36 servings):
Please note that these values are approximations and can vary based on exact measurements and ingredient brands used.
- Calories: 150 – 170 kcal
- Total Fat: 8g – 10g (primarily from butter)
- Saturated Fat: 5g – 6g
- Cholesterol: 25mg – 35mg
- Sodium: 60mg – 80mg
- Total Carbohydrates: 20g – 25g (includes sugars and starch from flour)
- Sugars: 12g – 15g
- Protein: 2g – 3g (from flour and eggs)
The Benefits of Homemade Ingredients
Baking at home gives you complete control over ingredient quality, unlike commercial mass-produced Funfetti Cookies which often contain preservatives, artificial flavorings, and high-fructose corn syrup.
- High-Quality Fats: Using real unsalted butter provides better flavor and allows you to control the sodium content, which is a significant nutritional advantage. Butter is a source of fat-soluble vitamins (A, D, E, K), though its primary purpose here is flavor and texture.
- Eggs for Protein and Nutrients: The eggs contribute a small amount of high-quality protein, which aids in structure, and provide essential vitamins like choline.
- Control over Sweetness: While these are sweet treats, baking at home allows you to adjust the sugar content slightly (though reducing sugar too much will impact texture). Furthermore, using pure vanilla extract means you rely on natural flavoring rather than artificial stabilizers commonly found in boxed mixes.
Enjoying a homemade dessert like these classic Funfetti Cookies is also a great way to practice mindful eating. Knowing exactly what goes into your food and savoring the baking process contributes to a healthier relationship with treats.
Frequently Asked Questions About Funfetti Cookies
How do I prevent my Funfetti Cookies from spreading too flat?
The key is temperature control. Ensure your butter is softened but not melted, measure your flour precisely (spooned and leveled), and most importantly, chill the dough for at least 30 minutes before baking. You can also slightly increase the flour by 1-2 tablespoons if you find your environment causes excessive spreading.
Should I use oil or butter for the best chewy Funfetti Cookies?
For these classic Funfetti Cookies, butter is strongly recommended. Butter not only provides the rich, authentic flavor profile required for the cake batter taste, but its solid structure at room temperature is crucial for the creaming process, which incorporates air and provides the necessary lift and chewiness.
Why did my sprinkles bleed color into the cookie dough?
Sprinkle color bleed usually occurs if you use nonpareils (the tiny round balls) instead of jimmies (rod-shaped). Nonpareils have a higher surface area of color that dissolves quickly upon contact with wet dough or when mixed too vigorously. Ensure you use jimmies and only fold them in gently until just distributed.
Can I freeze Funfetti Cookie dough?
Yes! This dough freezes perfectly. Scoop the dough into balls, place them on a parchment-lined tray, and freeze until solid. Once frozen, transfer the balls to a freezer bag or airtight container. Bake from frozen, adding 2–4 minutes to the total baking time, until the edges are golden.
What is the difference between Funfetti and Confetti cookies?
There is essentially no difference in composition. Funfetti is actually a brand name trademarked by Pillsbury for their cake mix, but the term has become synonymous with any baked goods, like these homemade Funfetti Cookies, that are dotted with rainbow sprinkles. ‘Confetti cookies’ is the generic name for the same dessert.
Conclusion: Bake a Batch of Happiness with Funfetti Cookies
How do I prevent my Funfetti Cookies from spreading too flat?
The key is temperature control. Ensure your butter is softened but not melted, measure your flour precisely (spooned and leveled), and most importantly, chill the dough for at least 30 minutes before baking. You can also slightly increase the flour by 1-2 tablespoons if you find your environment causes excessive spreading.
Should I use oil or butter for the best chewy Funfetti Cookies?
For these classic Funfetti Cookies, butter is strongly recommended. Butter not only provides the rich, authentic flavor profile required for the cake batter taste, but its solid structure at room temperature is crucial for the creaming process, which incorporates air and provides the necessary lift and chewiness.
Why did my sprinkles bleed color into the cookie dough?
Sprinkle color bleed usually occurs if you use nonpareils (the tiny round balls) instead of jimmies (rod-shaped). Nonpareils have a higher surface area of color that dissolves quickly upon contact with wet dough or when mixed too vigorously. Ensure you use jimmies and only fold them in gently until just distributed.
Can I freeze Funfetti Cookie dough?
Yes! This dough freezes perfectly. Scoop the dough into balls, place them on a parchment-lined tray, and freeze until solid. Once frozen, transfer the balls to a freezer bag or airtight container. Bake from frozen, adding 2–4 minutes to the total baking time, until the edges are golden.
What is the difference between Funfetti and Confetti cookies?
There is essentially no difference in composition. Funfetti is actually a brand name trademarked by Pillsbury for their cake mix, but the term has become synonymous with any baked goods, like these homemade Funfetti Cookies, that are dotted with rainbow sprinkles. ‘Confetti cookies’ is the generic name for the same dessert.
These classic chewy Funfetti Cookies offer everything you want in a homemade dessert: vibrant colors, irresistible texture, and that familiar, comforting vanilla cake batter flavor. By focusing on simple techniques like ensuring your butter is perfectly softened, patiently creaming the fat and sugar, and resisting the urge to overmix the flour you guarantee a spectacular, bakery-quality result that will impress everyone who tries them.
Remember that baking is a science, but making Funfetti Cookies is pure joy. They are a delightful way to celebrate small victories, mark major milestones, or simply indulge in a moment of colorful nostalgia. Whether you choose to follow the traditional recipe or experiment with one of the variations, you’ll find this dough to be forgiving, flavorful, and reliable. Don’t forget to check out our other comforting dessert recipes, such as our Hot Chocolate Fudge, perfect for cozy evenings.
Grab your jimmies, preheat your oven, and start baking these magnificent sprinkle cookies today. If you enjoyed this recipe, please share it with friends and leave a comment below letting us know how your perfect batch of Funfetti Cookies turned out!
Classic Chewy Funfetti Cookies
Ingredients
Equipment
Method
- Preheat your oven to 350°F (175°C). Line two large baking sheets with parchment paper or silicone baking mats. Ensure the butter and eggs are at room temperature.
- In the bowl of a stand mixer fitted with the paddle attachment (or using a large mixing bowl and a hand mixer), beat the softened butter until creamy (about 1 minute).
- Add the granulated sugar to the butter. Beat on medium speed for 3 to 4 minutes until the mixture is light, fluffy, and pale yellow. Scrape down the sides of the bowl as needed.
- Beat in the eggs, one at a time, mixing well after each addition. Stir in the vanilla extract until fully combined.
- In a separate medium bowl, whisk together the all-purpose flour, baking soda, and salt.
- With the mixer running on low speed, gradually add the dry ingredients to the wet ingredients. Mix only until just combined. The dough should be soft and shaggy; do not overmix, as this will result in tough cookies.
- Remove the bowl from the mixer. Gently fold in the ½ cup of rainbow sprinkles using a rubber spatula until they are evenly distributed throughout the dough. Avoid excessive mixing to prevent the sprinkle colors from bleeding.
- For thicker cookies that don't spread as much, cover the dough tightly and chill in the refrigerator for 30 minutes. If you skip chilling, the cookies will spread more. Use a medium cookie scoop (about 1.5 to 2 tablespoons) to portion the dough, rolling them into smooth balls. Place the dough balls two inches apart on the prepared baking sheets.
- Bake one sheet at a time in the preheated 350°F (175°C) oven for 9 to 12 minutes. The cookies are done when the edges are set and lightly golden brown, but the centers still look soft and slightly underbaked.
- Allow the cookies to cool on the baking sheet for 5 minutes before carefully transferring them to a wire rack to cool completely. Repeat the baking process with the remaining dough.