Welcome to the dessert that steals the show, requires zero oven time, and delivers the creamy, tangy flavor of classic cheesecake perfectly paired with the vibrant freshness of summer berries. We are talking about the Strawberry Cheesecake Trifle a magnificent layered creation that is as impressive visually as it is delicious to taste.
If you are seeking a show-stopping dessert that seems complicated but is deceptively simple, look no further. This recipe combines three distinct components: a moist, syrupy cake layer, a burst of sweet, macerated strawberries, and a luscious, cloud-like cheesecake filling made entirely without baking. Whether you are hosting a summer barbecue, celebrating a holiday, or just craving a decadent treat, this Strawberry Cheesecake Trifle recipe is your guaranteed path to dessert success. The key is in the layering, which transforms basic ingredients into an elegant culinary experience. Get ready to dive into the cool, creamy world of the best no-bake cheesecake dessert you’ve ever encountered.
Why You’ll Love This Strawberry Cheesecake Trifle Recipe
The appeal of a well-executed trifle lies not just in its flavor, but in its dramatic presentation and textural complexity. The Strawberry Cheesecake Trifle excels on all fronts, providing multiple compelling reasons why it deserves a permanent spot in your recipe rotation.
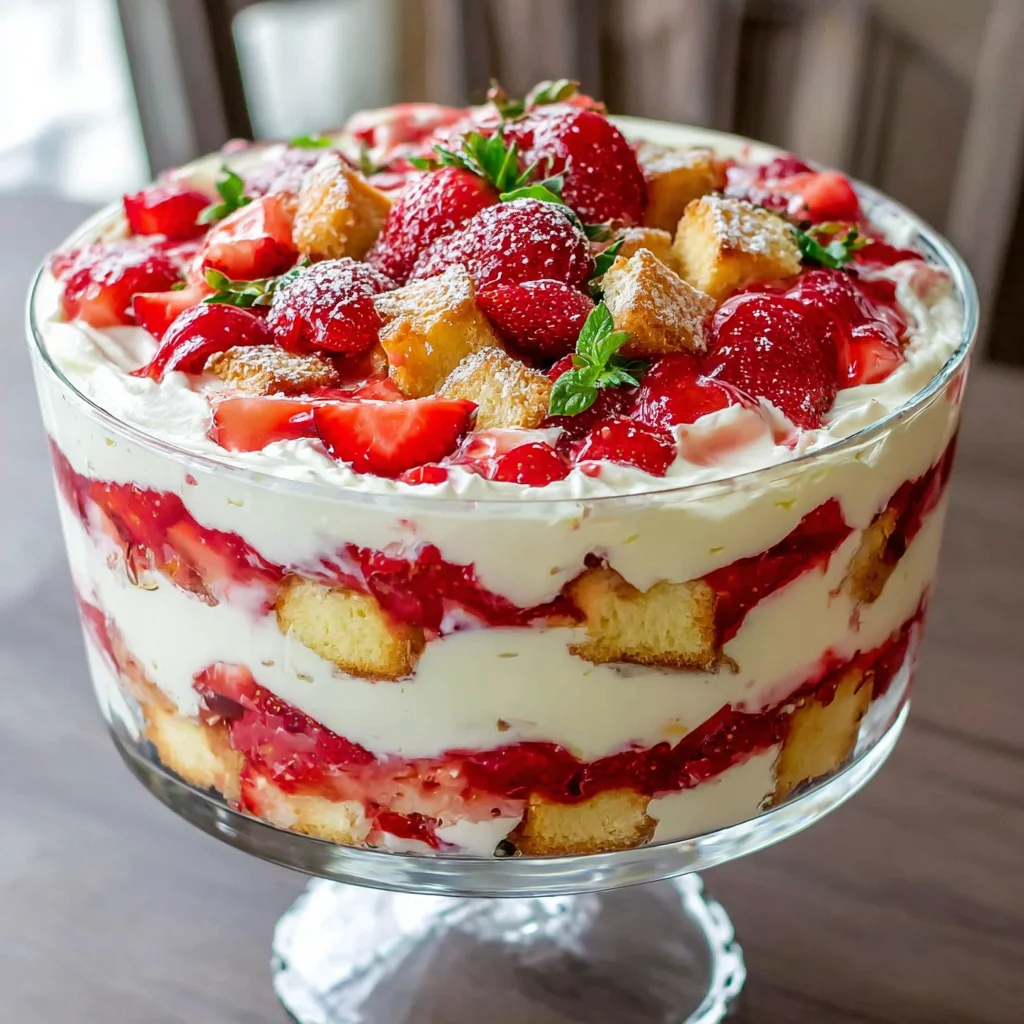
First and foremost is the spectacular visual appeal. Served in a clear glass trifle dish, the defined layers bright red strawberries, white fluffy cheesecake, and golden cake create a stunning mosaic. This dessert is designed to be admired before the first spoonful is taken. It naturally elevates any dessert table, making it an ideal centerpiece for occasions ranging from casual brunches to formal dinner parties. For more stunning dessert ideas that captivate an audience, make sure to check out my collection on Pinterest.
Secondly, the texture profile is unbeatable. Unlike traditional baked cheesecake, which relies on a dense, firm structure, this Strawberry Cheesecake Trifle offers a light, airy experience. The filling is a marriage of smooth, tangy cream cheese and freshly whipped cream, resulting in a cheesecake mousse that melts in your mouth. This creamy texture contrasts perfectly with the soft, syrup-soaked cake and the slight bite of fresh strawberries. Every spoonful is a delightful exploration of creamy, fruity, and tender components.
Third, and perhaps most importantly for busy home cooks, is the no-bake convenience. Preparing a traditional cheesecake can be intimidating, involving precise baking times, potential cracking, and lengthy cooling periods. This layered dessert sidesteps all those worries. The “baking” is replaced by assembling, folding, and chilling. The complexity of the flavor is achieved through simple, foundational techniques, making it achievable for even novice bakers.
Finally, the deep, balanced flavor is pure magic. The preparation process includes macerating the strawberries a simple step where sugar draws out the fruit’s natural juices. This creates a thick, sweet strawberry syrup that is then absorbed by the cake layers, ensuring every bite is moist and flavorful. The slight tang from the cream cheese cuts through the sweetness of the fruit and sugar, providing a refreshing and sophisticated balance that keeps you coming back for more. This perfect harmony of sweet, tart, and creamy is what makes this the quintessential summer dessert.
Why You Should Try This Layered Dessert Now
If you need further convincing, consider the practicality and versatility of the Strawberry Cheesecake Trifle. This recipe isn’t just good; it’s an essential tool in your dessert repertoire, particularly during the warmer months.
The primary reason to try this recipe right away is its inherent suitability for warm weather. Since it requires no oven use, you won’t heat up your kitchen, making assembly a cool, pleasant experience. Furthermore, because the entire dessert must be chilled for several hours (ideally overnight), it is the definition of a make-ahead marvel. This huge advantage frees up your time on the day of your event, allowing you to focus on appetizers, like this delicious Italian Starter Pasta Salad, or main courses, knowing the dessert is resting beautifully in the fridge.
Another compelling factor is the seasonal advantage of strawberries. This Strawberry Cheesecake Trifle truly shines when you use peak-season strawberries. When berries are fresh, ripe, and locally sourced, their flavor is maximized, creating a much richer syrup during the maceration process. While you can certainly make this dessert year-round using frozen or imported berries, making it during the height of strawberry season ensures an explosion of natural, sweet flavor that simply cannot be replicated.
This Strawberry Cheesecake Trifle is also exceptionally crowd-friendly and easily scalable. Trifle dishes are designed to feed a large group the standard 4-5 quart dish yields 10 to 12 generous servings. If you need to feed an even bigger gathering, you can simply double the recipe and use two separate dishes, or opt for individual trifle cups for a more stylized presentation. The simple ingredient list means scaling up doesn’t introduce complicated ratios or techniques.
Finally, the ability to customize the cake base offers great flexibility. While classic pound cake or delicate ladyfingers are traditional choices, the structure of the trifle welcomes substitution. Want a chocolate twist? Use brownie chunks. Need a lighter base? Opt for angel food cake. This adaptability ensures that the Strawberry Cheesecake Trifle can fit any flavor craving or dietary need (more on variations later!).
In summary, this layered dessert offers convenience, seasonal freshness, impressive presentation, and unparalleled taste. It’s a low-stress, high-reward dessert that guarantees delighted guests and satisfied taste buds.
Ingredients and Essential Utensils for the Perfect Strawberry Cheesecake Trifle
Successful assembly of the Strawberry Cheesecake Trifle relies on having high-quality ingredients and the right tools. Pay special attention to the temperature of your ingredients, particularly the dairy, as this dramatically impacts the final texture of the cheesecake filling.
The Three Essential Components
For the Cake Layer (The Sponge Base)
This layer provides structure and absorbs the rich strawberry syrup.
- 1 (10.75 ounce) store-bought pound cake or angel food cake: Sliced into 1-inch cubes. Store-bought is perfectly fine and saves significant time. Ensure it is plain vanilla flavor to let the cheesecake and strawberries shine.
- Alternatively: 1 package of crisp vanilla ladyfingers (Savoiardi). These can be arranged beautifully around the edges of the trifle dish for a more sophisticated look.
For the Strawberry Mixture (The Star of the Show)
Maceration is the non-negotiable step here, creating the necessary syrup.
- 3 pounds fresh strawberries: This is approximately 4 to 6 dry pints, depending on the size of the berries. They must be hulled and sliced.
- 1/4 cup granulated sugar: This quantity is a starting point. If your strawberries are already very sweet and ripe, you may reduce this to 3 tablespoons. If they are tart, you may increase it slightly.
- 1 teaspoon fresh lemon juice (optional): This brightens the flavor profile considerably and adds a subtle counterpoint to the sugar. Highly recommended!
For the Cheesecake Filling (The Creamy Cloud)
This is the heart of the Strawberry Cheesecake Trifle. Achieving the right consistency is paramount.
- 2 (8 ounce) packages cream cheese (16 ounces total): Must be fully softened to room temperature. This is critical. Cold cream cheese will result in a lumpy filling, even with rigorous beating.
- 1 cup powdered sugar (confectioners’ sugar): Sifts easily into the cream cheese, ensuring a smooth texture.
- 1 teaspoon pure vanilla extract: Use high-quality extract for the best flavor.
- 3 cups heavy whipping cream, chilled: Must be cold to whip up properly and achieve stiff peaks.
Recommended Tools and Utensils
While the Strawberry Cheesecake Trifle is a no-bake dessert, the preparation requires specific equipment to ensure the cheesecake filling achieves its airy, stable consistency.
Essential Tools:
- Large, Clear Glass Trifle Dish (4 to 5 quarts capacity): This is non-negotiable for presentation. The layers are the main appeal, and a clear dish showcases them beautifully.
- Electric Mixer (Handheld or Stand Mixer): Necessary for beating the cream cheese and whipping the heavy cream. Trying to whip 3 cups of heavy cream by hand is extremely challenging.
- Large Mixing Bowls (at least two): You will need one bowl for the cream cheese base and a separate, preferably cold, bowl for whipping the cream.
- Rubber Spatula: Essential for folding the whipped cream into the cream cheese mixture without deflating the airy structure. This gentle technique is key to a light cheesecake mousse.
- Measuring Cups and Spoons: For accurate measurements, especially of the cream and sugar.
- Sharp Knife and Cutting Board: For hulling and slicing the strawberries and cubing the cake.
- Sieve/Sifter (Optional but Recommended): To ensure the powdered sugar is lump-free before adding it to the cream cheese.
Pro Tip on Dairy: Always start your cheesecake filling with ingredients at the correct temperature. Room temperature cream cheese allows for smooth blending, while ice-cold heavy cream whips up faster and holds stiff peaks longer, guaranteeing a stable, fluffy filling for your Strawberry Cheesecake Trifle.
Step-by-Step Guide: Crafting the Perfect Strawberry Cheesecake Trifle
Building this layered dessert is a rewarding process, split into three manageable phases. Follow these steps meticulously to ensure your final trifle is visually stunning and texturally balanced.
Part 1: Prepare the Strawberry Mixture (Maceration)
This step draws out the juices from the berries, creating the essential syrup that flavors and moistens the cake.
1. Combine Ingredients: In a medium bowl, gently combine the sliced strawberries, the 1/4 cup of granulated sugar, and the optional (but highly recommended) lemon juice.
2. Gentle Stirring: Gently stir the mixture using a rubber spatula or wooden spoon until the sugar is dissolved and coats the berries evenly.
3. Macerate: Set the bowl aside at room temperature for at least 30 minutes. Ideally, leave it for 45 to 60 minutes. This process, called maceration, is crucial. It will draw out the natural juices from the strawberries, creating a rich syrup that will eventually soak into and moisten the cake layers below.
Part 2: Prepare the Cheesecake Filling (The Cloud Layer)
The secret to a light, mousse-like cheesecake filling is in the two-step mixing process: first the cream cheese base, then the careful folding of whipped cream.
1. Cream the Cheese: In a large mixing bowl, using an electric mixer, beat the two packages of fully softened cream cheese until it is completely smooth and fluffy. Beat aggressively for 2-3 minutes to ensure there are absolutely no lumps remaining. Lumps are the enemy of a smooth trifle filling.
2. Sweeten the Base: Add the powdered sugar and vanilla extract to the cream cheese. Beat on medium speed until the mixture is light, creamy, and well combined, scraping down the sides of the bowl as needed. Set this cream cheese base aside.
3. Whip the Cream: In a separate, very cold bowl (preferably a chilled metal bowl), pour the 3 cups of heavy whipping cream. Beat the cream on high speed until stiff peaks form. The peaks should stand up straight when you lift the whisk. Be careful not to over-beat, or the cream will break down and turn grainy or, eventually, into butter.
4. Lighten the Base: Gently fold approximately one-third of the whipped cream into the cream cheese mixture using a large rubber spatula. Use a cutting motion, bringing the spatula down the middle and folding the mixture over itself. This step is designed to lighten the dense cream cheese base.
5. Finish Folding: Once the first third is incorporated, fold in the remaining two-thirds of the whipped cream until the mixture is uniform, light, and airy. Do not over-mix, as this will deflate the mousse. Stop folding as soon as you see no more streaks of plain whipped cream. The finished cheesecake filling should resemble a thick, stable mousse.
Part 3: Assemble the Trifle
Assembly is the fun part! Ensure your work surface is clean and your clear glass trifle dish is ready to showcase the layers.
1. First Layer (Cake Base): Place half of the cubed pound cake pieces evenly across the bottom of the trifle dish. Press them down slightly to form a solid base. If using ladyfingers, arrange them vertically around the sides of the dish first, then fill the bottom space with the remaining pieces.
2. Second Layer (Strawberry Syrup): Spoon half of the macerated strawberries and their resulting syrup evenly over the cake layer. Use the spatula to lightly press the berries into the cake. Ensure the syrup thoroughly soaks into the cake pieces this is what keeps the cake moist during the chill time.
3. Third Layer (Cheesecake Filling): Carefully scoop half of the prepared cheesecake filling mixture over the strawberries. Gently spread the filling layer using the back of a spoon or spatula. Work from the center outward, taking care not to scrape against the glass sides, which could smudge the clear line between the layers.
4. Fourth Layer (Repeat Cake): Place the remaining cubed cake pieces over the cheesecake layer. This layer usually needs to be placed a bit more gingerly, as it rests on the soft filling.
5. Fifth Layer (Repeat Strawberry): Spoon the rest of the strawberries and syrup over the second cake layer. Crucially, reserve a small handful of the most attractive, whole, or perfectly sliced berry pieces for the final garnish.
6. Sixth Layer (Top Filling): Gently spread the remaining cheesecake filling over the strawberries. Create a smooth top surface, or use the tip of your spatula to create light, decorative swirls and peaks for visual interest.
Part 4: Chill and Serve
Patience is key to the perfect Strawberry Cheesecake Trifle. Do not skip the chilling step!
1. Cover and Refrigerate: Cover the trifle dish tightly with plastic wrap. Ensure the plastic wrap doesn’t touch the cheesecake top if you created high peaks.
2. Chill Time: Refrigerate for a minimum of 6 hours, or ideally overnight (10-12 hours). Chilling is essential. It allows the flavors to meld beautifully, the syrup to fully saturate and tenderize the cake, and the cheesecake filling to set firmly, making clean serving scoops possible.
3. Garnish: Just before serving, garnish the top of the trifle with the reserved strawberry slices. You can arrange them in a circular pattern or create a mound in the center. Serve immediately while cold.
Tips, Tricks, and Delicious Trifle Variations
While the classic Strawberry Cheesecake Trifle recipe is flawless as written, part of the joy of cooking is adapting recipes to fit your taste, dietary needs, or the seasonal produce you have on hand.
Tips for Trifle Success
1. Don’t Rush the Maceration: This step is truly the difference between a dry cake and a beautifully moist, flavorful base. If possible, macerate the strawberries for a full hour.
2. Cream Cheese Temperature is King: I cannot stress this enough. If your cream cheese is cold, you will end up with stubborn lumps that ruin the creamy consistency of the cheesecake filling. Take it out of the fridge at least two hours before starting.
3. Whip Cream in a Cold Bowl: To help the heavy cream achieve and maintain volume, chill your mixing bowl (and whisk attachments) in the freezer for 15 minutes before whipping. Cold temperatures stabilize the fat molecules, resulting in higher, stiffer peaks.
4. Gentle Folding: When mixing the whipped cream into the cream cheese base, be extremely gentle. If you over-mix or mix too vigorously, the air you incorporated into the cream will collapse, and the filling will be dense instead of mousse-like.
5. Use a Piping Bag (Optional): For ultra-clean layers, especially the final layer, consider transferring the cheesecake filling into a large piping bag fitted with a star tip. This allows you to pipe the filling precisely onto the strawberry layer, preventing the layers from mixing.
Delicious Variations of the Strawberry Cheesecake Trifle
This recipe is highly adaptable. Feel free to swap ingredients to create a unique dessert for any occasion, perhaps following up a hearty soup like this Creamy Lasagna Soup.
1. Fruit Swaps (Seasonal Trifle)
- Raspberry Cheesecake Trifle: Substitute strawberries entirely with fresh raspberries. Raspberries are tart and pair beautifully with the sweet filling.
- Berry Medley Trifle: Use a mix of strawberries, blueberries, and blackberries. Macerate them all together for a complex, mixed-berry syrup.
- Tropical Trifle: Use sliced mango or pineapple instead of strawberries. For this variation, you might substitute the vanilla extract with a splash of rum or coconut extract in the cheesecake filling.
2. Cake Alternatives (Texture Twists)
- Brownie Trifle: For the ultimate indulgent dessert, use cubes of fudgy brownies instead of pound cake.
- Cookie Crumbles: For a faster approach, use crushed shortbread cookies or graham crackers instead of sponge cake. This gives the base a more authentic cheesecake crust texture.
- Gluten-Free Trifle: Easily make this recipe gluten-free by using gluten-free pound cake or certified gluten-free ladyfingers. The rest of the ingredients are naturally gluten-free.
3. Flavor and Filling Variations
- Lemon Zest Boost: For an extra zesty and bright filling, grate the zest of one whole lemon into the cream cheese base along with the vanilla extract.
- Cream Cheese Substitute: If you prefer a lighter, less “cheesecakey” filling, you can substitute 4-8 ounces of the cream cheese with plain Greek yogurt or mascarpone cheese. Be mindful that this may make the filling slightly softer, so ensure your chilling time is adequate.
Nutritional Insights and Ingredient Benefits
While the Strawberry Cheesecake Trifle is undeniably an indulgent treat, it’s helpful to understand the nutritional contribution of its primary components. Desserts don’t have to be devoid of nutrition, especially when they utilize fresh fruit!
Estimated Nutritional Value (per serving, assuming 12 servings):
Please note: These are estimates and depend heavily on the exact size of the cake slices and berries used.
- Calories: 450–550 kcal
- Protein: 5–7g (primarily from the cream cheese and heavy cream)
- Total Fat: 35–45g (Saturated fat content is high due to the cream cheese and heavy whipping cream)
- Carbohydrates: 30–40g (includes sugars from the fruit, added granulated sugar, and refined sugars in the cake/powdered sugar)
- Fiber: 2–3g
The Benefits of Strawberries
The generous amount of fresh strawberries in this Strawberry Cheesecake Trifle contributes more than just amazing flavor; they also offer significant health benefits:
Vitamin C Powerhouse: Strawberries are famously high in Vitamin C, a powerful antioxidant essential for immune function, skin health, and collagen production.
Antioxidants: They are rich in various beneficial compounds like anthocyanins (which give them their red color), ellagic acid, and quercetin. These antioxidants help fight oxidative stress and inflammation in the body.
Fiber and Digestion: Strawberries provide dietary fiber, which aids in digestive health and helps promote feelings of satiety.
Manganese: This mineral, vital for metabolism and antioxidant defense, is also present in high quantities in strawberries.
While the cream cheese and heavy cream make this a rich dessert, consuming this Strawberry Cheesecake Trifle allows you to enjoy a flavorful treat packed with valuable nutrients from the fruit. Moderation, as always, is key!
Frequently Asked Questions About the Strawberry Cheesecake Trifle
How far in advance can I make the Strawberry Cheesecake Trifle?
The Strawberry Cheesecake Trifle is an excellent make-ahead dessert. You can fully assemble it 12 to 24 hours before serving. This timeframe allows the cake layers to fully absorb the strawberry syrup and ensures the cheesecake filling is perfectly set. Avoid assembling more than 24 hours in advance, as the cake can become overly soft and lose its definition.
How long does leftover Strawberry Cheesecake Trifle last?
Stored tightly covered in the refrigerator, the leftovers should be consumed within 3 to 4 days. While the cake layers will get softer the longer they sit, the dessert remains safe and delicious. Always ensure it is kept chilled, as the dairy components are highly perishable.
Can I use frozen strawberries instead of fresh ones in this Strawberry Cheesecake Trifle recipe?
Yes, you can use frozen strawberries, but they must be thawed completely first. Frozen berries release significantly more liquid when thawed, meaning you might need to drain some of the excess watery liquid before using the berries and syrup for layering. Adjust the added sugar based on the sweetness of the thawed fruit.
What is the best type of cake to use for the base?
Pound cake is the ideal choice because its dense, sturdy texture holds up well to the heavy moisture from the strawberry syrup. Angel food cake is a lighter alternative, but it can sometimes disintegrate quickly. If you prefer a richer flavor, consider using cubes of a firm, moist sheet cake.
Why did my cheesecake filling turn out lumpy?
Lumpy cheesecake filling is almost always caused by using cream cheese that was too cold. Cold cream cheese does not blend smoothly with the sugar and fat. Ensure your cream cheese is completely at room temperature, and beat it vigorously until silken before incorporating any other ingredients. If it’s already lumpy, try beating it longer with the electric mixer on high speed.
Conclusion: Your New Favorite No-Bake Dessert
The Strawberry Cheesecake Trifle is more than just a dessert; it’s a celebration in a dish. Combining the fresh, bright taste of summer strawberries with the creamy, tangy indulgence of no-bake cheesecake, and supported by a moist, syrup-soaked cake base, this recipe is a textural and flavor masterpiece. It truly delivers high visual impact with minimal preparation stress.
We’ve walked through every critical step, from the necessity of macerating your berries to generate that crucial syrup, to the delicate art of folding whipped cream to achieve that airy, stable cheesecake mousse. By adhering to these foundational techniques, particularly ensuring your cream cheese is soft and your cream is cold, you are set up for guaranteed success. Whether you are hosting a festive gathering or simply want an impressive treat after a simpler meal like this fantastic Oreo Fudge, this Strawberry Cheesecake Trifle is the perfect answer.
Don’t wait for a special occasion to try this recipe. Grab those fresh strawberries, whip up that cloud-like filling, and enjoy the ease and elegance of the perfect layered dessert. If you try this recipe, please let me know how it turns out in the comments below! I love hearing about your variations and tips. Happy layering! For even more recipe ideas, head over to my main recipes page.

No-Bake Strawberry Cheesecake Trifle
Ingredients
Equipment
Method
- In a medium bowl, combine the sliced strawberries, the 1/4 cup of granulated sugar, and the optional lemon juice.
- Gently stir the mixture until the sugar is dissolved and coats the berries evenly. Set the bowl aside at room temperature for at least 30 minutes. This maceration process creates a rich syrup that will moisten the cake layers.
- In a large mixing bowl, using an electric mixer, beat the softened cream cheese until it is completely smooth and fluffy, ensuring there are absolutely no lumps remaining. Add the powdered sugar and vanilla extract; beat on medium speed until light and well combined.
- In a separate, very cold bowl, pour the 3 cups of heavy whipping cream. Beat the cream on high speed until stiff peaks form (be careful not to over-beat).
- Gently fold approximately one-third of the whipped cream into the cream cheese mixture to lighten it. Once incorporated, fold in the remaining two-thirds of the whipped cream until the mixture is uniform, light, and airy. Do not over-mix, as this will deflate the mousse-like filling.
- First Layer (Cake Base): Place half of the cubed pound cake pieces evenly across the bottom of the trifle dish.
- Second Layer (Strawberry Syrup): Spoon half of the macerated strawberries and their resulting syrup evenly over the cake layer, ensuring the syrup soaks into the cake pieces.
- Third Layer (Cheesecake Filling): Carefully spread half of the prepared cheesecake filling mixture over the strawberries, gently smoothing the surface.
- Repeat the Layers: Add the remaining cubed cake pieces (Layer 4), followed by the rest of the strawberries and syrup (Layer 5). Reserve a small handful of the most attractive berry slices for the final garnish. Finally, gently spread the remaining cheesecake filling over the strawberries (Layer 6).
- Cover the trifle dish tightly with plastic wrap and refrigerate for a minimum of 6 hours, or ideally overnight. Chilling allows the flavors to meld and the cheesecake filling to set firmly.
- Just before serving, garnish the top of the trifle with the reserved strawberry slices or a final dollop of fresh whipped cream.