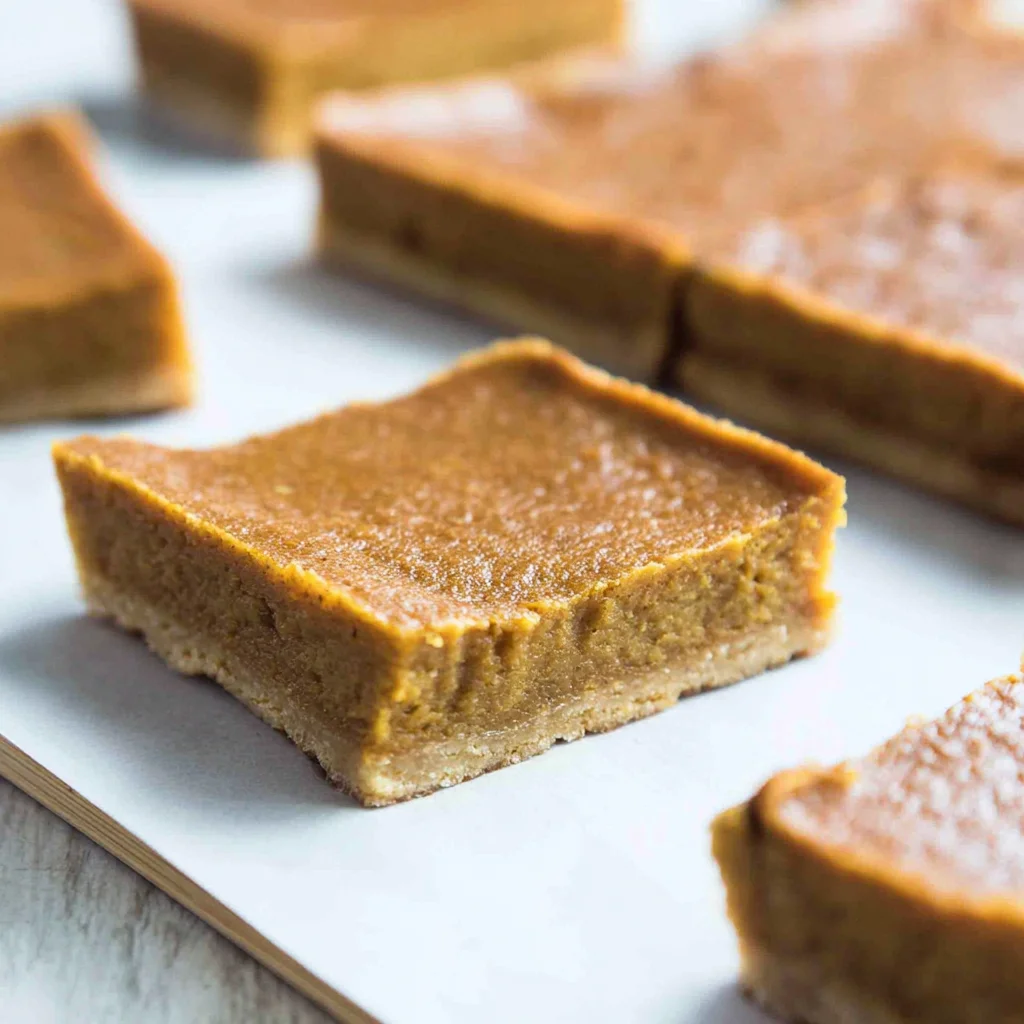
Fall is in the air, and what better way to celebrate the season than with a decadent, comforting dessert? Forget individual pumpkin pies; this year, we’re diving headfirst into the ultimate autumnal treat: Slab Pumpkin Pie Bars. Imagine a golden, buttery crust cradling a creamy, spiced pumpkin filling, all cut into easy-to-serve squares. This recipe is perfect for potlucks, Thanksgiving feasts, or simply indulging in a delicious slice (or three!) on a cozy evening. It’s easier to make than a traditional pie, offering all the flavor and warmth without the fuss of a complicated pie crust. Get ready to experience a pumpkin pie revolution one delicious slab at a time! Prepare to be amazed by how simple it is to create this crowd-pleasing dessert that’s guaranteed to be a hit with everyone. From novice bakers to seasoned pros, this recipe is approachable and delivers exceptional results, making it the perfect addition to your fall baking repertoire.
Why You’ll Love This Slab Pumpkin Pie Bars Recipe
There are so many reasons why you’ll fall in love with this Slab Pumpkin Pie Bars recipe! Firstly, it’s incredibly easy to make. No more wrestling with a finicky pie crust or worrying about perfectly crimped edges. This recipe simplifies the process significantly, making it perfect for busy schedules and even beginner bakers. Secondly, it’s incredibly versatile. You can easily customize it to your liking by adding nuts, chocolate chips, or even a streusel topping. This allows you to unleash your creativity and make the bars truly your own. Thirdly, the presentation is stunning. The golden, buttery crust and rich, spiced pumpkin filling create a visually appealing dessert that’s sure to impress your guests. It’s far more manageable than a whole pie, and the individual portions are perfect for sharing (or not!). Lastly, it’s incredibly delicious! The combination of a flaky crust and the warm, comforting flavors of pumpkin spice makes for a truly unforgettable dessert. It’s the perfect balance of sweet and spice, offering a unique texture and taste experience. It is easily customizable for different dietary requirements and preferences. The recipe can be easily adapted to be gluten-free, vegan, or even refined sugar-free, making it a perfect dessert for almost everyone. Try it out and discover why it’s become a family favorite.
Why You Should Try This Slab Pumpkin Pie Bars Recipe
If you’re looking for a delicious, easy-to-make, and visually appealing pumpkin dessert, then you absolutely should try this Slab Pumpkin Pie Bars recipe. Forget fiddly pie crusts and complicated techniques this recipe is designed for convenience and deliciousness. It’s perfect for those times when you crave that classic pumpkin pie flavor but don’t have the time or patience for a traditional pie. The slab format makes it incredibly easy to serve and portion, ideal for gatherings, parties, or simply sharing with loved ones. Unlike individual pies, a slab pie offers a greater surface area, providing a larger serving size per portion, resulting in a more satisfying dessert experience. But beyond the ease and convenience, this recipe delivers on taste. The combination of a buttery, flaky crust and a perfectly spiced pumpkin filling is simply irresistible. It’s the perfect balance of sweet and savory, with warm spices that evoke the cozy feelings of autumn. Plus, it’s a fantastic way to use up leftover pumpkin puree from your fall harvest. Try this Slab Pumpkin Pie Bars recipe and experience the joy of a simplified, yet spectacular, fall dessert. You won’t regret it!
Ingredients and Necessary Utensils for Slab Pumpkin Pie Bars
Gathering the right ingredients and utensils is crucial for baking success. This recipe is straightforward, but using the correct tools will ensure a smooth baking process and a perfectly baked result. Let’s delve into the specifics:
Ingredients: A Detailed Breakdown
- Crust:
- 1 ½ cups all-purpose flour: Provides the structure for your flaky crust. You can substitute with gluten-free flour blend for a gluten-free version. Make sure to use a blend specifically designed for baking.
- ½ teaspoon salt: Enhances the flavor of the crust, balancing the sweetness.
- ½ cup (1 stick) cold unsalted butter, cut into cubes: The cold butter is essential for creating a flaky crust. Use unsalted butter for better flavor control.
- ¼ cup ice water: Cold water helps keep the butter cold, resulting in a more tender crust. Add it gradually.
- Filling:
- 1 (15 ounce) can pumpkin puree: The star of the show! Use pure pumpkin puree, not pumpkin pie filling.
- 1 (12 ounce) can evaporated milk: Adds richness and creaminess to the filling.
- ¾ cup granulated sugar: Sweetens the filling. You can adjust this amount to your preference.
- 2 large eggs: Bind the filling and contribute to its texture. Use large eggs for consistent results.
- 1 teaspoon ground cinnamon: A classic pumpkin spice component.
- ½ teaspoon ground ginger: Adds warmth and a subtle spiciness.
- ½ teaspoon ground cloves: Provides a depth of flavor.
- ¼ teaspoon ground nutmeg: Another essential pumpkin spice ingredient.
- ½ teaspoon salt: Balances the sweetness and enhances the other spices.
Recommended Tools and Utensils
- 9×13 inch baking pan: The perfect size for these slab bars.
- Pastry blender or your fingers: For cutting the butter into the flour.
- Measuring cups and spoons: For accurate ingredient measurements.
- Whisk: For smoothly mixing the filling ingredients.
- Spatula or rubber scraper: To ensure even spreading of the filling.
- 9×13 inch baking sheet: For baking the slab.
- Knife or pizza cutter: For cutting the bars into squares.
- Mixing bowls: At least two large bowls are needed, one for the crust and one for the filling.
Detailed Recipe Steps for Slab Pumpkin Pie Bars
Follow these steps carefully to achieve perfectly delicious Slab Pumpkin Pie Bars:
Making the Crust
- Preheat your oven to 350°F (175°C). This is crucial for even baking.
- Grease and flour a 9×13 inch baking pan. This prevents sticking and ensures easy removal.
- In a large bowl, whisk together the flour and salt. This combines the dry ingredients evenly.
- Cut in the cold butter using a pastry blender or your fingers until the mixture resembles coarse crumbs. Work quickly to prevent the butter from melting. The colder the butter, the flakier the crust.
- Gradually add ice water, mixing until the dough just comes together. Do not overmix. Overmixing will develop the gluten in the flour, resulting in a tough crust.
- Press the dough evenly into the prepared pan. Use the bottom of a measuring cup or your hands to create an even layer. Make sure the dough reaches the corners and edges of the pan.
- Bake for 15-20 minutes, or until lightly golden. Keep a close eye on it as ovens vary.
Making the Filling
- While the crust is baking, in a large bowl, whisk together the pumpkin puree, evaporated milk, sugar, eggs, cinnamon, ginger, cloves, nutmeg, and salt until smooth. Make sure there are no lumps.
Assembling and Baking
- Pour the pumpkin filling over the partially baked crust. Spread it evenly to the edges.
- Bake for 30-35 minutes, or until the filling is set and a knife inserted near the center comes out clean. Overbaking can result in a dry filling.
- Let cool completely before cutting into bars. This allows the filling to set completely and prevents the bars from crumbling.
Tips and Variations for Slab Pumpkin Pie Bars
Experimenting with this recipe is half the fun! Here are some tips and variations to make your Slab Pumpkin Pie Bars even more special:
- For a richer crust: Use a combination of all-purpose flour and pastry flour.
- Add-ins for the filling: Chocolate chips, chopped pecans, or walnuts add delightful texture and flavor.
- Spice it up: Add a pinch of allspice or cardamom for a more complex flavor profile.
- Make it vegan: Substitute the eggs with flax eggs (1 tablespoon flaxseed meal mixed with 3 tablespoons water per egg) and the butter with vegan butter. Use full-fat coconut milk instead of evaporated milk for a creamier texture.
- Make it gluten-free: Use a good quality gluten-free flour blend designed for baking.
- Avoid overbaking: The filling should be set but not dry. Start checking for doneness around 30 minutes.
- Cool completely: This is crucial to prevent the bars from crumbling when cutting.
For more delicious fall recipes, check out our recipe collection! We also have a fantastic pumpkin and walnut cake recipe you might enjoy.
Nutritional Values and Health Benefits of Slab Pumpkin Pie Bars
While Slab Pumpkin Pie Bars are undeniably indulgent, they do offer some nutritional benefits, particularly when made with wholesome ingredients. The pumpkin puree is a good source of vitamin A, beta-carotene, and fiber. The spices, such as cinnamon, have been linked to various health benefits, including improved blood sugar control. However, it’s important to remember that this is a dessert, and moderation is key. The exact nutritional values will vary depending on the specific ingredients used and portion sizes. A general estimate for a single bar might be approximately 300-400 calories, with varying amounts of protein, fat, and carbohydrates. Always check the nutritional labels of your specific ingredients for accurate information. Remember that this recipe can be adapted to be healthier by reducing sugar and using whole-wheat flour, or by incorporating other healthy ingredients. The focus should be on enjoying this treat in moderation as part of a balanced diet.
FAQs about Slab Pumpkin Pie Bars
FAQs
Can I make the crust ahead of time?
Yes, you can make the crust a day or two in advance. Wrap it tightly in plastic wrap and refrigerate until ready to use.
What if my crust is too dry?
Add a teaspoon of ice water at a time until the dough comes together. Don’t overmix.
How do I know when the Slab Pumpkin Pie Bars are done baking?
The filling should be set and a knife inserted near the center should come out clean. The edges may be slightly browned.
Can I freeze Slab Pumpkin Pie Bars?
Yes, once cooled completely, wrap tightly in plastic wrap and then foil, and freeze for up to 3 months. Thaw overnight in the refrigerator before serving.
Are there any substitutions for the evaporated milk?
You can substitute the evaporated milk with heavy cream or full-fat coconut milk for a richer filling. Adjust the sweetness if needed.
How long do Slab Pumpkin Pie Bars last?
Store leftover Slab Pumpkin Pie Bars in an airtight container in the refrigerator for up to 3-4 days. They are best enjoyed within the first two days for optimal texture.
Conclusion: Enjoy Your Slab Pumpkin Pie Bars!
These Slab Pumpkin Pie Bars are a fantastic alternative to traditional pumpkin pie, offering the same delicious flavors with a much simpler preparation process. The ease of making these bars, coupled with their delightful taste and visually appealing presentation, makes them perfect for any fall gathering. Don’t forget to share your baking experience with us! Leave a comment below and let us know how your Slab Pumpkin Pie Bars turned out. Share your photos on social media using #SlabPumpkinPieBars and tag us! We can’t wait to see your creations. And finally, remember to pin this recipe to your Pinterest boards for later! Check out our Pinterest page for more delicious ideas!

Slab Pumpkin Pie Bars
Ingredients
Equipment
Method
- Preheat oven to 350°F (175°C). Grease and flour a 9x13 inch baking pan.
- Make the crust: In a large bowl, combine flour and salt. Cut in cold butter using a pastry blender or your fingers until the mixture resembles coarse crumbs. Gradually add ice water, mixing until the dough just comes together.
- Press the dough into the prepared pan. Bake for 15-20 minutes, or until lightly golden.
- Make the filling: While the crust is baking, whisk together pumpkin puree, evaporated milk, sugar, eggs, cinnamon, ginger, cloves, nutmeg, and salt until smooth.
- Pour the pumpkin filling over the partially baked crust.
- Bake for 30-35 minutes, or until the filling is set and a knife inserted near the center comes out clean.
- Let cool completely before cutting into bars.